Loading...
Loading...
Loading...
Loading...
Loading...
Loading...
Loading...
Loading...
Loading...
Loading...
Loading...
Loading...
Loading...
Loading...
Loading...
Loading...
Loading...
Loading...
Loading...
Loading...
Loading...
Loading...
Loading...
Loading...
New in ME 1.26!
The ability to import grader-learner relationships for Gradebook assessments
Database settings to allow you to include learner email or username in an export of a gradebook (gradebook_assessment_csv_include_username, gradebook_assessment_csv_include_email)
Gradebook is an Elentra module that allows the management of all assessments and learner grades within a course/program. It has multiple capabilities including:
Recording grades and making them visible to learners and some faculty (e.g., course directors)
Supporting multiple marking schemes including percentages, numerical grades (e.g., 7/10), complete/incomplete, pass/fail, and custom grading scale
Allowing an organization to have multiple grading scales as needed
Importing and exporting student grades
Linking assessments built through Elentra's quiz and exam module to a gradebook for easy transfer of grades
Allowing electronic submission of assignments through a drop box
Attaching grading forms (built in Assessment and Evaluation) to gradebook assessments so faculty can grade assessments inline and provide feedback to learners
Notifying a designated person if a learner grade is below a specific threshold
Creating dashboard notices for learners re: upcoming assignments (this applies specifically to assessments with drop box assignments added)
Allowing administrators to record comments about grades (e.g., late, excused absence, etc.)
Using weighted collections in a gradebook to easily distribute weights of assessments within a collection (e.g., quizzes)
Providing documents to learners through the gradebook (Document Delivery) without the learner having submitted anything
You can watch a recording about Gradebook at collaborate.elentra.org (login required).
Multiple database setting options can be configured for a Course Gradebook.
eportfolio_can_attach_to_gradebook_assessment
Allow a portfolio to be linked to a gradebook assessment.
eportfolio_show_comments_in_gradebook_assessment
Allow comments made on a portfolio artifact to be accessed when grading a portfolio attached to a gradebook assessment.
eportfolio_entry_is_assessable_by_default
Allows for all portfolio artifacts to be accessed when grading a portfolio attached to a gradebook assessment.
eportfolio_entry_is_assessable_set_by_learner
This changes the possible actions in the portfolio but the impact is in the gradebook. Allows learners to define which artifacts will be available when a portfolio is attached to a gradebook assessment.
eportfolio_entry_is_assessable_set_by_advisor
This changes the possible actions in the portfolio but the impact is in the gradebook. Allows portfolio advisors to define which artifacts will be available when a portfolio is attached to a gradebook assessment.
export_weighted_grade
export_calculated_grade
gradebook_assessment_document_delivery_enabled
Enable this setting to allow gradebook administrators to create a folder in a gradebook to provide files to learners (e.g. results from an external exam).
gradebook_passing_grade
Add a value here to be applied in the Student Report Card report (System Report > Learner Reports > Student Report Card)
calendar_assignments_enabled
Used to allow learners to see due dates on their dashboard calendar for any gradebook assessments that include a drop box assignment.
gradebook_adjusted_grades_enabled
Allows you to manually enter an adjusted overall grade for a course gradebook. Useful when assessment policies require that a learner pass an ungraded course component to pass a course, regardless of their calculated grade. (New in ME 1.21)
gradebook_assignment_show_form_options
Allows increased control of how assessment forms used in conjunction with course gradebook assessments can be displayed to learners. Choose to have the option to show only the ungraded form, the graded form, both, or none. (New in ME 1.21)
gradebook_assessment_bonus_marks
Enable this option if you want to be able to enter grades over 100% for course gradebook assessments.
gradebook_include_ungraded_assessments
Controls whether the admin. view of a course gradebook ignores unentered grades or counts them as zero. Enabled by default. (ME 1.21)
gradebook_assessment_csv_include_username
Disabled by default. Enable to add a username column to a gradebook export (ME 1.26)
gradebook_assessment_csv_include_email
Disabled by default. Enable to add a user email address column to a gradebook export (ME 1.26)
When creating as assessment in the gradebook you can create a group assessment. This will allow learners to upload one assignment (if you use a drop box) on behalf of their whole group and when a grader grades the assignment, the grade will be applied to all group members.
If you use this tool, graders can still tweak individual grades after the group grade has been entered.
To use this feature, you must have course groups built. Please see the Course>Groups page for more detail.
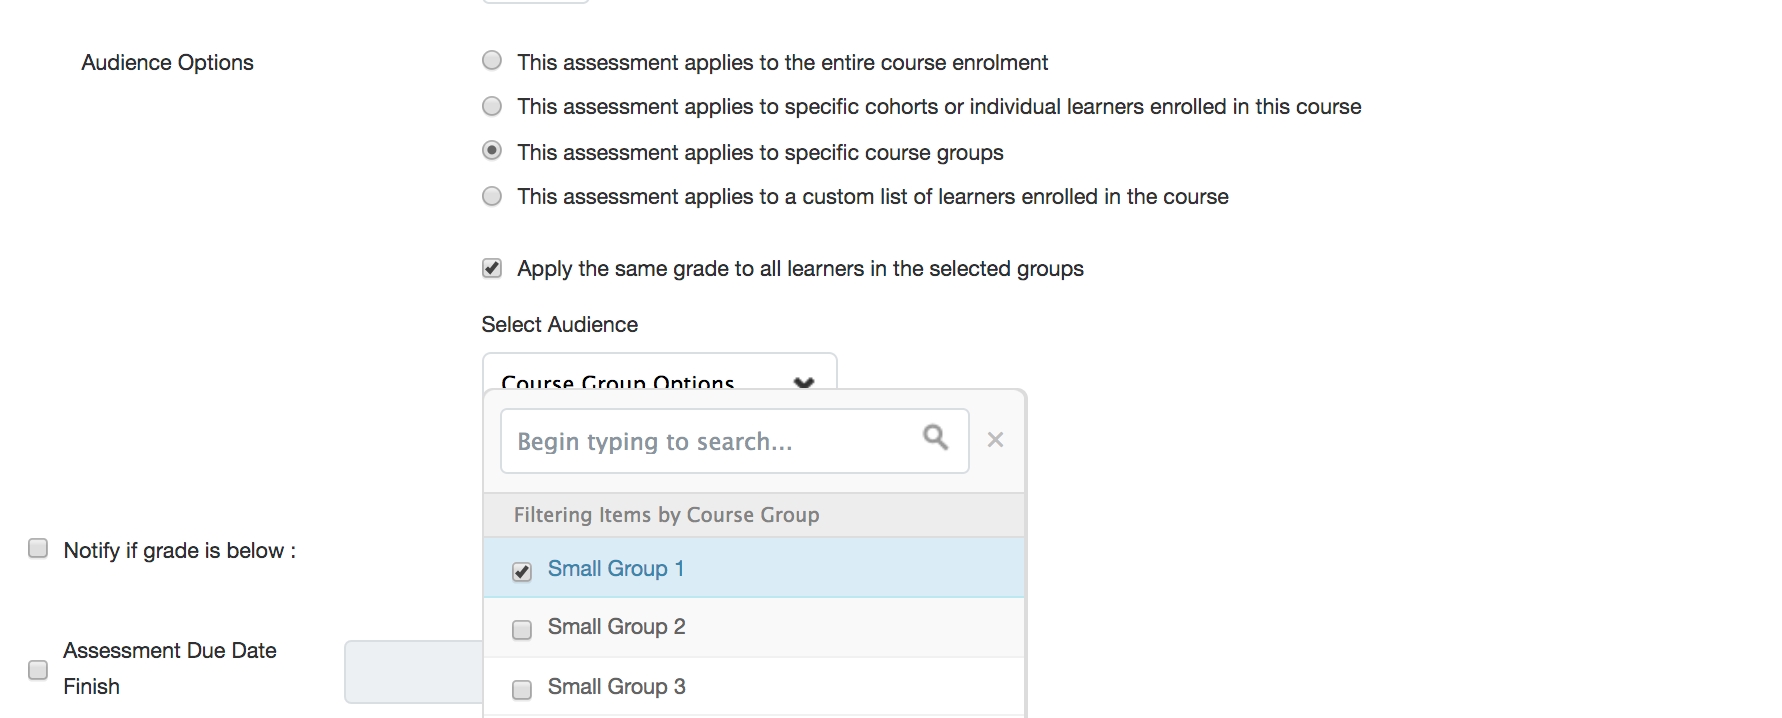
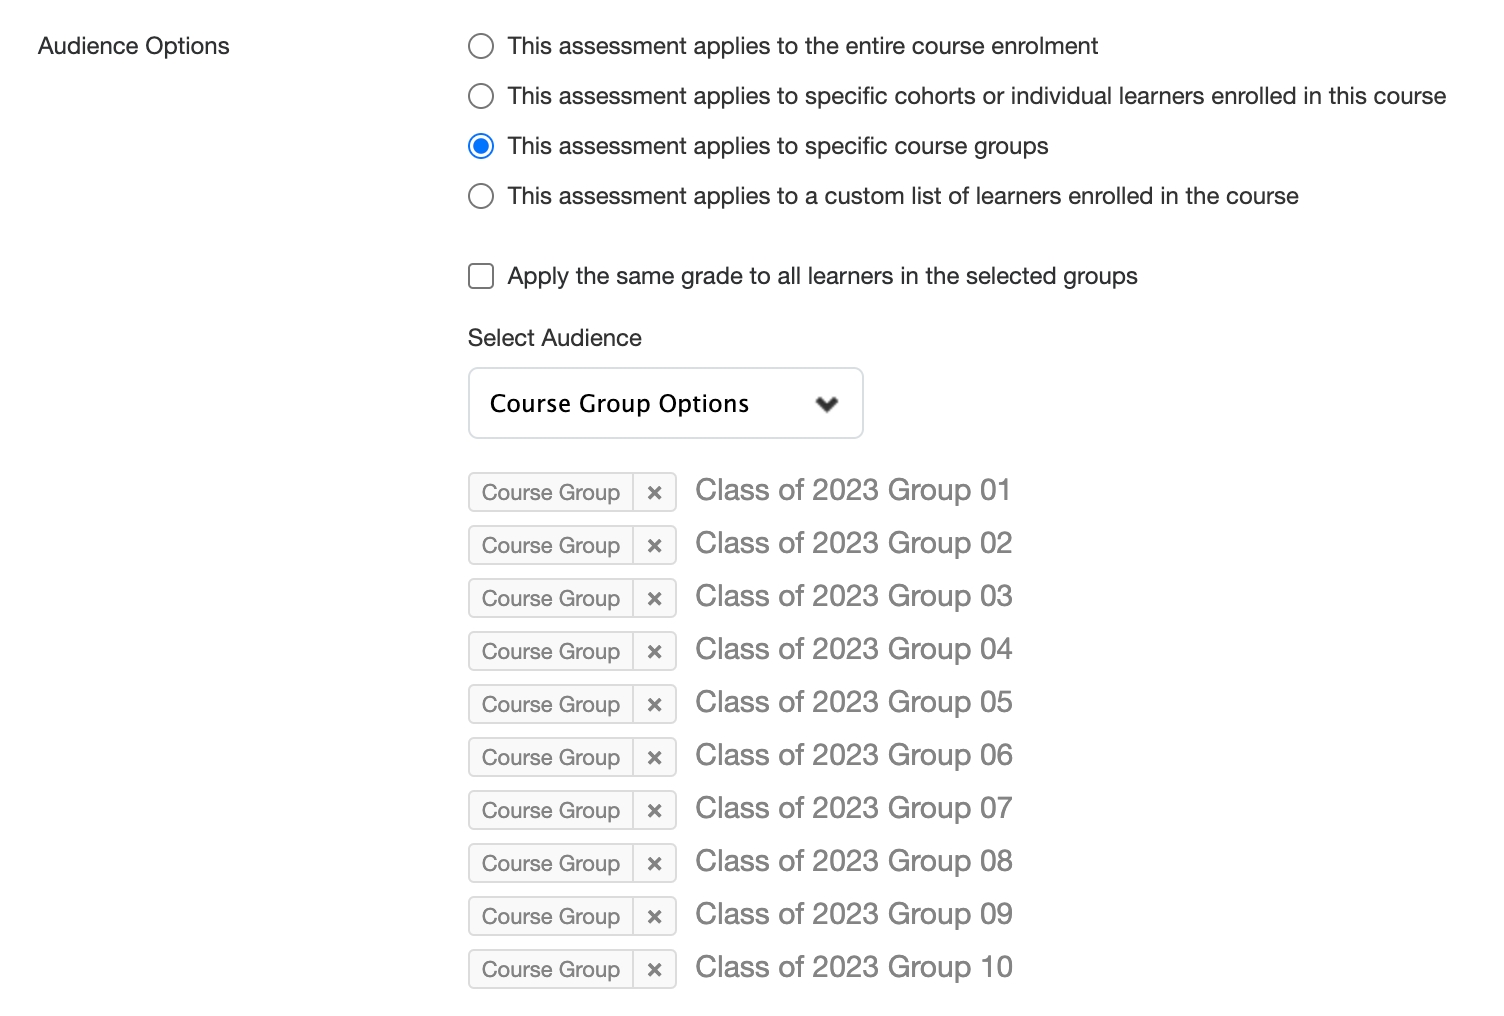
In the 'Audience Options' section, assign the assessment to specific course groups (include all groups if an entire course is responsible for completing the assessment).
If you want learners in the same group to get the same grade, check the box.
Click the 'X' beside the search or somewhere outside the selection window to close it.
The selected groups will display on a list below the "Select Audience" dropdown.
To remove a group from the list, click the 'x' beside the group name.
Begin to type a grader name into the search field and when matches appear, click on the appropriate name and select Add.
You may add multiple graders to one assessment.
To assign groups to graders, click the checkbox beside multiple group names and click 'Assign Selected to Grader'.
In the popup window, click the checkbox beside the appropriate grader name click 'Assign Learner'.
The names of individual learners in each group should appear beside the grader name in the Grader/Assigned Learners table on the left.
To delete a learner from a grader's list, click the red minus icon. Note that the learner will not be added back to learner's list since it only shows groups. If you remove an individual learner from a grader's list you need to ensure the student gets graded some other way.
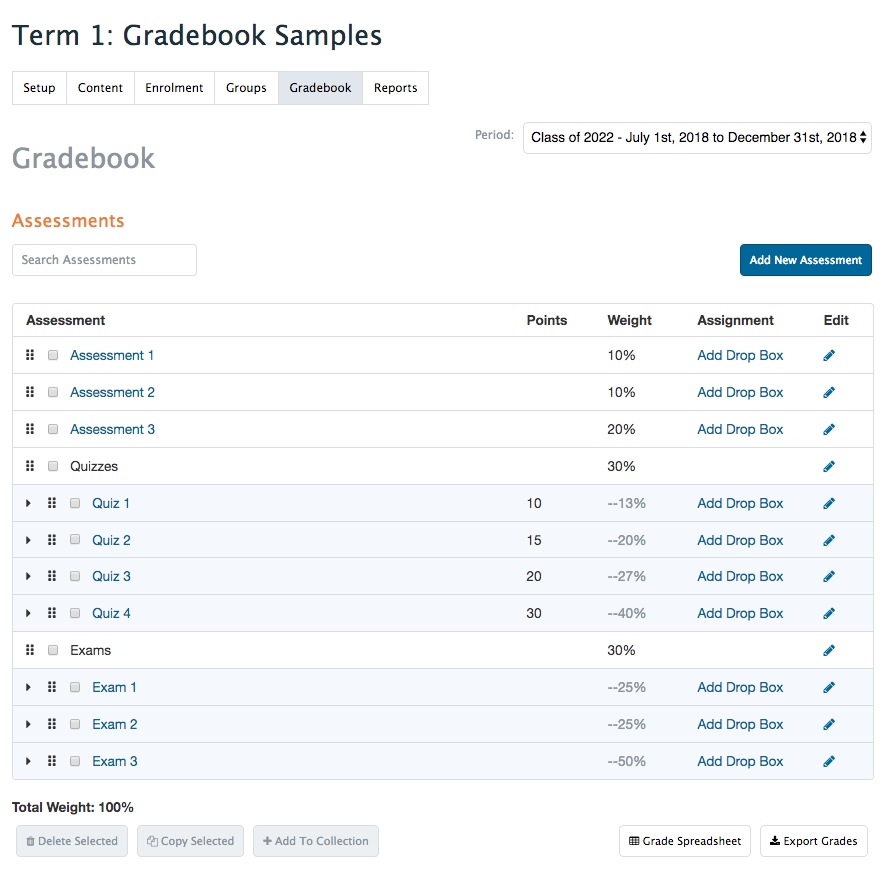
The collections tool allows you to group multiple assessments together in a course gradebook assessment list allowing for quick review of learner performance (e.g., all quizzes will show up beside each other).
Create the required assessments.
Tick the small boxes beside the assessments you want to add to a collection.
Click on “Add to Collection” at the bottom of the gradebook screen.
Provide a title and optional description for the collection.
Set the grading scale as necessary.
Set how to display grades for the collection to the learner.
Click '+Add to Collection'.
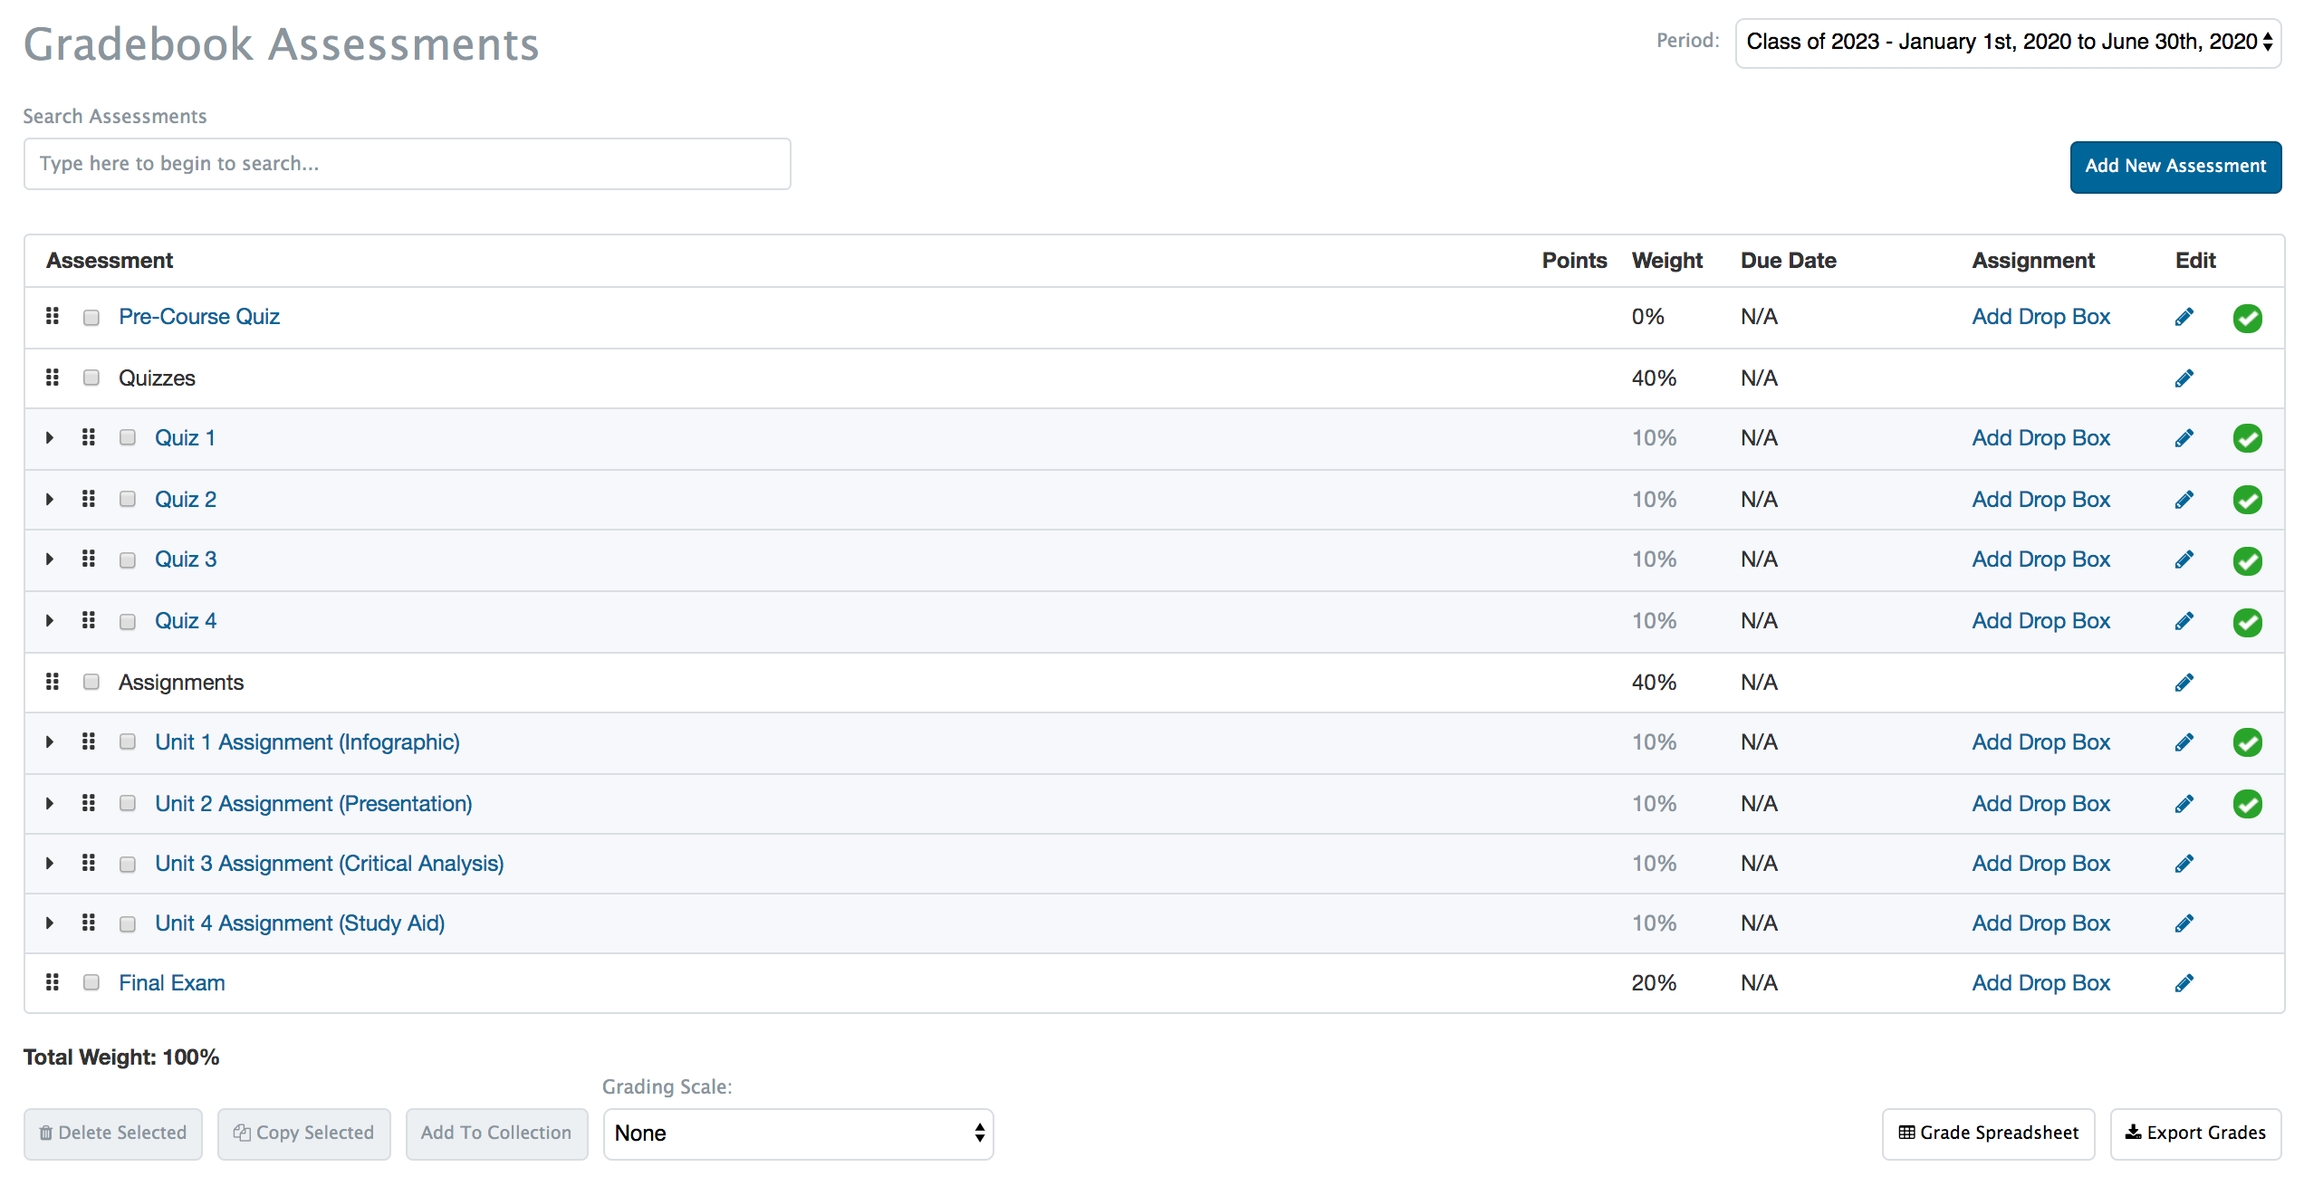
The collection will now display on the Assessments list.
To add additional assessments to an existing collection, tick the small box to the left of the assessments you want to add. Click on Add to Collection. Under Assessment Collection use the dropdown menu to select the appropriate collection title and click Add to Collection.
To deleted a collection, tick the small box beside the collection name and then click the red “Empty Collection” button at the bottom of the page.
Weighted Collections gives users the opportunity to create provide a total course weight for a selection of assessments (e.g. all quizzes will be worth a total of 20%) and then have Elentra automatically calculate the weight of individual assessments based on the total weight of the collection.
This development was initially designed to support schools using point totals (numeric grades) as the basis for multiple assessments.
Create the required assessments.
Tick the small boxes beside the assessments you want to add to a collection.
Click 'Add to Collection' at the bottom of the gradebook screen.
Provide a title and optional description for the collection.
Set the grading scale as necessary.
Set how to display grades for the collection to the learner.
Check the "This Collection is Weighted" option which will open additional options. Complete the information, noting the following:
Total Weight of the Collection in Course Gradebook: This should reflect how much you want this collection to be worth in the total gradebook (e.g. all quizzes will be worth a total 20% of the course gradebook)
Distribute Weight of Assessments Using: This allows you to specify how you'd like to calculate the weights on individual assessments added to the collection. The options are Numeric Points or Percentage.
If you select numeric points, you'll initially see the existing points total and weight for each assessment. When you enter a total weight for the collection, the weight of each individual assessment will automatically adjust.
If you select percentage, you'll initially see the original percentages assigned to each assessment. If you enter a total weight for the collection, you will need to change the weight of each assessment to total 100%. The Assessment Weight in the Course Gradebook will automatically be calculated.
Gradebook Assessments in Collection:
Numeric Points: You can adjust the points assigned to any assessment in the collection. This will override the previously entered points total.
Percentage: You can adjust the percentages which will override the percentage weights entered when creating the original assessment.
Click '+Add to Collection'.
The collection will now display on the Assessments list. The weight column will show the total collection weight beside the collection name and the weight within a collection for each individual assessment.
Note that Elentra allows a gradebook to have a total weight of more than 100%. Especially when using weighted collections, ensure your gradebook total weight is what you want it to be.
To edit an existing collection, click the pencil icon in the edit column to the right of the collection name.
It is only by editing assessments through the collection that you can change the numeric points or percentage and have it reflected in the collection. If you edit an individual assessment that is part of a collection, you can modify the points, but the weight will not automatically adjust.
You can attach an exam to a gradebook assessment from the gradebook or from an exam post. Doing this creates a link between the two so that exam grades will automatically populate the gradebook.
Please note that if you include questions in an exam that need to be manually graded (e.g., short answer), student grades will initially be calculated and displayed in the gradebook without including their possible points from those questions. As such, it is recommended that if you include manually graded questions, you delay the gradebook assessment visibility to learners until you know the exams will be graded.
To attach an exam to a gradebook assessment the exam must first be posted to an event in the appropriate curriculum period. The curriculum period for the gradebook and the event to which the exam is posted must match.
Create a gradebook assessment using the instructions in the Gradebook help section.
Click the checkbox beside Link existing online exam to this assessment.
Click 'Add Exam Post'.
Begin to type the name of the exam and select it from the displayed list.
Click 'Attach Exam Post'.
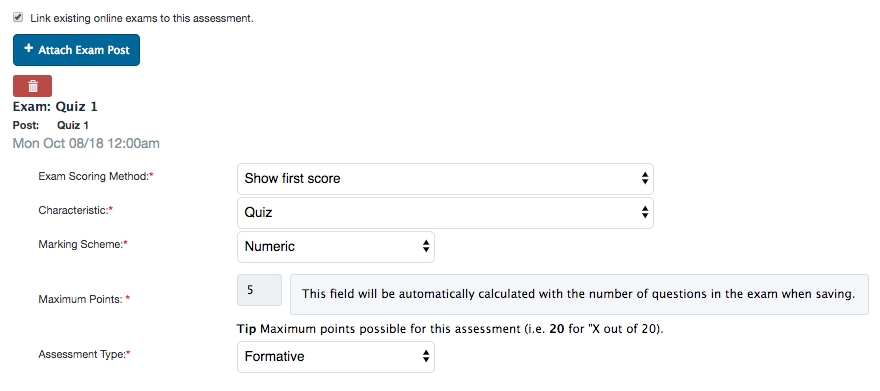
Note that you have a new item to configure which is exam scoring method. Your options are to: show average of all scores, show first score, show highest score, or show latest score in the gradebook. These options only apply if you set the exam to be taken multiple times by learners.
Set the other parameters for the assessment and click 'Save.' Note that you do not need to set graders for an exam in the gradebook assessment since you add graders to specific exam posts in the Exams module.
When the exam is completed and grading is complete (if required) the grades will automatically display in the gradebook.
It is possible to attach more than one exam post to a single gradebook assessment. This might be useful if you have two sections of learners writing the exam at different times but the grades will populate the same gradebook assessment.
Note that when you attach an exam to the gradebook from the edit assessment page, the system automatically determines the point total based on the number of questions on the exam (e.g. 5 questions = 5 points) if you are using a numeric marking scheme.
If you wish to attach an exam to a gradebook assessment from an exam post you will do so on Step 4:Feedback. *Attach GradeBook: Select an existing gradebook entry to attach the exam to (the list will prepopulate based on the course and event selected in earlier steps and the contents of the gradebook for the relevant curriculum period). Note that you can't set the exam scoring method from here; you must navigate to the gradebook assessment to do so.\
The Quizzes module of Elentra is no longer supported. Now we recommend you create quizzes using the Exams module.
To attach a quiz to a gradebook assessment it must first be attached to a learning event. You will only be able to add a quiz to a gradebook assessment if the gradebook and learning event the quiz is attached to share a curriculum period.
Create a gradebook assessment using the instructions in the Gradebook help section.
Click the checkbox beside Link existing online quizzes to this assessment.
Click 'Add Quiz'.
Begin to type the quiz name and select it from the displayed list. The list of quizzes displayed will be based on quiz authorship so you must be listed as a quiz author to add a quiz to a gradebook.
Click 'Attach Quiz'.
The quiz questions will display and you can uncheck any that you do not wish to include.
Set the other parameters for the assessment and click 'Save.' Note that you do not need to set graders for a quiz since a quiz only allows multiple choice questions which will automatically graded.
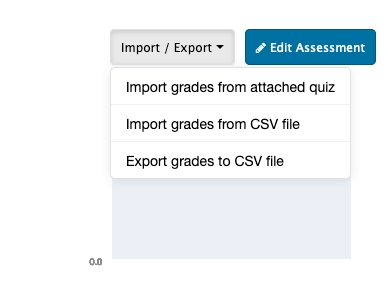
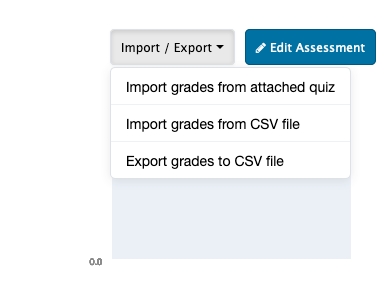
After the quiz is completed by learners, use the Import/Export tool to import grades from the attached quiz.
Note that the gradebook will record the learner's first attempt of the quiz, even if they are allowed multiple attempts.
If you attach a quiz to a gradebook assessment you can edit the questions once. If you need to edit them again, you should delete and reattach the quiz.
To attach a Course Discussion Forum to a Gradebook assessment, you must have the following in place:
Your Course Website must be associated with a Curriculum Period.
Your Course Website must have a Discussions page type containing at least one Forum.
Create a Gradebook assessment.
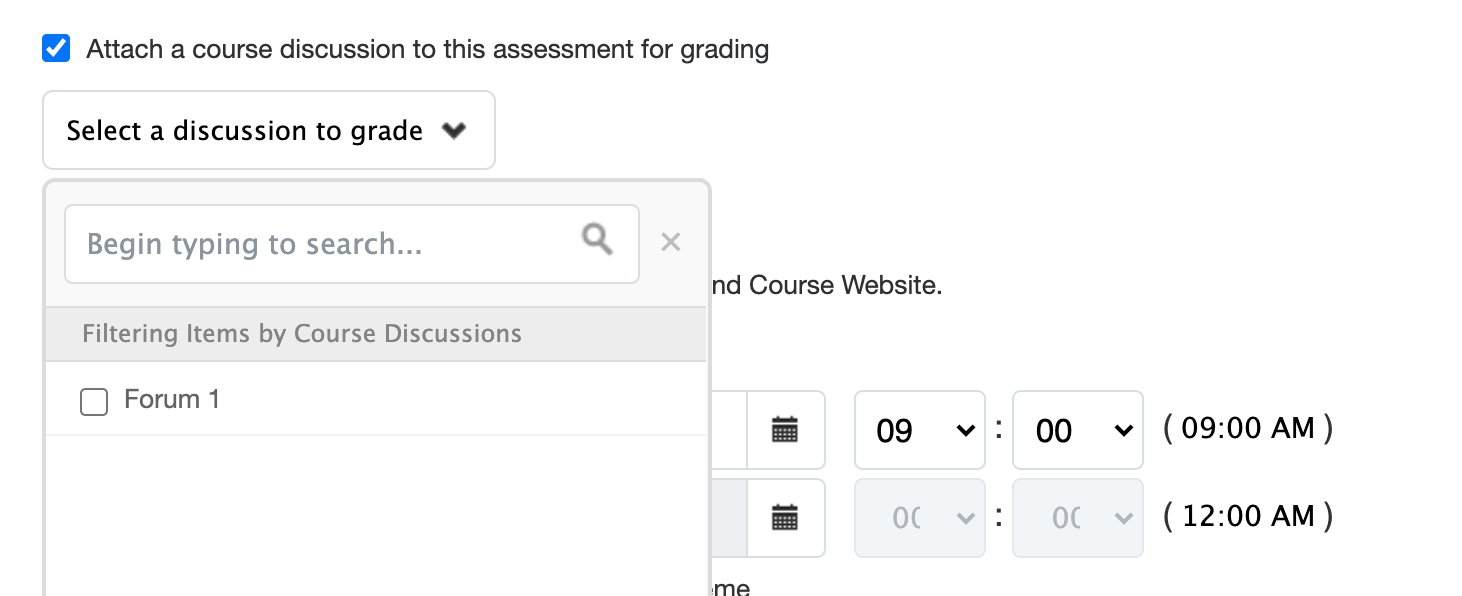
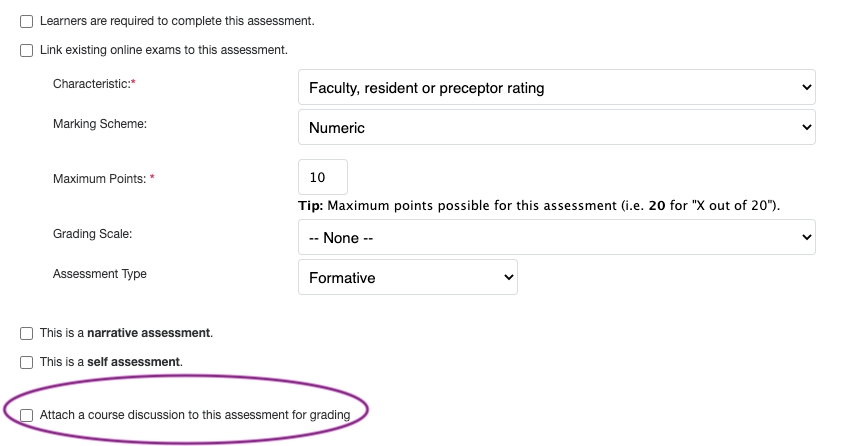
Click the checkbox beside Attach a course discussion to this assessment for grading.
The checkbox is below the area where you define the assessment characteristic, marking scheme and grading scale.
From the Select a Discussion to Grade dropdown menu, select one or more forums that you want to associate with the assessment.
If you select more than one forum, your grader(s) will be able to switch between forums to access the learners posts and replies for each.
Assign your learners to Assessment Graders as required.
Optionally, attach an Assessment Form to assist your graders in grading the discussion forum.
Optionally, create an Assignment Dropbox for the assessment, if the learner is also required to make a submission.
Click Save.
Navigate to a course gradebook.
Click on the pencil icon in the Edit column.
Navigate to a course gradebook.
On the list of existing assessments check off the box beside the assessment you want to delete and then click the red “Delete Selected” button at the bottom left.
Before you start, ensure that the curriculum period (e.g., Sept. 1, 2021 – Dec. 31, 2021) you want to create a new gradebook for exists and has an audience (e.g., a cohort). Navigate to Admin > Manage Course > Setup to review and adjust this as needed.
Navigate to Admin > Manage Courses.
Search for a course as needed.
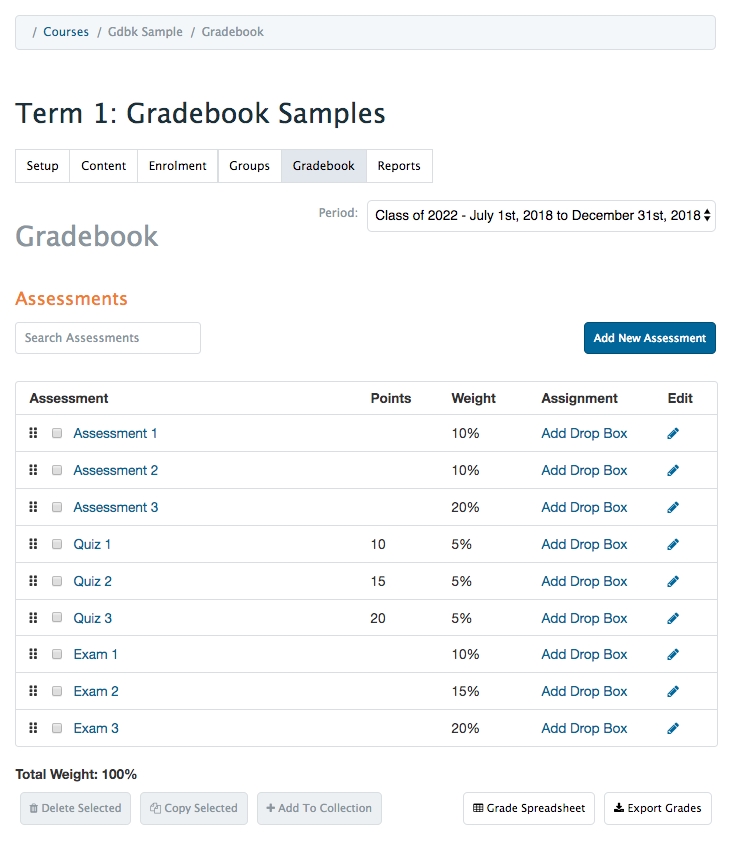
Click the cog icon to the right of the course name and select Gradebook.
Ensure you are in the correct curriculum period and adjust using the period selector in the top right if needed. (The current curriculum period will display by default.)
Select the assessments you want to copy by ticking the small box beside the assessment title.
Note that you can select all by ticking off the box beside the Assessment column title.
If you want to copy a collection .**
Click 'Copy Selected'.
In the window that opens, select the new target course and enrolment/audience (you will see the audience and relevant cperiod in the selector).
Click 'Copy Assessments'.
To view your newly copied course gradebook either use the cperiod switcher in the top right (if you copied to the same course), or navigate to a different course and view the gradebook for the appropriate curriculum period.
What is copied:
Assessment and collection titles and weights including previous assessment details (assuming you checked off a collection)
You must update any applicable due dates, Show Start dates, etc. for the newly copied gradebook assessments.
A drop box will be copied in the same course when you copy to a new curriculum period, but you'll need to update the dates
Drop box assignments will not copy across courses!
A form attached to a gradebook assessment will be copied so it can be used again if appropriate.
Curriculum tags assigned to assessments will be copied.
What is NOT copied:
Specific assessment audiences will not be copied - you will need to specify the audience for any assessment you don't want to apply to the entire cohort.
Course Gradebook Grading Scale (assessments' grading scales will copy)
Assessment Events
Assessment Graders
Attached Assessment Portfolios
There are several ways to enter grades into the gradebook including importing grades with a CSV, manually entering grades, linking an assessment to exams, and using an assessment form which, when completed, automatically populates the grade.
Staff:admin users and staff:pcoordinator and faculty director users assigned to a course can access a complete course gradebook and enter grades from Admin > Manage Courses > Course > Gradebook. This page describes grading actions available in a course gradebook.
If an organization wishes to permit bonus grades for individual assessments, an optional database setting can be enabled to allow gradebook assessments to be scored over 100% (gradebook_assessment_bonus_marks).
This option is available to users that have access to a course gradebook like staff:admin, and program coordinators and faculty directors associated with the course. (Faculty assigned to grade assessments for specific learners should enter grades via My Grading Tasks.)
Navigate to Admin > Manage Courses.
Search for a course as needed.
Click the cog icon to the right of the course name and select Gradebook.
Ensure you are in the correct curriculum period and adjust using the period selector in the top right if needed. (The current curriculum period will display by default.)
Search for and click on the title of the assessment you would like to grade. This will take you to the assessment page.
Click the Import/Export button on the right and select Import grades from the dropdown menu.
The data needs to be in CSV format to be uploaded. If you use Excel or Numbers use “Save As” to create a version of your file as a .csv.
The marking scheme dictates what information and formatting should be included in your .csv file to upload. For all imports, include the learner id number or email address to link grades to the appropriate users.
For numeric marking schemes include the numerator of the grade
For percentage marking schemes include the percentage
For pass/fail marking schemes format your CSV so that a pass is 100 and a fail is 0
For complete/incomplete marking scheme change the assessment marking scheme to pass/fail, import the marks as listed above, then revisit the Edit Assessment page and change the assessment marking scheme back to complete/incomplete. The marks should update to C’s and I’s as required.
Drag and drop or browse you computer to find the file you need to upload. Click Import CSV.
Navigate to Admin > Manage Courses.
Search for a course as needed.
Click the cog icon to the right of the course name and select Gradebook.
Ensure you are in the correct curriculum period and adjust using the period selector in the top right if needed. (The current curriculum period will display by default.)
Search for and click on the title of the assessment you would like to grade. This will take you to the assessment page.
Click in the grade column beside a learner name/number. Enter the appropriate grade.
Your work saves automatically.\
Another option is to open the grade spreadsheet for a course and input grades directly in the spreadsheet.
Note that custom grades and adjusting point values per form, per learner are not currently available to graders assigned to a specific assessment and/or learners. The feature only works when you are entering grades as a course administrator (i.e., Curriculum Coordinator or Course Director).
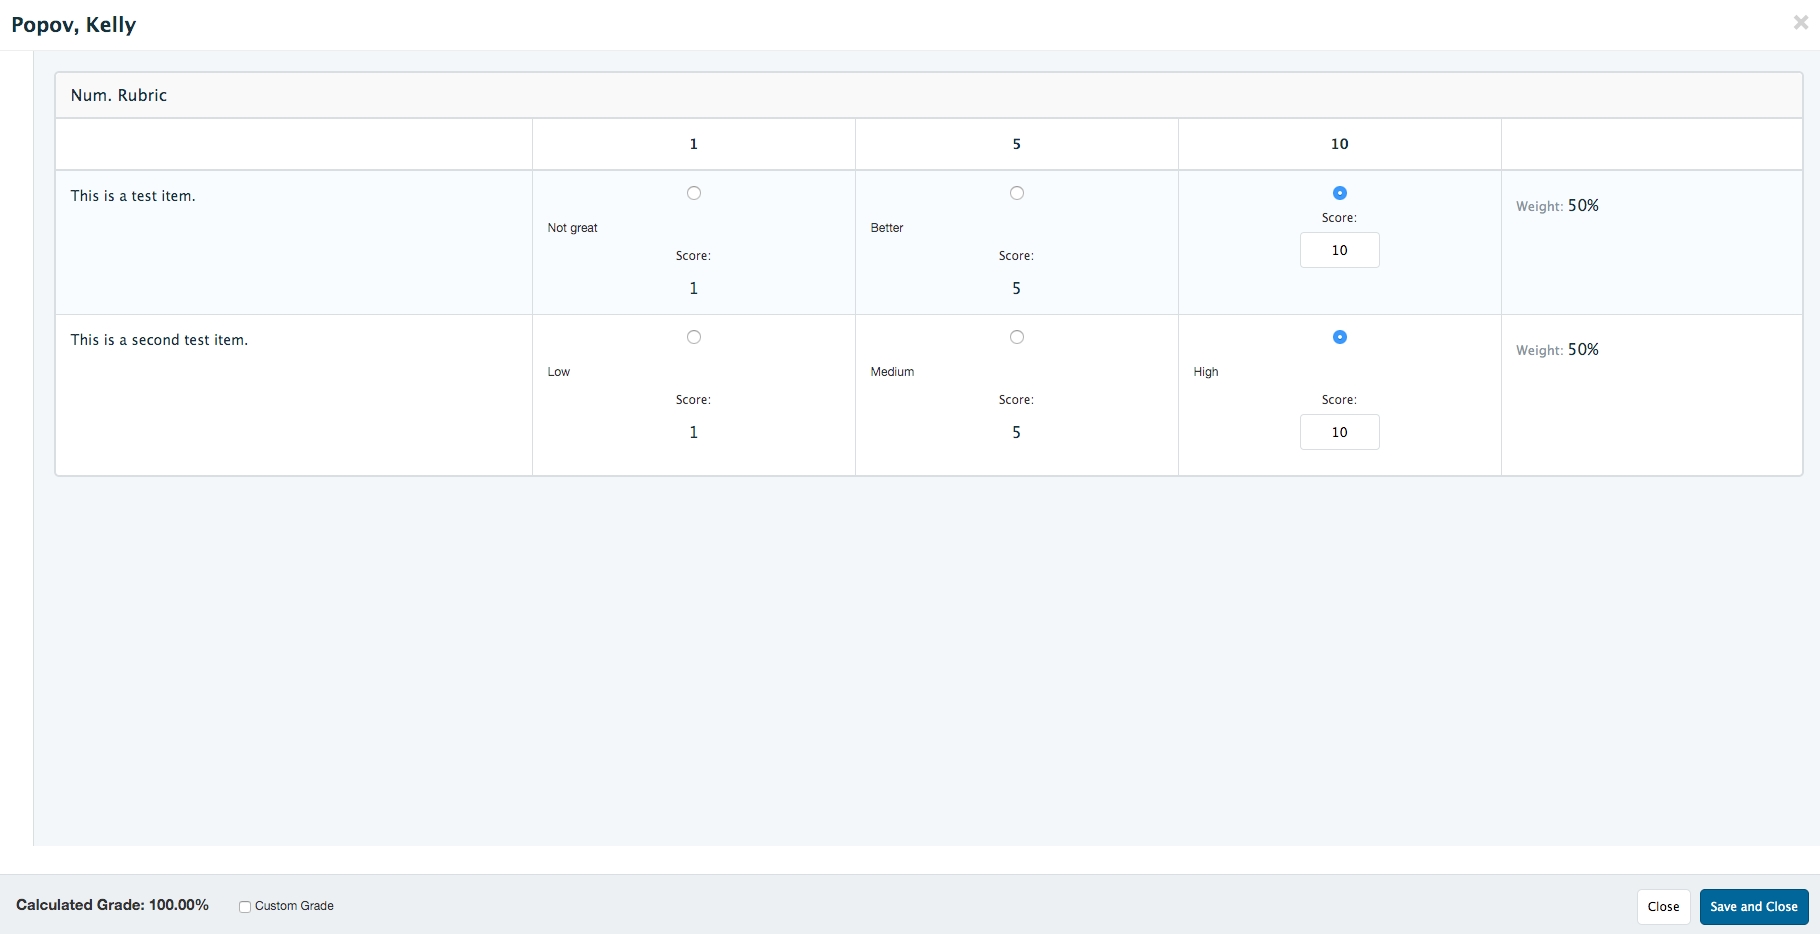
When grading with an attached Assessment and Evaluation form, and in a Course Gradebook, admin users and course directors can optionally check the Custom Grade box and enter a value. This allows you to override the automatically calculated grade.
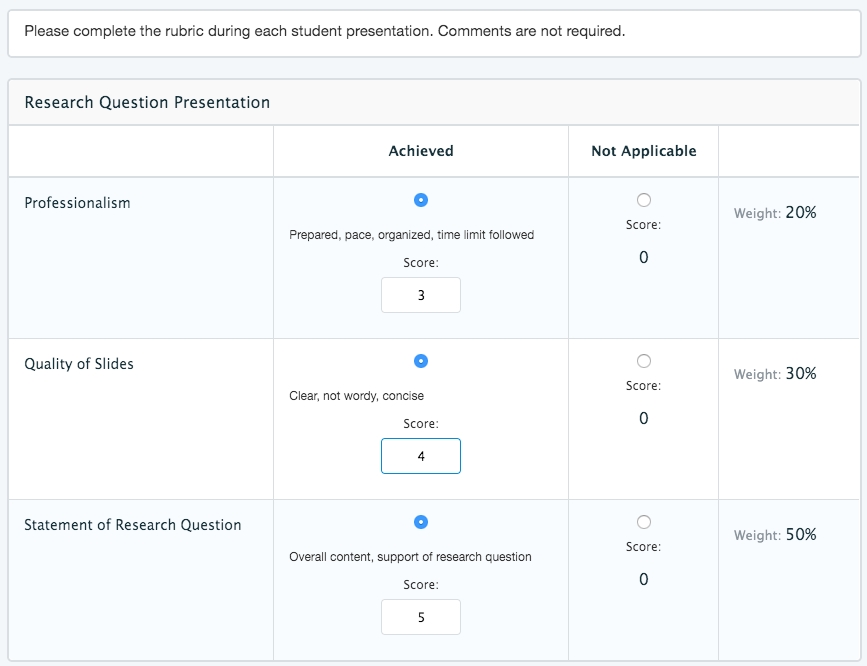
When grading with an attached Assessment and Evaluation form, and in a Course Gradebook, admin users and course directors can optionally adjust the point awarded to a learner. This allows for a more specific grade calculation as needed.
In the example below each 'Achieved' score was set to 5 by default. Professionalism and Quality of Slides have been updated to 3 and 4 respectively. The adjusted point total will be taken into account to calculate the learner's grade.
If you use the pass/fail or complete/incomplete marking schemes the information stored in the Elentra database about a learner’s grade will be 100 or 0, regardless of what you enter to record the grades. For instance, if you enter that Student A got a 65% and that registers as a P, the database will store a grade of 100 for them.
You can control the threshold of what percentage score counts to register as a pass or complete with the database setting gradebook_passing_grade. (So for example you can make it so that a 50 registers as a P or that a 60 registers as a P. Either way what the database actually stores for a P is a 100.)
To record specific learner percentage grades in the database but represent them as a P or F to learners, you should build a grading scale that can be applied to an assessment for the purposes of displaying grades. That will allow you to record a 65 for a learner, store the 65 in the database and include the 65 in the student’s final grade calculation, but display a P to them in the gradebook.
If no grade is entered for an assessment, a dash will display in the grade column and on the grade spreadsheet.
A database setting (gradebook_include_ungraded_assessments) controls whether unentered grades are ignored by Elentra or count as zeros in the administrative view of a gradebook.
If you export the grades there will be a blank cell in the spreadsheet where the missing grade is and depending on the setting option used, all missing grades will either be ignored or count as zeroes in the learner's final grade calculation.
Regardless of the setting option you use, learners' views of their gradebooks will always ignored unentered grades so that administrative staff can create all assessments in a gradebook at the beginning of a course and fill in grades over time without learners thinking they have multiple zeroes.
This feature allows you to modify the weight of an assessment for an individual student.
Navigate to Admin > Manage Courses.
Search for a course as needed.
Click the cog icon to the right of the course name and select Gradebook.
Ensure you are in the correct curriculum period and adjust using the period selector in the top right if needed. (The current curriculum period will display by default.)
Search for and click on the title of the assessment you would like to grade. This will take you to the assessment page.
Scroll down to Grade Calculation Exceptions.
Click on Select a Student and select the required learner from the dropdown menu.
When the learner name appears below adjust the weighting by typing in the new assessment weight.
Remove individual grade calculation exceptions by clicking the red minus button beside a learner name.
If you use this feature you do need to ensure that you rebalance the gradebook weighting of other assessments for the learner. For example, if you reduce a midterm from 10% to 0% because of an excused absence, you will need to manually increase the weight(s) of the same student's other assessments so that the total weight is still 100%.
When you add an assessment to the gradebook you can specify whether or not to show the assessment in the learner gradebook and you can set start and end date and time to control the visibility of the grade. Grades are released to all members of the course enrolment at the same time. You can’t currently release grades to only selected learners through gradebook.
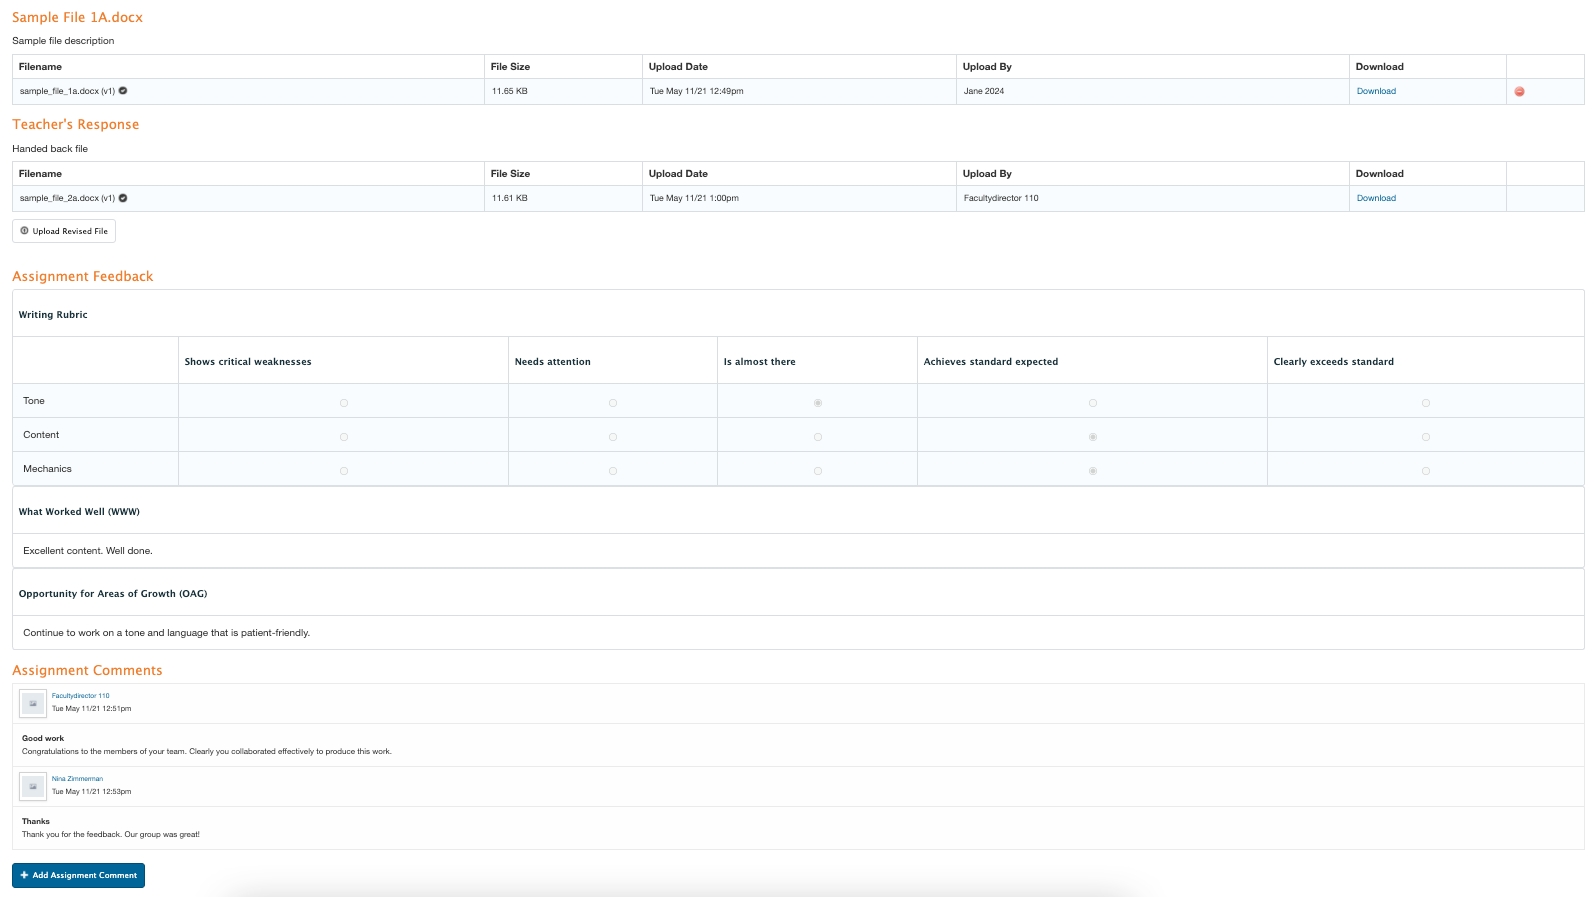
By adding a drop box to an existing gradebook assessment you can allow learners to upload assignments, and allow faculty to view and mark those assignments in Elentra. If a form is attached to a gradebook assessment, faculty can use the form and view the submitted assignment simultaneously.
Assignment due dates can optionally be displayed on the learner dashboard calendar. You need a developer to enable the calendar_assignments_enabled setting if you want learners to see assignment due dates on their calendars.
Navigate to a course gradebook and ensure you are in the correct curriculum period.
Search for or create a new assessment.
Click 'Add Drop Box' under the Assignment column for the assessment.
Complete the required information, noting the following:
Assignment Drop Box
Set submission options**.**
Allowing students to upload more than one file can be useful if students are submitting pictures or documentation of an experience. The maximum number of files a student can upload also limits how many files can be handed back.
Adding a dashboard notice will automatically generate a dashboard notice including assessment due date and a link to the drop box and display it to the learners responsible for the assessment. If you select a dashboard notice, the default release is immediately. To modify the release date, click “Release notice on a custom defined date” and set the release date (this section applies to the dashboard notice only, not the availability of the drop box).
Allow learners to upload new revisions will allow students to replace an existing file with a newer one.
Allow graders to see the name of the learner they are grading can be unchecked if you wish graders to work without knowing the names of the learners assigned to them. Note that they will still have access to student numbers on any downloaded files. Student names will also be available to users with administrative access to the gradebook (e.g. Curriculum Coorindators, Course Directors).
Submission due date: If you have set an assessment due date, the submission due date for the drop box will match it. If you change the assessment due date, the assignment submission due date will automatically be adjusted. Please note that they system does allow learners to upload files after the submission due date so that late work can be submitted without additional hassle to administrative staff. If you wish to track late submissions, it is recommended that you make that selection on the edit assessment screen.
Time Release Options: Set the time release for a viewable start and finish which will control when the drop box will be visible to users. The default setting causes the drop box to be immediately visible to learners and does not set a finish date.
Click “Save” at bottom right.
Navigate to Admin > Manage Courses > *course* > Gradebook.
For an existing assessment that has an existing drop box, click 'View Drop Box'.
You will see a list of learners, their student number, any existing grades, initial submission date for existing assignments (red means it was late), and a timestamp showing last activity on the drop box.
The Last Activity column will show the date/time of a file upload or comment from a learner or grader.
From this page you can click on a learner name to view their drop box submission, or download the submission.
If learners have submitted hard copies of assignments or have emailed their assignments to a staff member, those files can quickly be added to the drop box using the bulk upload tool.
Navigate to a course gradebook.
Ensure you are in the correct curriculum period.
Search for the assessment if required.
Click View Drop Box under the Assignment column for the required assessment.
Click Upload Zip of Submissions.
Where the instruction says that each uploaded file must contain the user's email address, please use the user's email address as the file title (e.g., johnsmith@email.com.doc)
Attach a file by dragging and dropping it in place or browsing your computer, and click Submit.
You can also bulk download all submitted assignments from this same page. This can be useful if you have faculty who wish to grade hard copies of an assignment.
In the top right corner click on the user name to open the personal menu options.
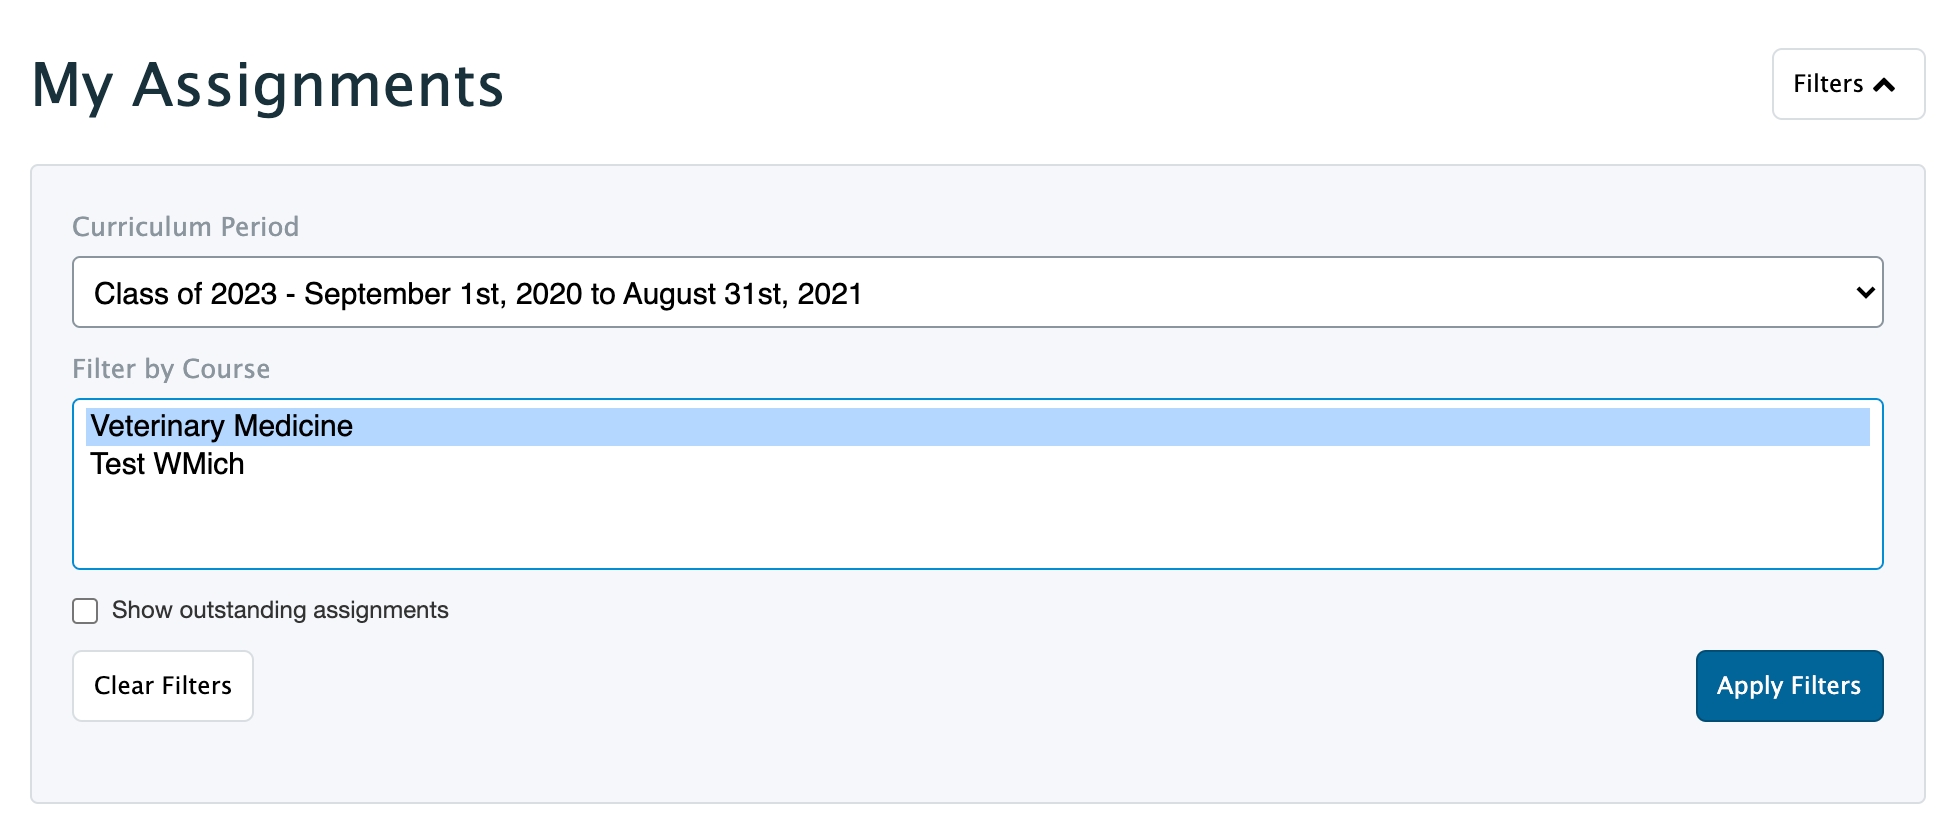
Click 'My Assignments'.
On the My Assignments screen, learners can see all required assignments and their due dates as well as any grades already assigned.
Click on an assignment title and then click 'Add File'.
In the popup window that opens, drag and drop or browse for a file to upload.
Provide a file title and comment (optional).
Click 'Upload'. The uploaded file will display on the Assignment Submissions list.
Depending on how the drop box was set up learners may be able to upload additional files or revised files.
Learners can also add comments to the assignment submission page by clicking 'Add Assignment Comment'.
If an organization has enabled the setting to allow learners to view assignments from their dashboard calendar learners can also access the specific assignment submission page or view My Assignments from there.
Make sure that faculty have been added to an assessment as a grader for them to use this process.
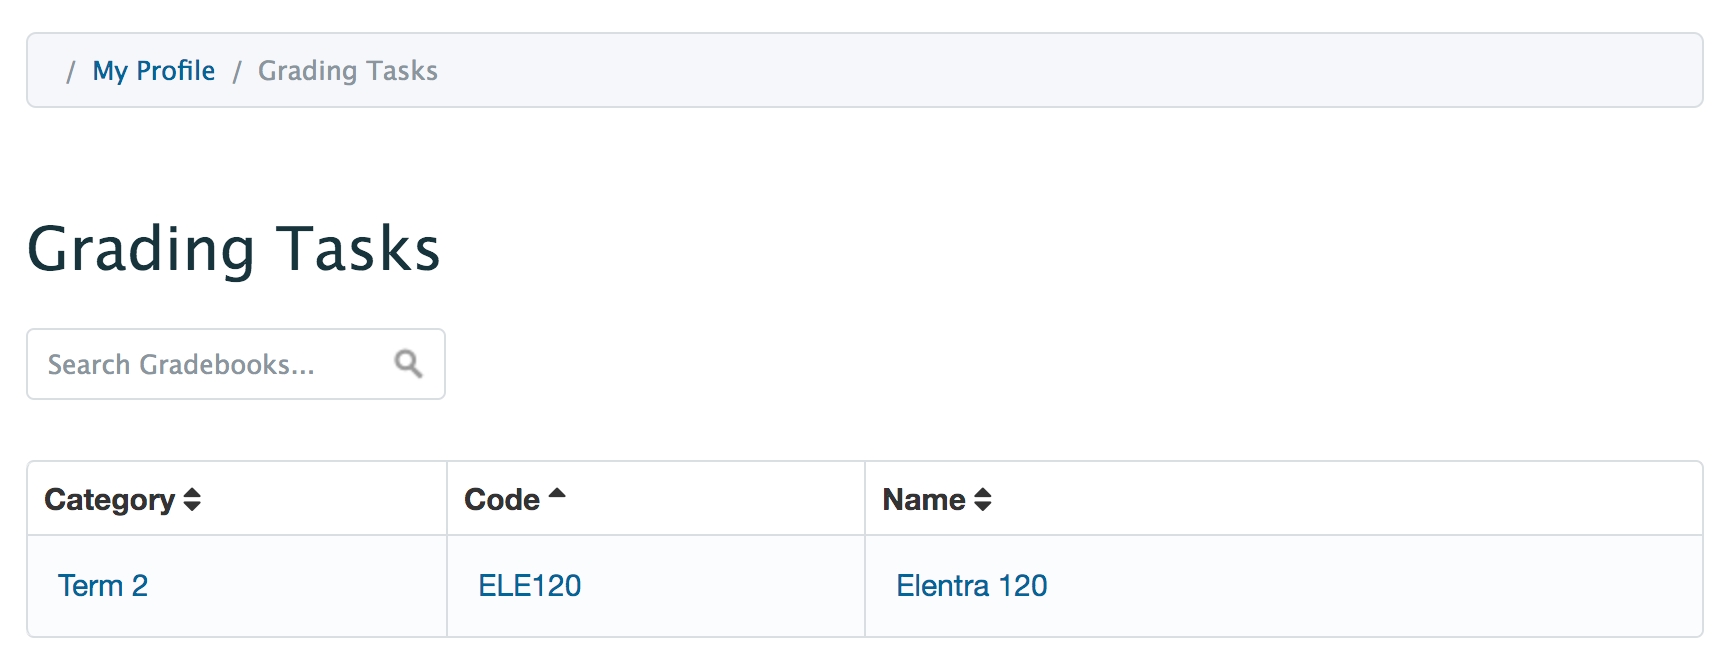
From the user icon, faculty click 'Grading Tasks'.
Click on the appropriate course.
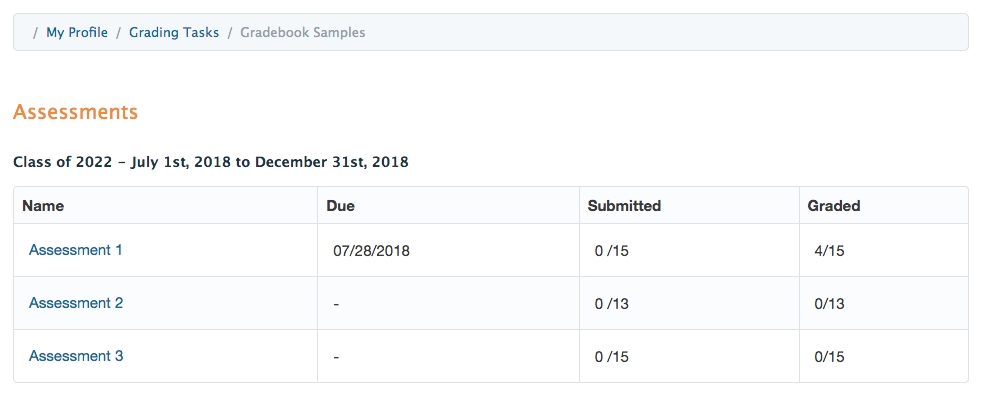
Click on the appropriate assessment.
Scroll down to view the list of learners; click in the Grade column beside a student name.
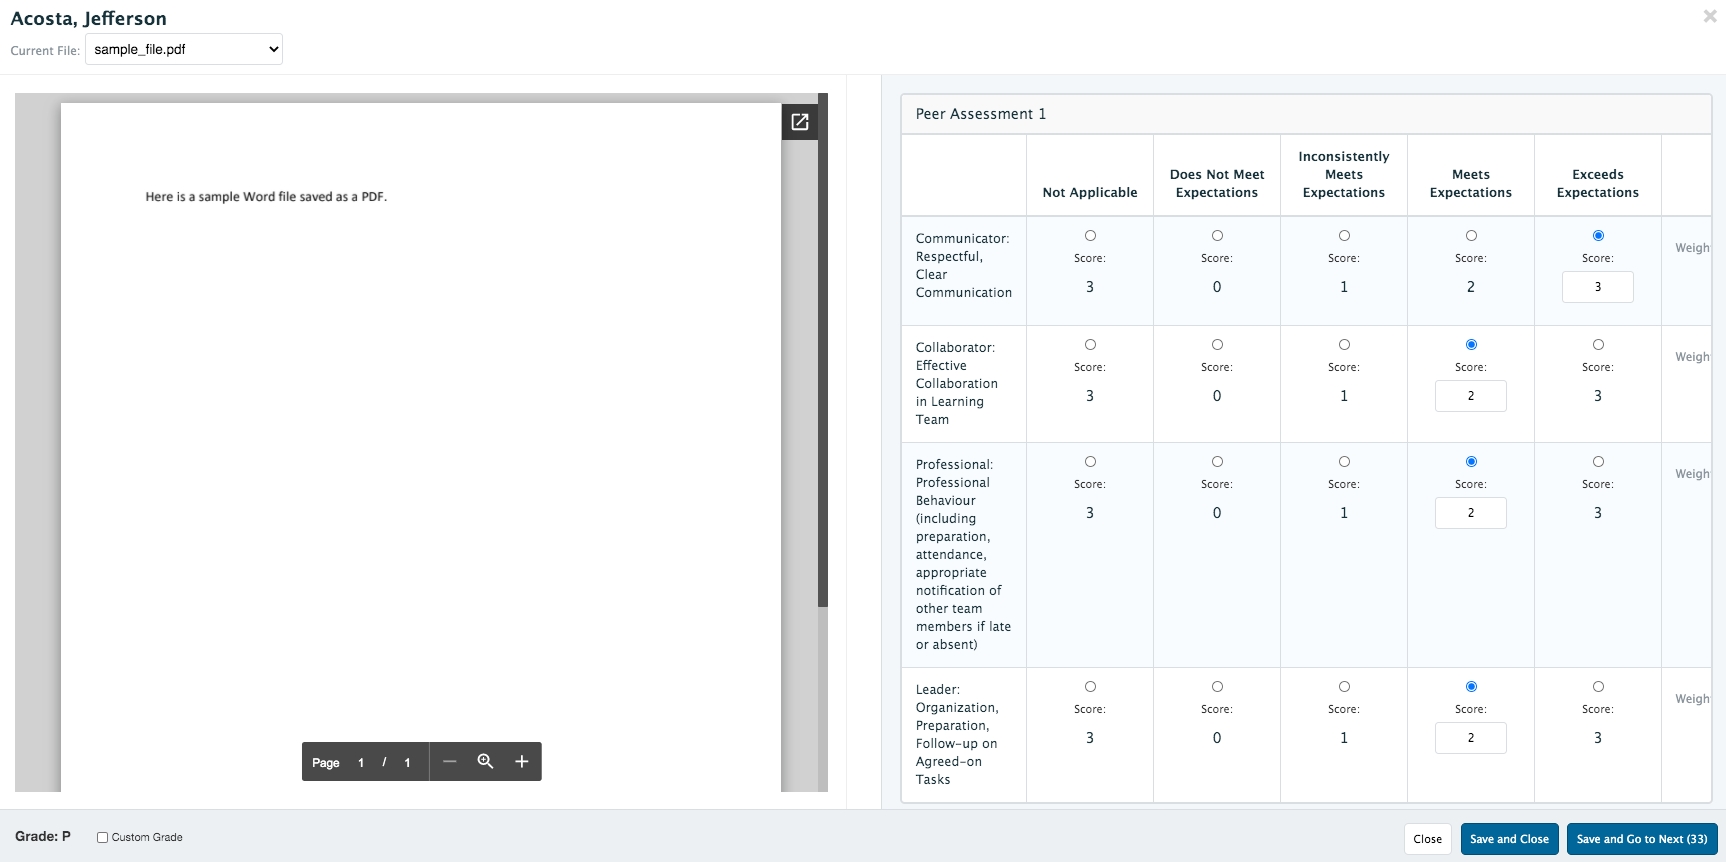
If a form has been attached to the drop box assessment the user will see a split screen with the assessment form on one half and the assignment on one half. Use the assessment form and click 'Save and Close' to just grade this one assignment, or 'Save and Go to Next' to continue grading additional assignments. (Note that the system progresses to each learner whether or not an assessment has been submitted to the drop box.)
If no form has been attached to the drop box assessment, the user can enter grades directly into the Grade column.
A note on anonymous grading: If you do not want graders to view the names of learners when they grade their dropbox assignments, make sure you uncheck "Allow graders to see name of learners they are grading" on the dropbox setup page.
Course directors who are additionally assigned as graders can access their Grading Tasks to view anonymous assignments. Note that this is supported when course directors are grading inline by clicking on the grading cell to enter a grade. If a course director clicks View in the Dropbox submission column, they will be redirected to the admin. view of the gradebook which will NOT be anonymous.
Note that the ability to assign a custom grade or to adjust the points per form item is restricted to administrators and course directors grading in a course gradebook. We are working on introducing the ability for faculty graders to also use these tools.
If graders have downloaded assignments and annotated the files to return to leaners, admin users may return assignments to learners using the Hand Back Response tool.
Navigate to a course gradebook.
Click View Drop Box.
Click on a learner name.
Click Hand Back Response and drag and drop or browse your computer for a file to attach and then click Upload.
If a revised response file needs to be added follow the same steps.\
A grade spreadsheet can be accessed from the bottom right corner of a Gradebook Assessments page. Course coordinators can quickly enter grades into the spreadsheet instead of entering grades for one assessment at a time. The grade spreadsheet also provides a way to indicate an adjusted grade or include a narrative comment about a learner.
The ability to enter adjusted grades on a gradebook spreadsheet is controlled by a database setting (gradebook_adjusted_grades_enabled). To enable the setting, please speak to a developer.
The Adjusted Total Grade feature will allow course administrators to enter an Adjusted Total Grade to the Grading Spreadsheet for a Course Gradebook.
This will allow you to reflect a grade other than that calculated in the Weighted Total column of the Gradebook. An example use case could be: A learner has a weighted total of 75%/Pass (P) in the course, but, because they failed the NBME, their adjusted total should reflect a grade of Incomplete (INC) standing. An administrator or the Course Director can now reflect that adjusted overall grade of INC due to the NBME failure.
With the gradebook_adjusted_grades_enabled setting enabled, navigate to a Course Gradebook and open the Grade Spreadsheet.
On the far left of the spreadsheet, you'll see a column for Adjusted Total.
Click on a cell to enter an adjusted total percentage.
Currently the adjusted total will display to learners in their My Gradebooks view.
Adjusted Totals will not display in the System Report Learner Report Card.
Future work will include the Adjusted Total in the gradebook export and introduce the adjusted total in the Learner Explorer view.
New in ME 1.25
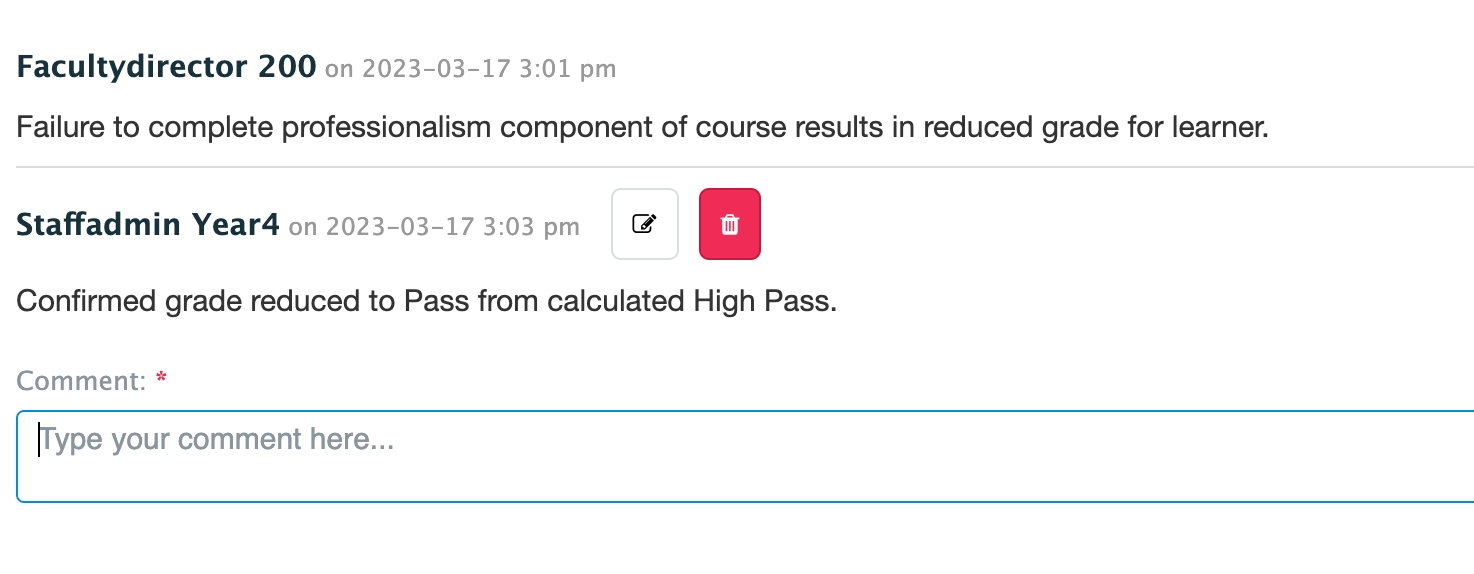
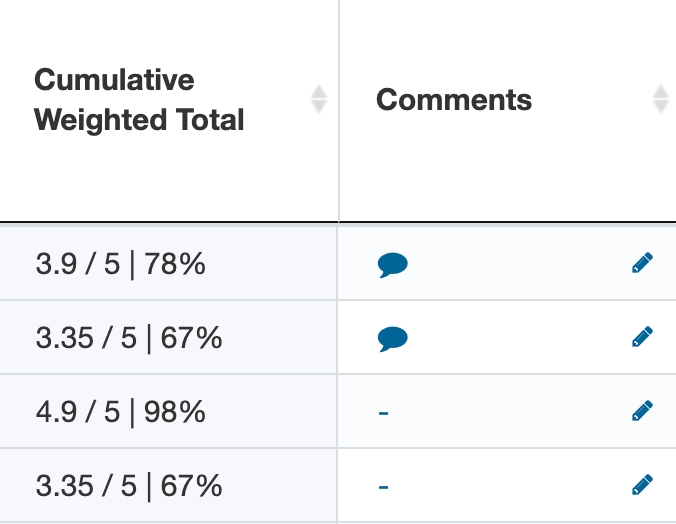
The Comments column in a grade spreadsheet gives course administrators a space to add comments for each learner as needed (e.g., the rationale for a change in weighting to one or more assessments, the rationale behind the application of an Adjusted Total Grade). These comments are not visible to learners.
If a comment has been entered, a filled-in speech bubble will display in the Comments column.
When comments are entered, Elentra will display the author's name and a date and time stamp.
Users may edit or delete their own comments.
Comments are included in an export of the grade spreadsheet. Mulitple comments on one learner will be separated by a semi-colon.
Gradebooks automatically exist for courses and all their associated curriculum periods, however each gradebook must be populated with assessments. Once you have assessments in one gradebook, you can copy and apply them to new curriculum periods and courses as needed.
You must have staff:admin permissions or be a program coordinator or faculty director associated with a course in order to access assessments in a course gradebook. Only staff:admins and program coordinators can add new assessments (course directors can edit existing assessments).
If you have multiple assessments in a gradebook that share multiple details (e.g. graders, groups, weight, etc.) it may be fastest to create one assessment then copy it multiple times and adjust each copy as needed to reflect the unique assessments required.
You can also copy a group of assessments from one course to another (with some limitations). Schools with relatively consistent gradebooks across courses may find it most efficent to build one gradebook and then copy it to other courses and adjust it as needed.
One reason to set a grading scale for a course gradebook before doing anything else is that if a grading scale is set for a course gradebook, all assessments added to the gradebook will inherit the course grading scale. This can be a time saver if you use the same grading scale for multiple assessments in the a gradebook. Note that users can optionally change the grading scale of an assessment when it is being made.
If you'd like to see an example of how grading scales can be used, and you are a Consortium participant, you can access the Gradebook Scales and Templates recording here (collaborate.elentra.org login required).
Navigate to Admin > Manage Courses.
Search for a course as needed.
Click the cog icon to the right of the course name and select Gradebook.
Ensure you are in the correct curriculum period and adjust by using the period selector in the top right if needed.
Below the list of assessments and beside the options to delete and copy assessments, look for the Grading Scale dropdown selector.
Select the appropriate grading scale.
The selected grading scale will display in the grading scale space.
Navigate to Admin > Manage Courses.
Search for a course as needed.
Click the cog icon to the right of the course name and select Gradebook.
Ensure you are in the correct curriculum period and adjust by using the period selector in the top right if needed.
Click 'Add New Assessment' (right side).
Fill in the required fields.
Assessment Name: Required; will display to learners and any graders associated with this assessment.
Assessment Description: Optional; this will be displayed on the Edit Assignment screen, will be seen by learners when reviewing or submitting an assignment tied to this assessment, and will also display if you choose to include this assessment in the gradebook display on a course website.
Assessment Weighting: This can be left as 0% if an assessment carries no weight towards the final course grade. Otherwise, enter the weight this assessment will have towards the final course grade.
Audience Options: Use this optional field to create an assessment for a specific course audience. Your options are for the entire course enrolment, a course group or groups, specific cohorts or individuals in the course, or a custom list of learners.
Click the radio button for the appropriate audience option and then select the audience using selector. Note that you can search the list of cohorts/groups/learners as needed.
If you assign the assessment to specific course groups and you want all learners in one group to have the same grade recorded, check off "Apply the same grade to all learners in the selected groups." If you use this option and an assignment drop box, one member of the group can upload the assignment and once graded, the mark will be applied to all group members.
If an assessment is assigned to a specific audience only those learners will see the assessment in their My Gradebook view (assuming the assessment is released for view) and have its weight (if any) applied to their grade calculation.
Notify if grade is below: Use this feature to automatically send an email to the selected audience if students score below the designated threshold.
Check the box on the left to enable this feature.
Enter a threshold (e.g. 65%) and click 'Select Who Gets Notified' to add the name(s) of people to notify. The options available will be based on the course contacts (e.g. course director, curriculum coordinator, and associated faculty).
If no options appear, make sure the course has course contacts on the Course Setup page. Note that you can add multiple people to the list. To remove someone from the list, click the red minus button beside a name.
Assessment Due Date: This is not a required field but if used will create a due date visible to learners. If the assessment later has a drop box assignment added the drop box assignment will inherit the assessment due date.
Learners are required to complete this assessment: This creates a flag in the database for this assessment but does not impact the learner's experience.
Characteristic: Required; this is assessment type (test, paper, oral exam, etc.). The list of assessment characteristics can be modified in Admin > System Settings. Please see details here.
Selecting different assessment characteristics will dynamically open additional fields:
Track Late Submissions: This adds a late submission column that allows you to identify students who have submitted assessments late with a checkmark. This will be visible in the course gradebook.
Track Resubmissions: This adds a resubmission column that allows you to identify the number of times a student had to resubmit an assignment.
Extended Options: This allows you to define the type of questions used in the assessment. This stores information but is not currently used in reporting, nor is it visible to learners.
Marking Scheme: Elentra supports Pass/Fail, Percentage, Numeric, Complete/Incomplete, Grading Scale and Floating Numeric marking schemes.
If you choose Numeric you'll be prompted to ender the maximum points for the assessment (i.e., the denominator in the score). When entering grades you'll enter the numerator in the score.
If you chose Grading Scale as a marking scheme it means users will be able to choose from the grading scale characteristics (e.g., Honors, High Pass, Pass, Fail) to enter grades.
Floating Numeric can be used for numeric grades that do not have a denominator. Note that grades using this marking scheme can only have a weight of 0%.
Pass/Fail and Complete/Incomplete Marking Schemes
If you use the pass/fail or complete/incomplete marking schemes the information stored in the Elentra database about a learner’s grade will be 100 or 0, regardless of what you enter to record the grades. For instance, if you enter that Student A got a 65% and that registers as a P, the database will store a grade of 100 for them.
You can control the threshold of what percentage score counts to register as a pass or complete with the database setting gradebook_passing_grade. (So for example you can make it so that a 50 registers as a P or that a 60 registers as a P. Either way what the database actually stores for a P is a 100.)
To record specific learner percentage grades in the database but represent them as a P or F to learners, you should build a grading scale that can be applied to an assessment for the purposes of displaying grades. That will allow you to record a 65 for a learner, store the 65 in the database and include the 65 in the student’s final grade calculation, but display a P to them in the gradebook.
Grading Scale: Optionally set a grading scale for an assessment. (If you chose Grading Scale as your Marking Scheme make sure to select a Grading Scale!)
Note that if a grading scale was set for the entire course gradebook, that grading scale will be selected by default for newly created assessments. Users can edit the grading scale as needed.
If a grading scale is used, you can control how the learner will view their results (e.g. see grading scale, marking scheme, both). The option to set how learners view their results will be visible if you select "Show this Assessment in Learner Gradebook" further down the page.
The list of grading scales can be configured in Admin > System Settings. Please see more detail here.
Assessment Type: Formative and Summative are the options. Typically, formative assessment is to monitor student learning and provide ongoing feedback, and summative assessment captures overall student learning at the end of an instructional unit. You may wish to check with your institution’s student assessment coordinator or education consultant to clarify how your institution uses these terms. The number of formative and summative assessments in a course is reported by course in the Assessment Summary Report.
Narrative assessment: Check this off if students receive written feedback for this assessment. This information is reported by course in the Assessment Summary Report.
Self-assessment: Optionally check this off if students are assessing themselves. This checkbox collects information and does not give the learner the ability to enter his/her own grade in My Gradebooks.
There is no existing report that displays which assessments are flagged as self-assessments, however a developer might be able to retrieve it from the database if required.
Updated in ME 1.26 to no longer impact the ability of assigned graders to access this assessment to grade.
Show Assessment details to learners in the Gradebook and Course Website
Check this box if you wish to show the assessment to learners in their My Gradebook view (whether or not a grade is entered), AND you want to show this assessment on the course website if you include a Gradebook page (visible to learners, faculty, and staff).
Note that displaying assessments using the above option won't display individual grades associated with them.
Show Grade in the learner's Gradebook
Check this to control if and when to show a grade for the assessment in the learner's My Gradebook view.
Set the appropriate start and finish times. Students will be able to see this assessment grade during the active date range. If you enter grades after the designated start time, students will see their grades immediately when you save your work.
Choose how to display grades to the learner. Optionally select to show them the marking scheme, grading scale, or both.
Note that the green checkmark that displays in the Gradebook overview page shows whether a gradebook assessment is set to be visible in general (i.e., in the learner's gradebook and on the course website if a Gradebook page is in use). It does not currently reflect whether the assessment is set up to display an individual's grade to them.
Linking an event to an assessment in the gradebook allows you to provide data for the AAMC Curriculum Inventory Portal.
Click 'Attach Learning Event'.
Begin to type the learning event name and click on the appropriate event when you see it. You will only be able to pick from events associated with the specific course/program you’re working on. If an event you expected to see is not visible, check that the event is assigned to the course you are in, and that you are working in the correct curriculum period.
Click 'Attach Learning Event'. The event should now display on the Edit Assessment page. When you visit the event page as an admin., you'll see the event type displayed in the event information overview in the top left. You can also link to the assessment from there.
Note that you can only link an assessment to one event.
This allows you to give specific faculty or learners designated as TAs for a course access to view assignments and enter assessment grades for their assigned learners. First add graders to the list, and then assign learners to the graders. Currently, each student can only be assigned to one grader.
Graders will not save unless they have been assigned learners.
To add graders you can import a CSV file or build relationships between users through the user interface.
Import CSV file
From the Edit Assessment page, go to the Assessment Graders section.
Click Import to access a csv template you can complete.
Tip: The csv template download doesn't include learner emails but you can just export the grader list to quickly get the list of emails OR you can export a list of learner names and their email addresses from the Course Enrolment tab.
The csv template includes the following columns:
Learner Email
Grader Email
Name of course group or course list (optional - this is for quality control and does not impact the import nor create grading relationships between all group members that will display in the UI)
Drag and drop or search for the appropriate file.
Click ‘Add.’
If an association between learners and graders has already been made, but no grading has taken place, then an import can rewrite those associations to new associations.
You will see a green success message for successful grader-learner connections. If grades exist and a new grader-learner relationship could not be created, that information will also be presented. Click 'Close.'
Once grader and learner assignments have been made, the available export will show them.
Work through User Interface
Begin to type a grader name into the search field and when matches appear, click on the appropriate name and select Add.
You may add multiple graders to one assessment.
Note that to add a student grader to an assessment and have them successfully access their grading tasks, the student must be listed as a Teaching Assistant on the Course Contact list managed on the course setup tab via Admin > Manage Courses. (The user interface in the gradebook will appear to let you add a student not assigned as a TA to the assessment, but the user won't be able to access the course via My Grading Tasks.)
If you assign multiple graders to an assessment you can distribute learners to the graders randomly or manually. (Note that if you have set an assessment as a group assessment the interface will look slightly different. Please see more details on the Group Assessments page.)
To randomly assign learners to graders click the blue “Randomly Distribute Learners to Graders” button.
To manually assign learners to graders, click the checkbox beside multiple learner names and click 'Assign Selected to Grader'.
In the popup window, click the checkbox beside the appropriate grader name click 'Assign Learner'.
The selected learners should appear beside the grader name in the Grader/Assigned Learners table on the left.
To delete a learner from a graders list, click the red minus icon.
To delete a grader, check off beside the grader name and click the "Remove Selected Graders" button. If a grader you remove had learners assigned to him/her, those learners will automatically return to the Learners list on the right.
Linking a gradebook assessment to an existing portfolio allows course directors, and curriculum and program coordinators to access portfolio entries while in the gradebook. This can be particularly useful if a form is also attached to the assessment and the user can see a portfolio entry and assessment form simultaneously. Linking a portfolio to a gradebook is a setting option that can be turned off if desired.
Please note that at present portfolio artifacts are not available to be viewed by individual graders (i.e., if you've added graders to a gradebook assessment). Portfolio artifacts can only be viewed by users with access to Admin > Manage Courses > Gradebook (e.g., course director, curriculum coordinator).
Additionally, note that there is no integration between portfolio artifacts and gradebook assessment assignments. Attaching a portfolio to an assessment that also has a dropbox created for it will not result in artifacts uploaded by learners also populating the dropbox.
To link a portfolio to an assessment:
Click 'Attach Portfolio'.
If no Portfolios appear for you to select, make sure you are working in the correct curriculum period and that the affiliated cohort has an active Portfolio.
Select the appropriate portfolio and click 'Attach Selected Portfolio'. The name of the portfolio should display underneath the Assessment Portfolio heading.
If you've added a portfolio to a gradebook assessment but aren't seeing anything when attempting to grade it, please confirm that a) there are artifacts uploaded to the portfolio, and b) the artifacts are set to be visible/assessable in the gradebook.
There are additional database system settings that allow an organization to define who can control the visibility of portfolio artifacts in a gradebook. The options include making all artifacts assessable by default, allowing the learner to control which are assessable and allowing the advisor to control which are assessble. All three settings are enabled by default. There is an additional database setting to control whether you can view portfolio comments when accessing the portfolio via a gradebook. This setting is off by default and if you'd like it enabled you should speak to a developer.
To remove a portfolio from an assessment click 'Remove Portfolio'.
Assessment Form allows you to link an existing assessment form to the gradebook assessment. This permits online, electronic grading by faculty. (If you need to create a form navigate to Admin > Assessment and Evaluation > Forms. Please see more detail in the Assessment and Evaluation section.)
If you add a rubric item to a form, please ensure you have made a grouped item (even if it is just one line). A form with just a single rubric attribute attached will not display properly when attached to the gradebook.
Do not use forms that include item types like date selector, numeric answer field, or autocomplete (multiple responses). They will not work. (Even if it seems like the system lets you add a form with these items, and even though an admin. user may be able to complete the form, faculty graders will not be able to use the form via My Grading Tasks.)
When attaching a form to a gradebook assessment it is recommended that you only use forms that rely on multiple choice, dropdown selector, rubric (grouped item only), and free text items.
To provide a form for graders to use in the gradebook:
Click 'Attach Assessment Form'.
Begin to type the form title and options should appear. Click on the form you wish to attach and click 'Attach Assessment Form'.
The assessment form will now appear on the assessment screen.
You must indicate a score for each possible response on a rubric and give a weight for items on the assessment form (a free text item will have no weight). The weights should total 100%. This information is what allows the system to automatically create a grade after the form is complete.
If the database setting gradebook_assignment_show_form_options is enabled you may see the option to define form visibility settings.
Options include: show the learner the graded assessment form only, show the learner the ungraded assessment form only, show the learner the ungraded and graded assessment forms, and never show the learner the assessment form.
Click 'Save'. The form will be attached to the assessment and you'll be directed to the main Grade Assessment page where you can input grades.
To remove an attached assessment form, click the red "Remove Form" button.
You must have permission to access the form you are attempting to attach to a gradebook. To manage form permissions a user with access to the form needs to go to Admin > Assessment and Evaluation > Forms.
Assessment Objectives allows you to map anything in your Curriculum Tags sets to an assessment.
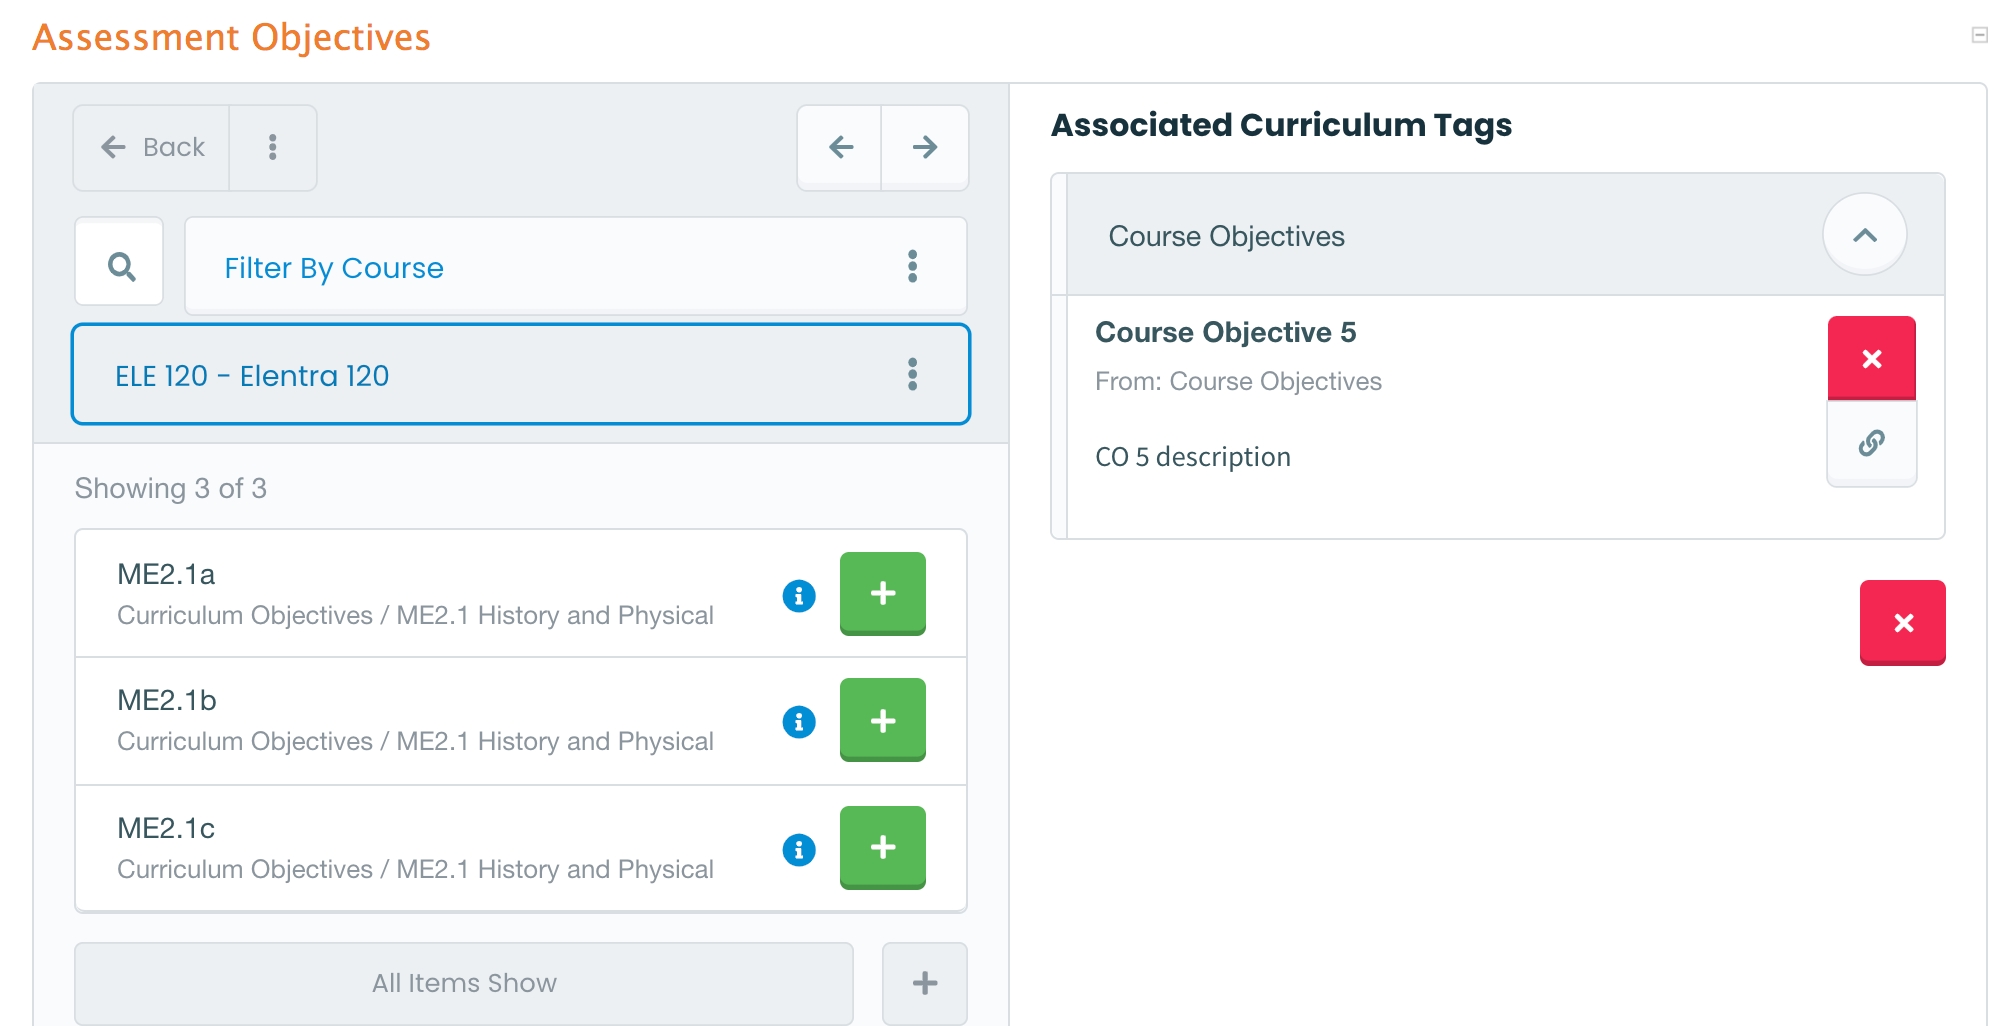
The Curriculum Tag Selector is hidden by default. Click the greyed out Assessment Objectives heading to open it.
The tag selector will be filtered by course by default. Curriculum tags assigned to the course will display for you to select from.
To remove the course filter and access all curriculum tag sets in your organization, click Filter by Course and deselect 'Course'. Click the Filter By button to close the modal.
Click the magnifying glass to search for a specific curriculum tag.
After finding the appropriate curriculum tag, click the green plus sign to assign a curriculum tag to the gradebook assessment.
Selected tags will appear on the right side "Associated Curriculum Tags" list.
To add a context-based link, save the assessment and reopen the edit screen. You'll now be able to assign context-based linkages by clicking the link icon.\
Pick Draft or Publish to indicate whether you want to finalize the assessment or leave it in draft mode. Once published, an assessment can still be edited, however if it is already shown in a learner gradebook, learners may see any changes made.
Click Save.
By default, when you save your work the system will redirect you to the Grade Assessments page where you can input student marks depending on your user permissions. To select a different destination after saving use the dropdown menu immediately to the left of the blue "Save" button.
Elentra users frequently ask about the best options to support assessments in clerkships.
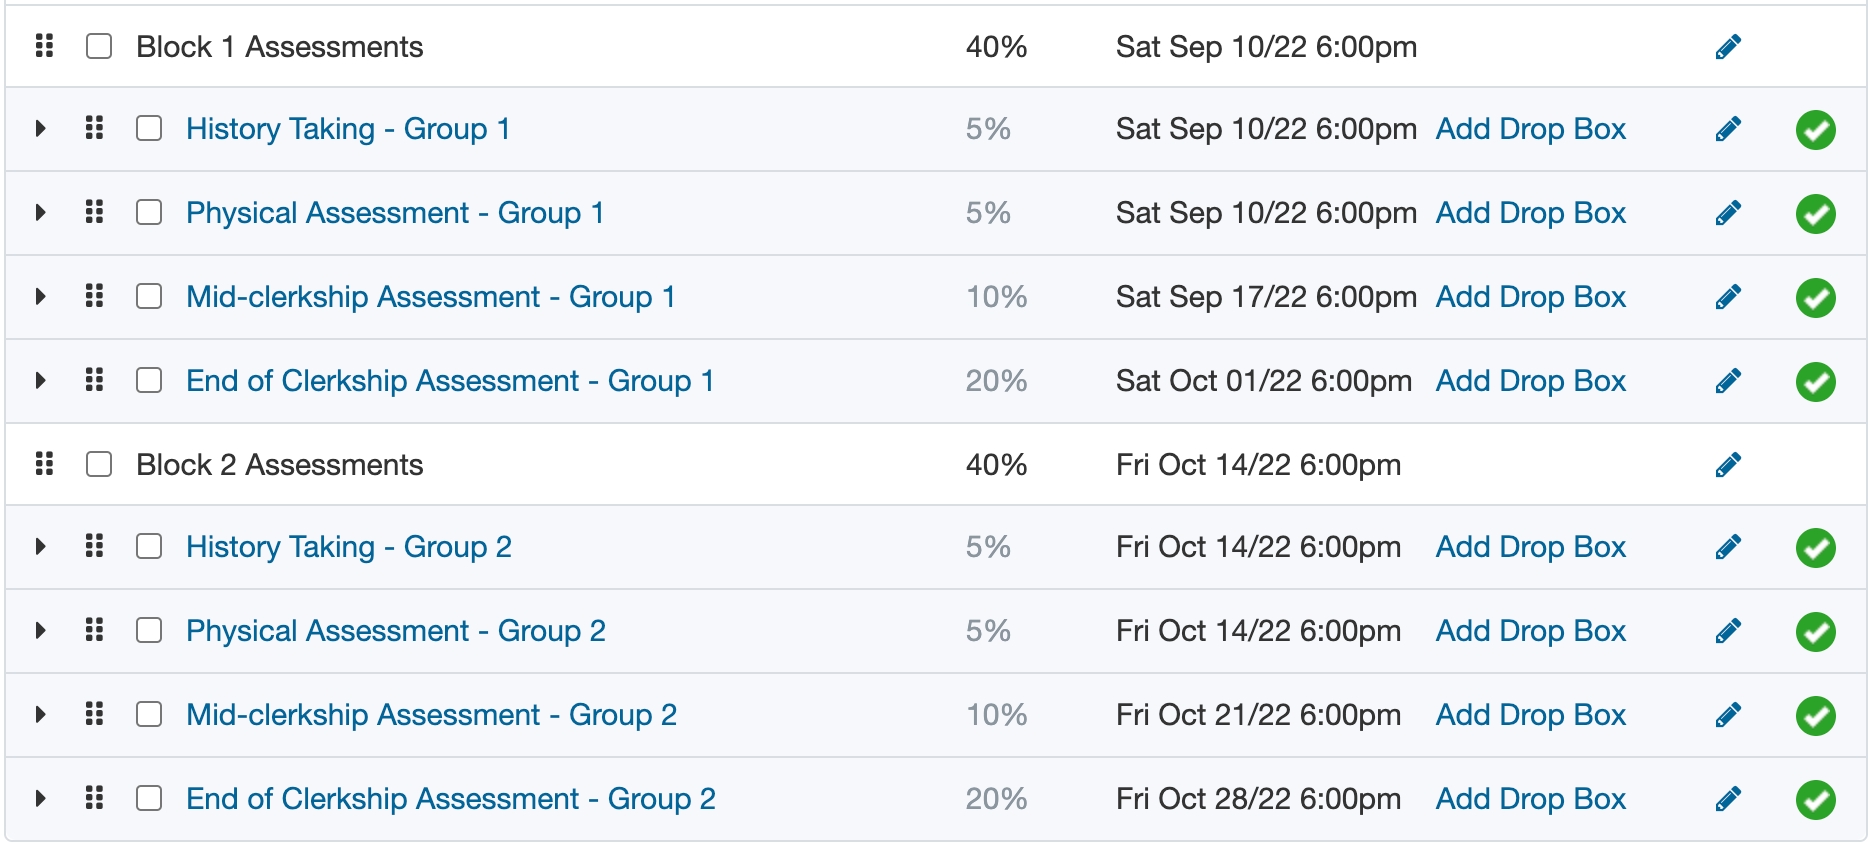
There is no current support in the Elentra Gradebook for assessment due dates to be automated based on a rotation schedule. Instead, if you use a relatively traditional clerkship schedule, consider the following options.
Within a Course Gradebook, build unique assessments per rotation or block
If your clerkship assessments have due dates and you want to track them in Elentra, you can build unique assessments per rotation/block so that the learners in that rotation/block see their due dates. If you take this approach, when you create the assessments you can set the audience to be a specific course group. For each assessment, administrators will just see the learners in that course group which can help with monitoring completion.
You can also use Collections in a Gradebook to organize the assessments per rotation/block for ease of use.
Remember that the Gradebook allows you to copy assessments, so an efficient approach can be to build a list of assessments for one rotation/block and then copy it multiple times, editing the audience and due dates as needed. If multiple clerkships have similar assessment plans you can also copy a list of assessments from one course to another.
Within a Course Gradebook, create one set of assessments for all learners
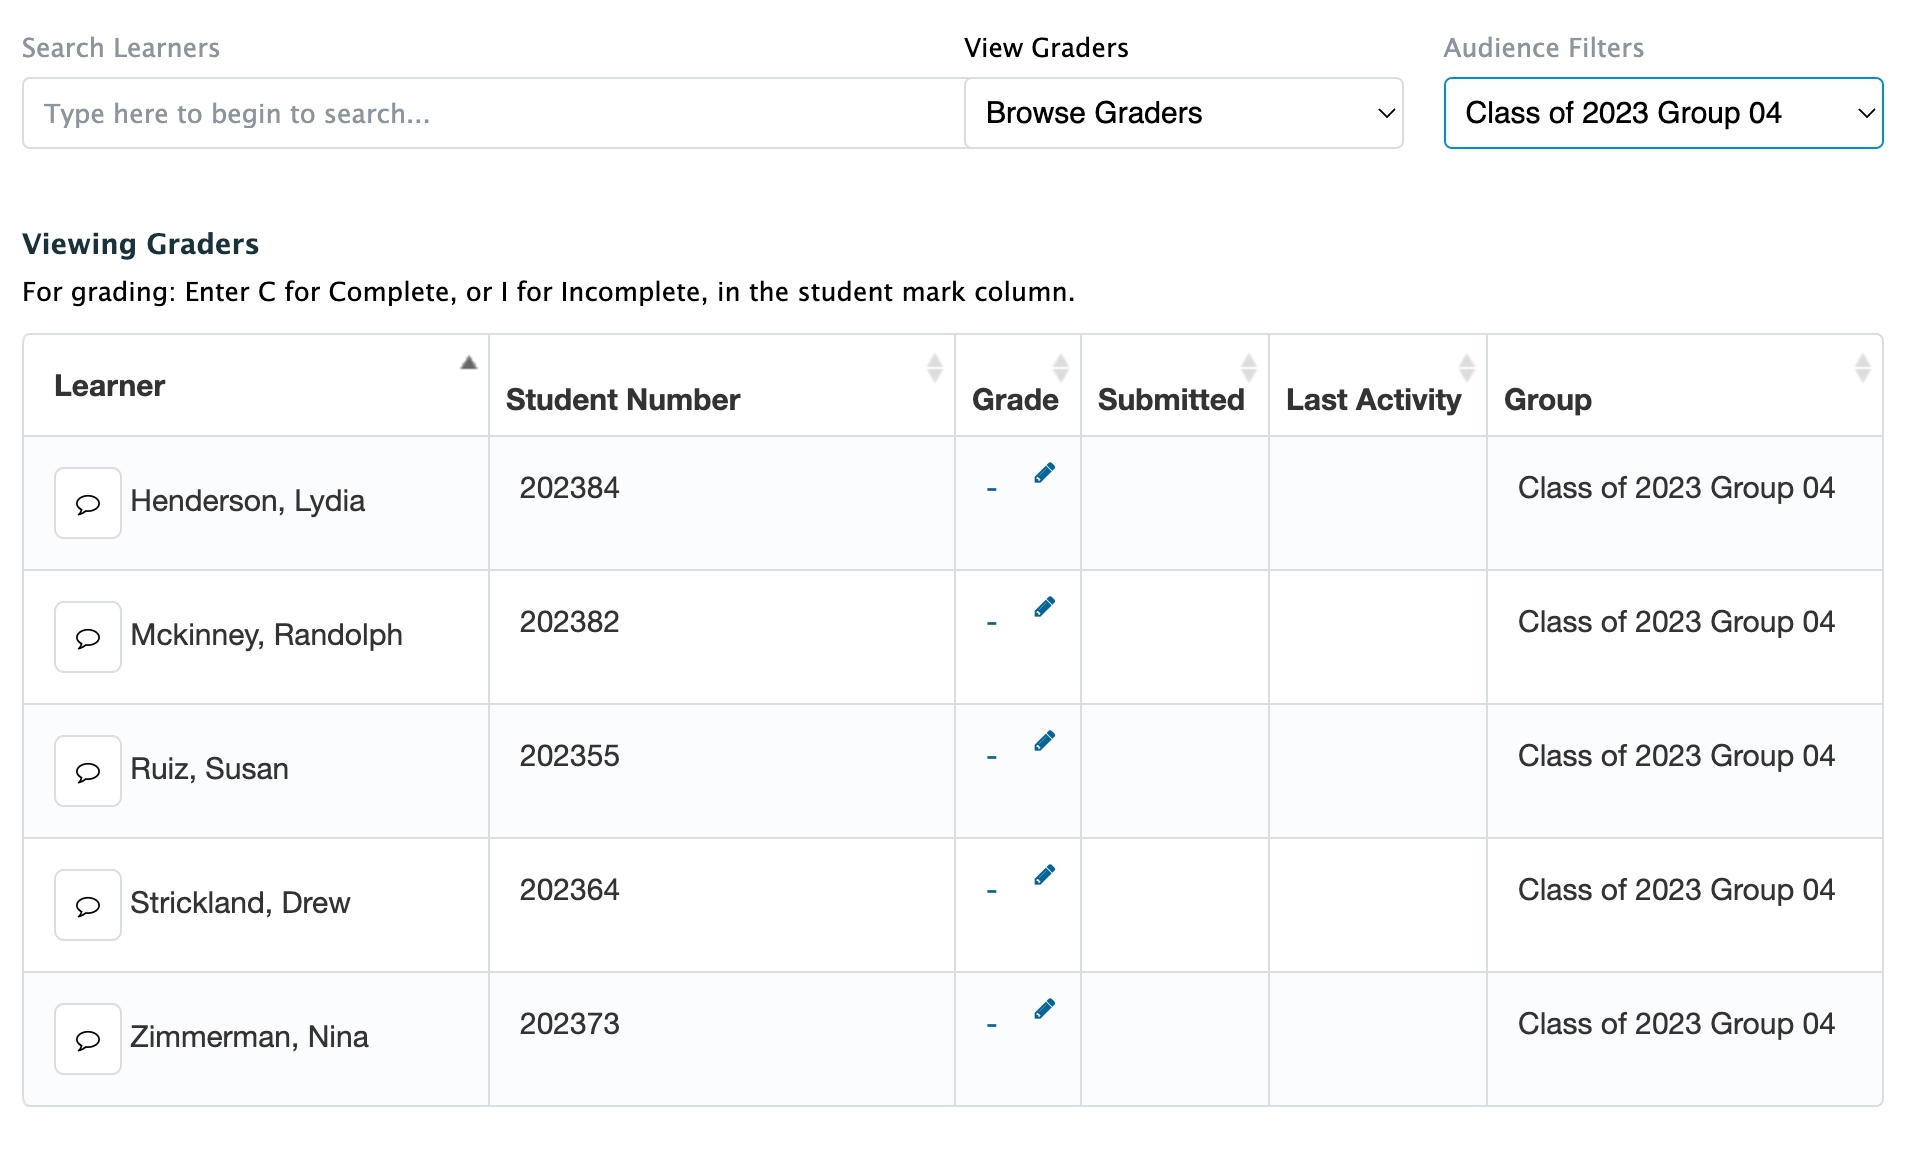
If you have very few clerkship assessments or the assessments don't require due dates that are unique to a rotation/block, you can create assessments that apply to the entire course enrolment and enter the information on a rolling basis. This approach can be a little more tedious when staff are confirming all information for all learners in a specific rotation/block has been entered, so consider adding the assessment audience by adding multiple course groups. Then administrators can filter the grade entry page by course group and more easily see if all learners for a particular rotation/block have their information up-to-date.
When faculty or learners assigned as TAs are set as graders on an assessment, they will have access to the assessment from My Grading Tasks. From there they can view assessments, complete any attached forms, and enter grades.
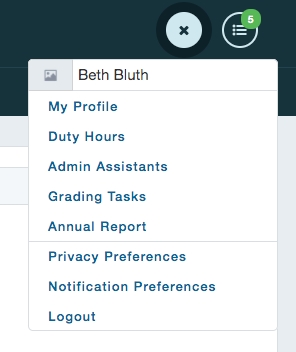
In the top right corner click on the user name to open the personal menu options.
Click 'Grading Tasks'.
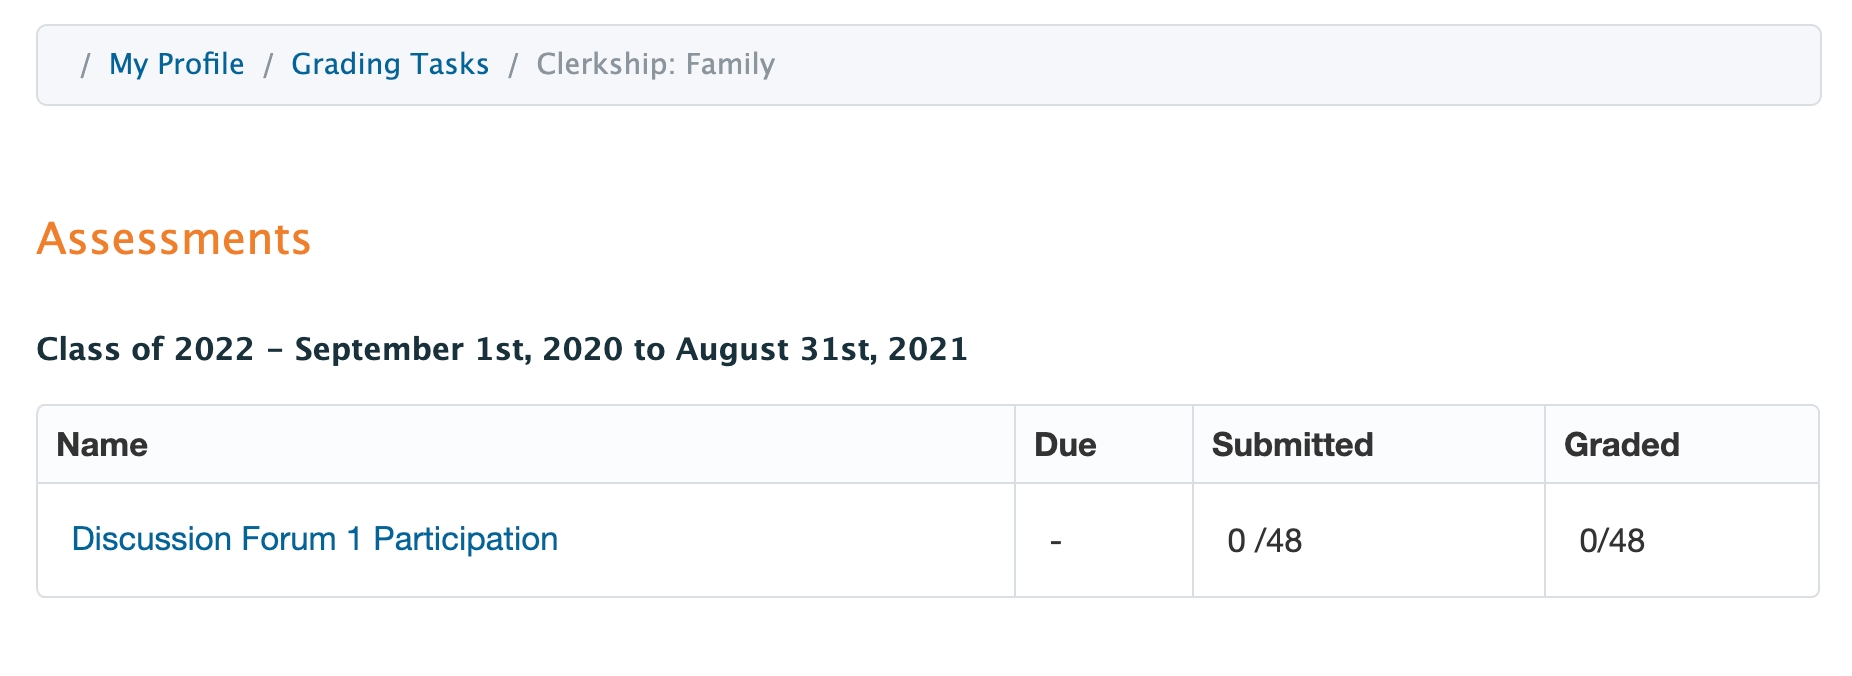
The Grading Tasks page shows any courses in which a user has a grading task.
Click on the appropriate course and to see assessments with grading tasks.
In the Submitted column graders can see how many assignments have been submitted (if the assessment includes a drop box). In the Graded column graders can see their own progress towards completion.
Click on an assessment to see a list of learners and to enter grades.
Click on a cell in the Grade column and enter a grade.
If a form has been attached to an assessment it will open for the grader to view.
If a drop box assignment was included, graders will also be able to view and access it.
If a form created in the Assessment and Evaluation has been attached to a gradebook assessment, graders will see that form when they click on the grade cell for a learner. Graders can complete the form, provide comments as required, and the learner grade will be automatically calculated (form items are weighted and given point totals when they are added to the gradebook).
Please note that custom grades and adjusting point values per form, per learner are not currently supported for users grading outside a course gradebook. Although users will see these options in the user interface, they cannot save a grade if they have customized it.
Additionally, if a custom grade has already been entered via a course gradebook, individual graders will not be able to override that grade.
There is currently no support for assigned graders to view portfolio entries from the public grading page. If a portfolio is attached to a gradebook entries can only be viewed by a staff:admin or course director who has access to the complete course gradebook.
\
Exams created with the Elentra Exam module can also be attached to a gradebook entry so that when the exam is graded the grade automatically forwards to the gradebook. Attaching an exam to a gradebook assessment can be completed from an exam post or from a gradebook assessment (assuming a post already exists). For additional details on completing this process please see .
Please note that the Elentra Quizzes module is no longer supported. Use the Exams module to create quizzes.
A quiz created through the Elentra Quizzes module questions can be automatically graded, however a user must still import those automatically calculated grades into the course gradebook.
Navigate to Admin > Manage Courses.
Search for a course as needed.
Click the cog icon to the right of the course name and select Gradebook.
Ensure you are in the correct curriculum period and adjust using the period selector in the top right if needed. (The current curriculum period will display by default.)
Click an assessment name.
Click the Import/Export button and select Import grades from attached quiz.
Indicate how you'd like to apply grades (e.g. first attempt, best attempt).
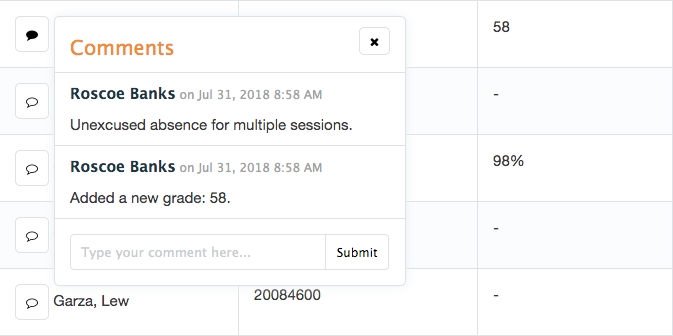
Course Gradebooks support commenting for staff and course directors with full access to a course gradebook. This tool can be used to record notes and also automatically records the date and time that grades were entered or changed. Grades entered directly from the main grade assessments page or by a faculty grader, or those that are automatically recorded based on a quiz, exam, or attached Assessment and Evaluation form will automatically have the date and time of entry recorded.
Access the comments from the speech bubble beside a learner name. A filled in bubble indicates that there is a manually entered comment.
Click on the bubble to view existing records. Type a comment and click 'Submit'. To close the window click the 'x' in the top right.
\
To have graders grade a Course Discussion Forum via a Gradebook assessment, you must have the following in place:
Your Course Website must be associated with a Curriculum Period.
Your Course Website must have a Discussions page type containing at least one Forum.
The gradebook assessment must be linked to a discussion forum.
You can optionally assign graders (if no graders are assigned to the assessment, only the course director or course staff will be able to enter grades).
Upon logging in to Elentra, graders can access their Grading Tasks via the profile icon in the upper right-hand corner of the screen.
They will be directed to a list of any courses that contain assessments that they have been assigned to grade.
Clicking on the title of a course will direct them to the a listing of the assessments associated with that course that they have been assigned to grade
If submissions were required, they will see a total number of submitted assessments out the the total number expected.
They will see a calculation of the number of assessments they have graded out of the total number expected.
Clicking on the name of an assessment will direct them to the a listing of the learners they have been assigned to grade.
To begin grading, click on a cell in the Grade column.
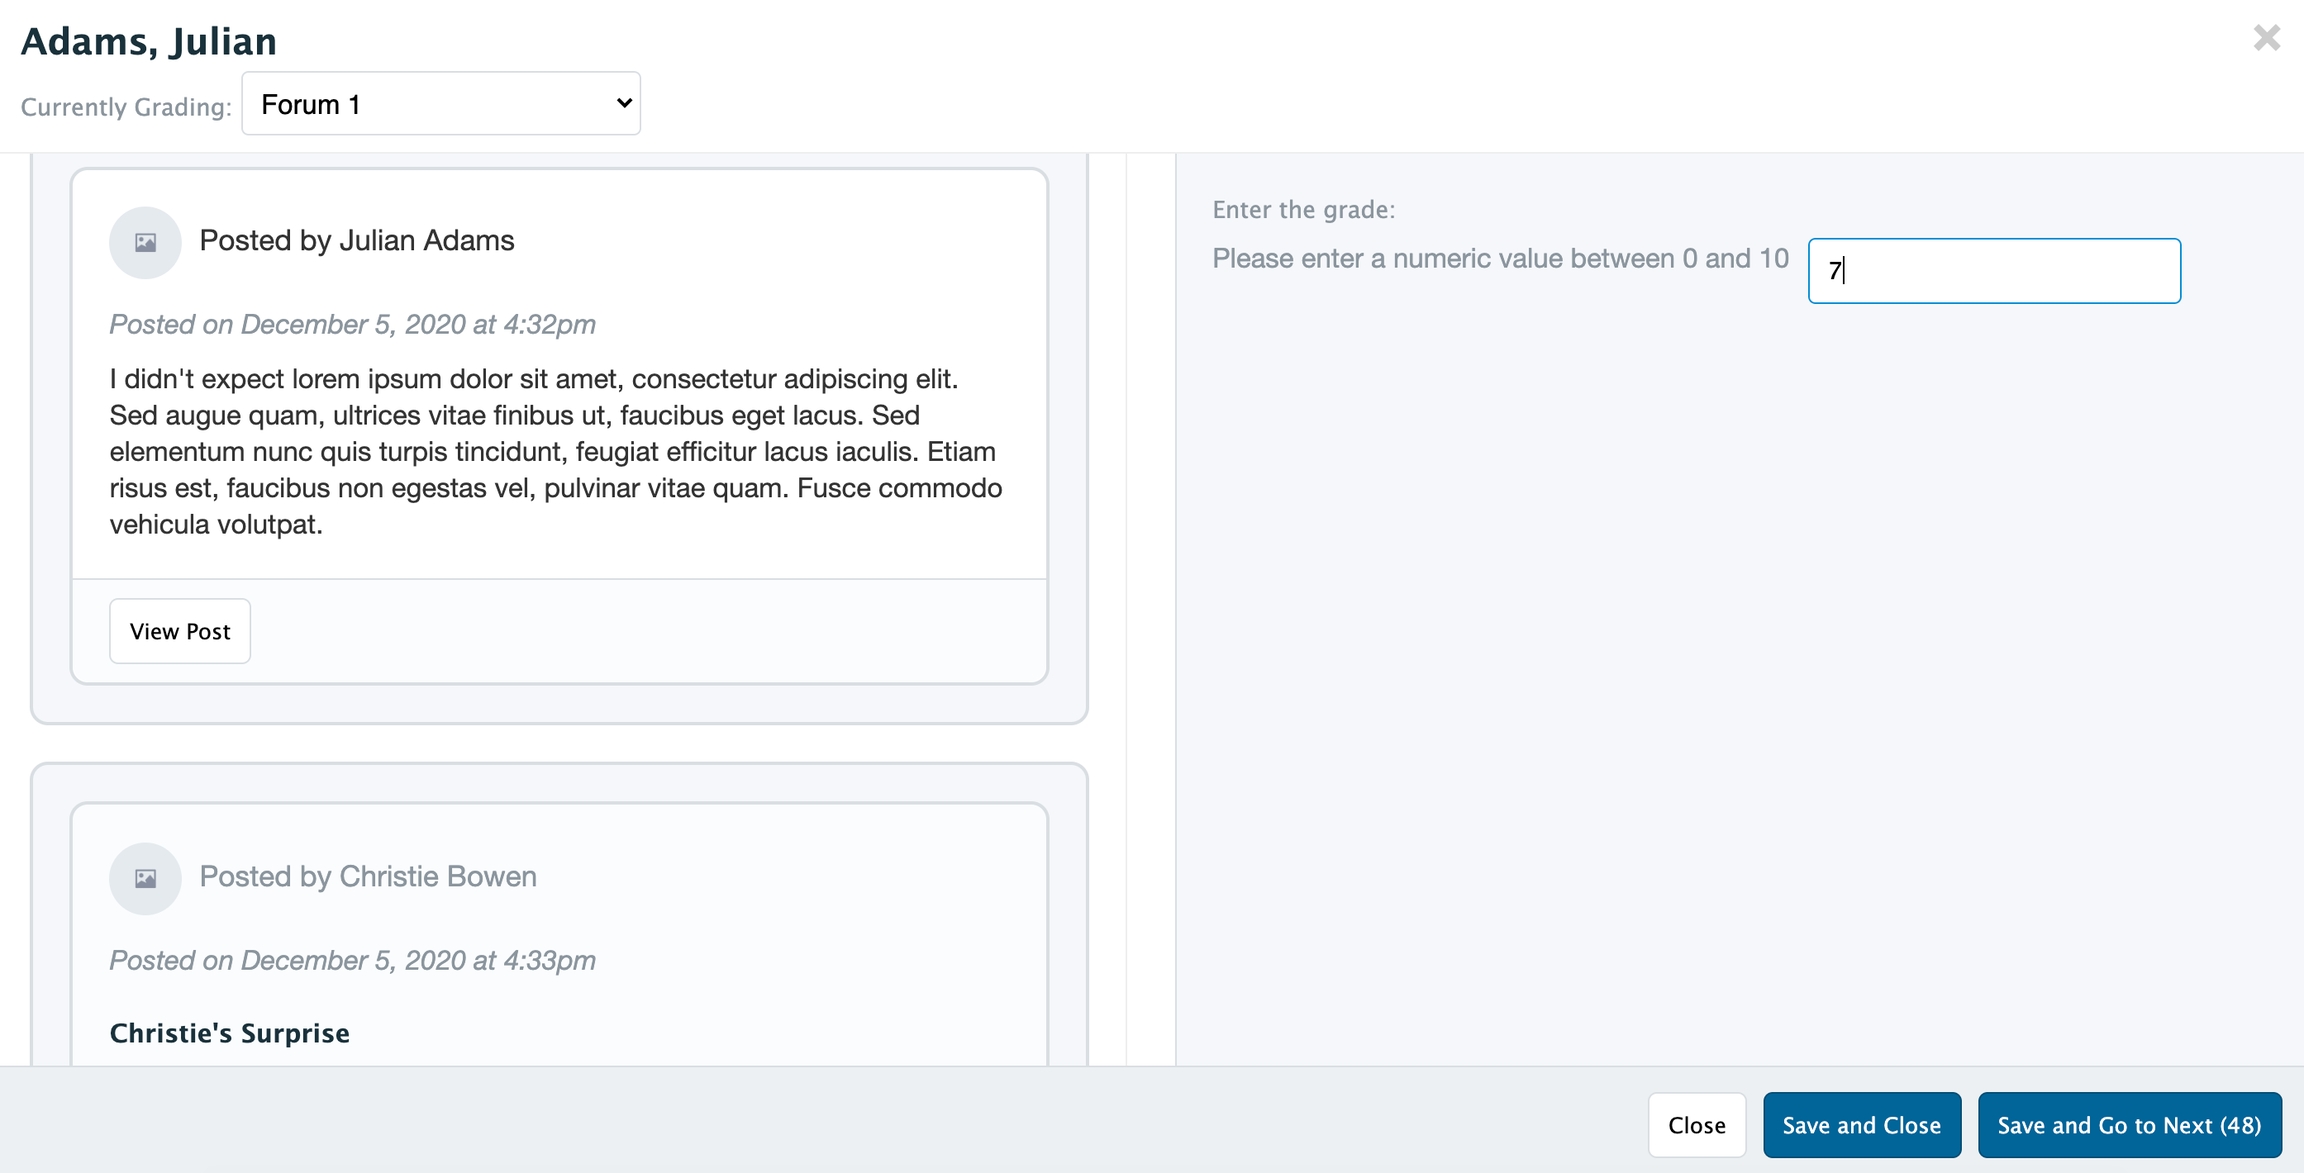
The grader can click on the drop down menu in the upper right column to navigate between forums, if more than one is associated with the assessment, and to navigate between a forum(s) and a learner's submitted assignment, if a dropbox has been associated with the assessment.
When grading a forum, the grader will see the learner's topic post and any replies the learner has made to other learners' topic posts in the selected forum on the left-hand side of their browser.
They can use the View Post button to navigate directly to the learner's post in the Discussion Forum. The discussion page will open in a separate tab.
On the right-hand side of the browser, the grader will see an area for them to enter a grade or, if an assessment form was attached to the assessment, they will be able to use the assessment form to grade the learner's posts, replies, and dropbox submissions as needed.
For further instructions on linking an existing quiz to a gradebook assessment, please see .
This feature is designed to allow administrative staff to provide documents to learners. Unlike the 'handback response' feature for a dropbox assignment, with document delivery the learner does not have to submit a file in order to receive something back.
At present you must individually upload documents for learners.
This feature is controlled by a database setting (gradebook_assessment_document_delivery_enabled) and is disabled by default. To enable it for your organization, speak to a developer.
Navigate to Admin > Manage Courses.
Search for the course you want to work with and from the cog icon on the right, select 'Gradebook'.
On the lower half of the screen, look for Document Delivery and click 'Add New Folder'.
Provide a folder name and set the access start and end date as needed.
Click 'Save'.
The newly created folder will display on the screen.
To edit a folder, click on the pencil icon to the right of the folder name.
Once a folder has been created you can upload documents for learners.
Navigate to the graebook for a course.
Click on a folder name in the Document Delivery section.
You will see a list of all learners for the applicable cperiod.
Click the 'Add Document' button beside a learner's name to add a document.
You will be prompted to select a file from your computer.
After you have uploaded the document, the filename will display on the screen along with the date and time it was uploaded.
Note that you can upload more than one document per learner.
Supported documents include PDFs, .doc and.jpeg files.
To delete a document click the garbage icon beside the file name.
Navigate to My Gradebook.
Click on a course title.
Learners will see a Document Folder section, and beneath that the names of any folders created for that course.
Within each collapsible folder, learners can view the documents available to them. (In the image above, the second two folders are collapsed.)
Click on a file name to access the file. The icon to the right of the file shows the file type.
Please note that if a folder has no document uploaded for a learner, the folder will not display to the learner.
The Elentra database does not currently store an infinite number of decimal places per gradebook assessment and use those infinite numbers in gradebook calculations. Instead Elentra rounds each percentage stored per assessment (i.e., 11/17 is stored as 64.706%). Elentra then uses those rounded percentages when it calculates weighted totals (and rounds the weighted total).
Similarly, weights are also stored as floating point values (gradebook assessment weights, form weights, collection weights for example). This can also lead to a loss in precision.
The Elentra database can also store more digits than are necessarily configured to display to learners when they view their assessment results. These multiple factors can sometimes lead to confusion if learners try to calculate their own final grade and find a discrepancy between their calculations and what's displayed in Elentra. Organizations might consider including a boilerplate statement explaining this to learners on their course websites (or in other policy documents).
Assessment grade table information is stored as a float - a float gives you a lot of precision, but in the context of the databases we use, there is a limit to the number of decimal places that are stored.
Consortium schools can adjust theGRADEBOOK_GRADE_PRECISION constant to configure how many decimals are used, but the maximum Elentra supports is 4.
The GRADEBOOK_GRADE_PRECISION constant is used to determine decimal places for assessment grades and weights. For instance:
1round($weighted_total, GRADEBOOK_GRADE_PRECISION) inwww-root/core/modules/admin/gradebook/api-edit.inc.php:3101number_format($output, GRADEBOOK_GRADE_PRECISION)
www-root/core/library/Entrada/gradebook/handlers.inc.php:821Number(weight.toFixed(GRADEBOOK_GRADE_PRECISION))
www-root/javascript/gradebook/view.js:835
Currently we are aware of one place where the precision constant is not used: www-root/core/library/Entrada/LearnerExplorer.php:147 assumes decimal precision is 2.
Elentra offers users a variety of ways to view and extract information about gradebook assessments and overall course grades. From viewing learner results to examining the use of curriculum tags applied to gradebook assessments, Elentra's tools and reports can help faculty make important decisions about student progress and their school wide assessment plan.
A database setting (gradebook_include_ungraded_assessments) introduced in Elentra ME 1.21 controls whether the administrator view of a gradebook ignores unentered grades or counts them as zero. Please speak to a developer to adjust the setting as per your needs.
With gradebook_include_ungraded_assessments set to 1, Elentra will treat all unentered grades as being zeroes for the purposes of calculating the learners' collection averages and final grades. This means that the gradebook spreadsheet will show different grades than what a learner sees in their My Gradebook overview. In the My Gradebook view for learners, unentered grades are ignored (this helps to prevent a situation where learners always start the year with an empty gradebook and 0%).
With gradebook_include_ungraded_assessments set to 0, Elentra will ignore unentered grades. Collection averages will adjust to show this. Learners with unentered grades will have a reduced gradebook weight total (i.e., less than 100%) unless you adjust other assessments. The gradebook spreadsheet will show the same grade as what a learner sees in their My Gradebook overview.
Navigate to Admin > Manage Courses and search for a course if needed.
Click the menu cog to the right of the course title and select Gradebook.
Adjust the curriculum period if needed. Using the period selector in the top right.
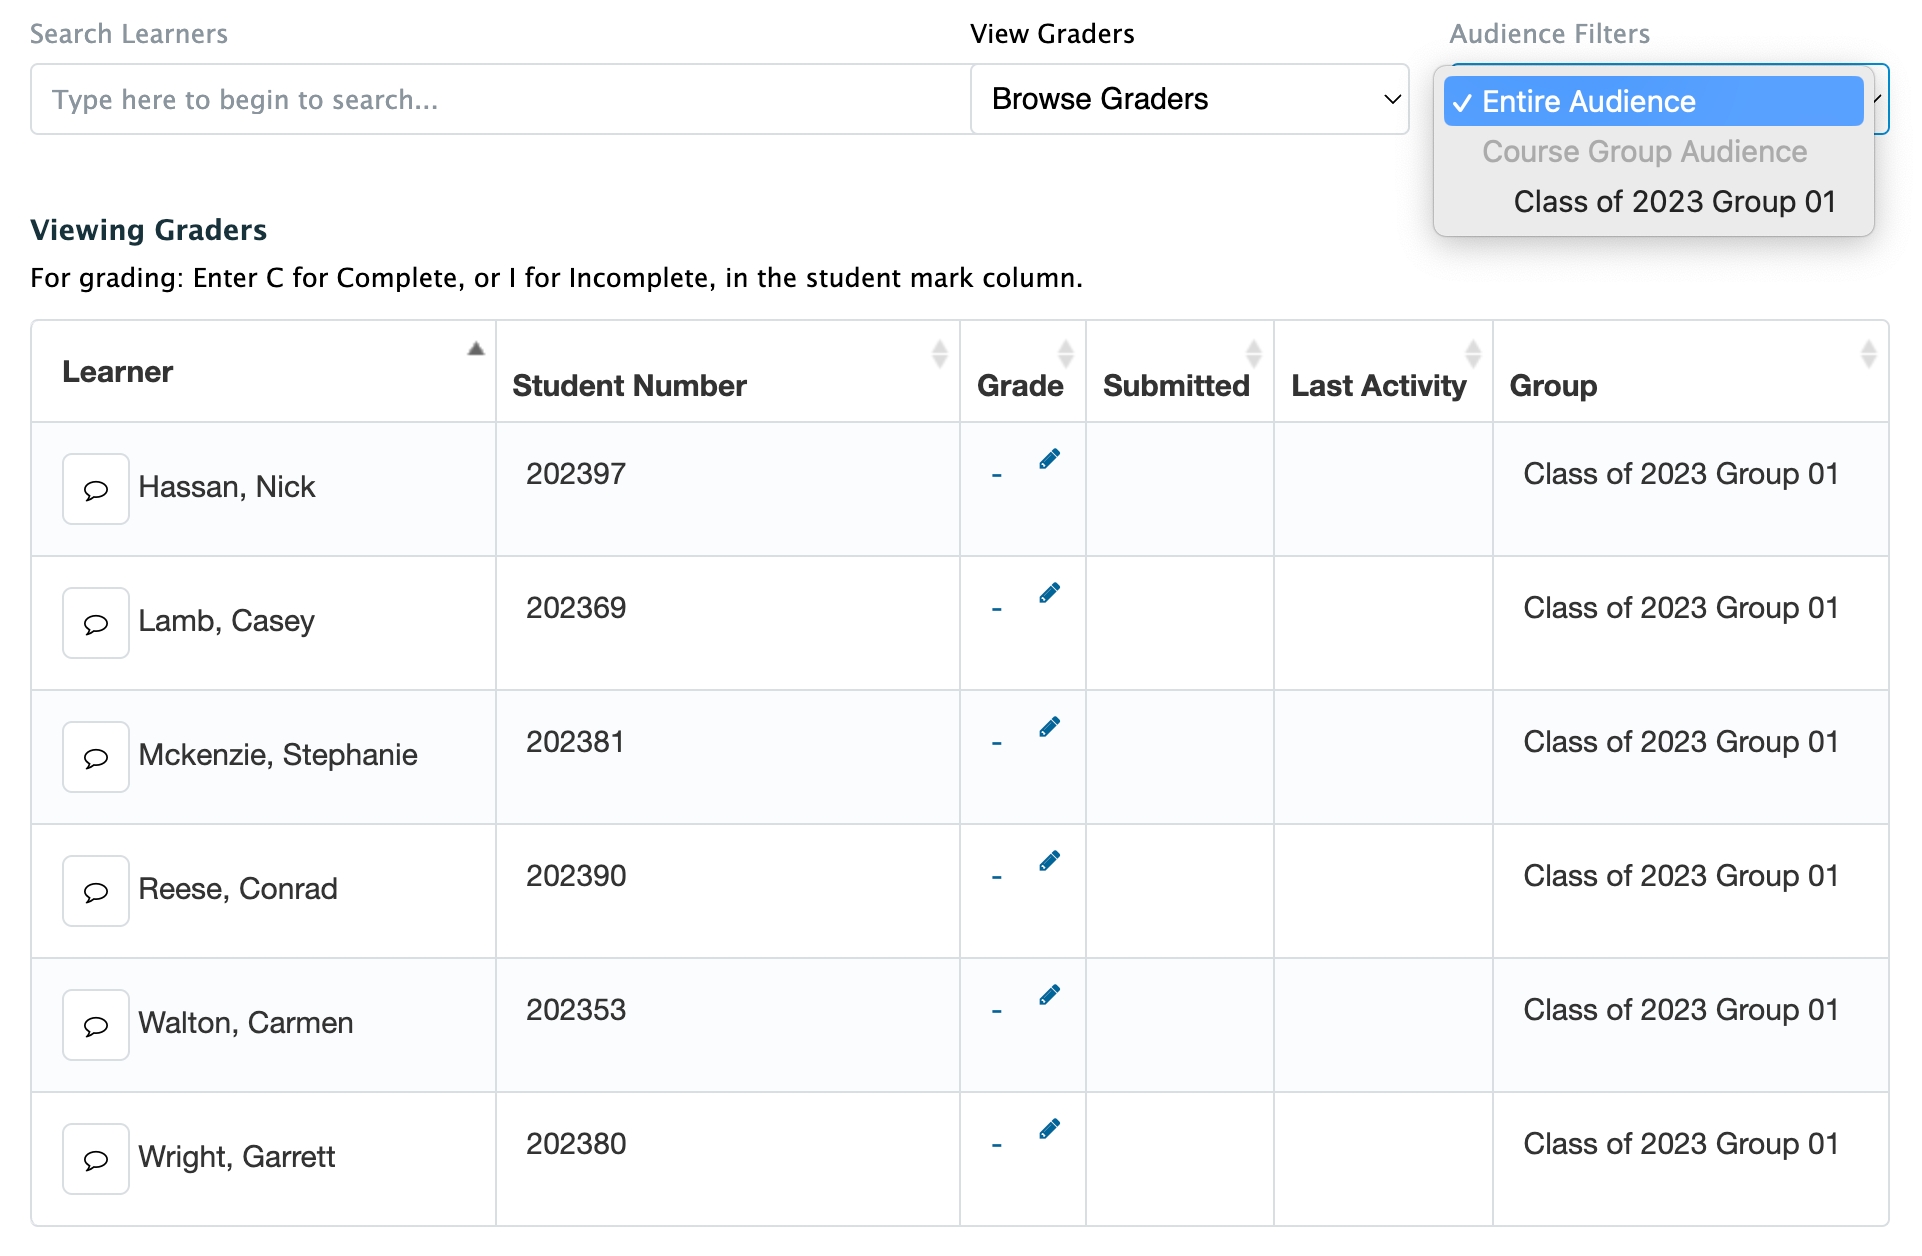
Click on the title of an assessment to access the grading page and view the assessment statistics and individual learner grades for that assessment.
Import or export grades as needed.
Filter your view by assigned grader or assessment audience (e.g. a specific course group).
Edit the assessment or view its existing settings from the Edit Assessment button in the top right.
Note that if learners submitted assignments through a drop box, the submitted column will show whether the submission has been made. Red text indicates a submission was made after the due date.
Whether the grades viewed in the Grade Spreadsheet match the learner view of their gradebook will depend on whether you have the database setting gradebook_include_ungraded_assessments enabled or not. See above for more details.
Navigate to Admin > Manage Courses.
Search for a course as needed.
Click the cog icon to the right of the course name and select Gradebook.
Ensure you are in the correct curriculum period and adjust using the period selector in the top right if needed. (The current curriculum period will display by default.)
Click 'Grade Spreadsheet' at the bottom right of the page. The grade spreadsheet can take some time to load if you have many assessments. Please be patient.
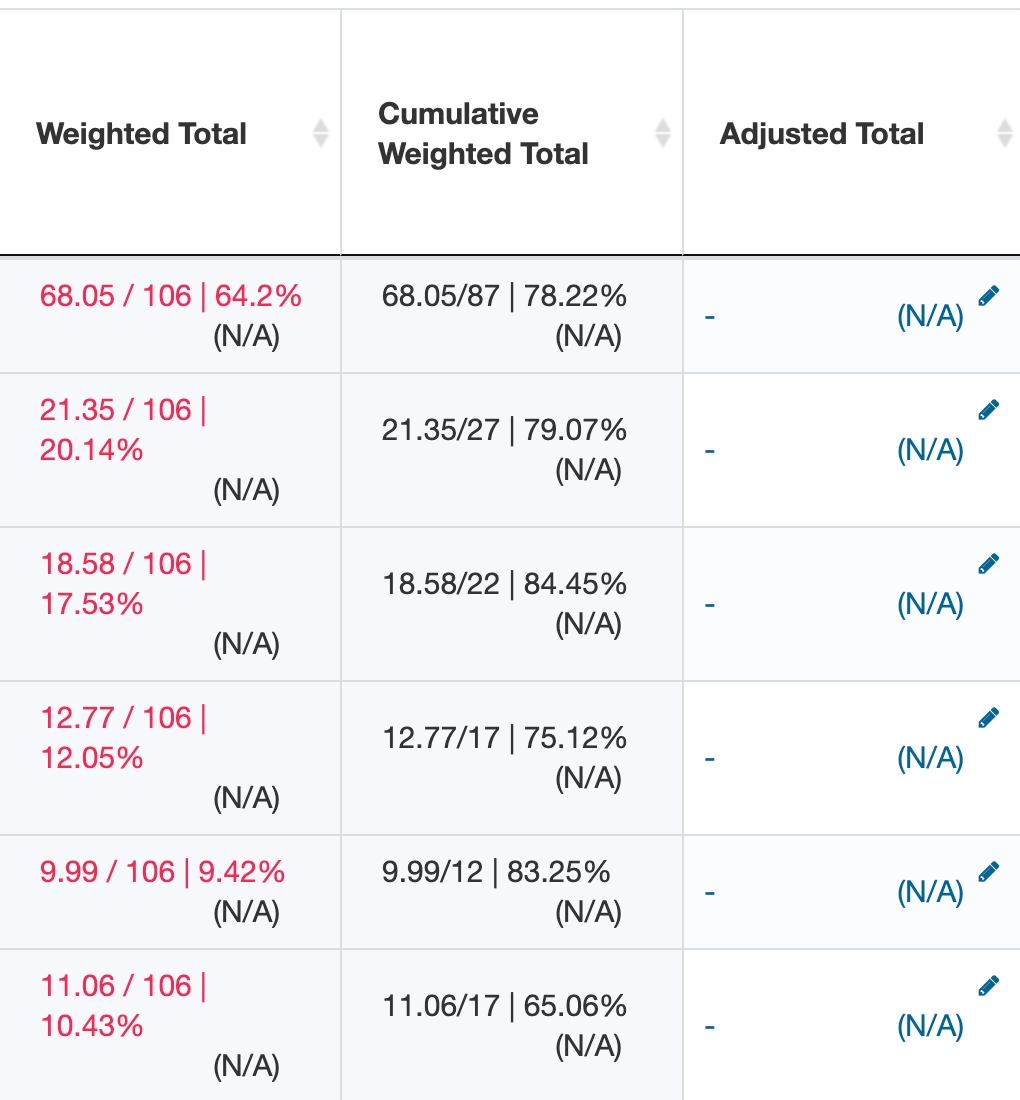
You will see a list of a learners, their institutional id number, each assessment, any existing collections, weighted total (weight of all assessments per learner), cumulative weighted total (all assessments per learner adjusted to 100%), and optionally an adjusted total (a manually updated course grade entered by gradebook administrators).
Most column headers can be clicked on to reorder the display from ascending to descending.
If a learner has a custom weight applied to an assessment, you'll see a red exclamation mark in the cell to alert you to the custom weighting.
If a learner is not part of the audience for an assessment, you'll see that the cell is greyed out and shows N/A.
For any column with results, if a marking scheme and grading scale were set both will be displayed to the user.
Numbers in the Weighted Total column will display in red if the total gradebook weight for a learner is different than 100%.
You can adjust grades from this screen by typing in revised scores.
Please note that although the individual mark and grade will update immediately, to update the entire row (and therefore recalculate the weighted total) you must click 'Refresh' in the top right.
Limit the view to one student by typing their name into the search bar in the top right. This can be useful in learner conferences or when reporting to committees.
Optionally export a CSV from this view.
Click 'Close' in the top right to close the window and return to the Gradebook Assessments list.
A database setting allows you to optionally include username and email in gradebook csv exports (gradebook_assessment_csv_include_username, gradebook_assessment_csv_include_email).
Navigate to Admin > Manage Courses.
Search for a course as needed.
Click the cog icon to the right of the course name and select Gradebook.
Ensure you are in the correct curriculum period and adjust using the period selector in the top right if needed. (The current curriculum period will display by default.)
Click 'Export Grades' at the bottom right of the page.
A CSV file will automatically download or you will be prompted to store the file on your computer.
The file will be titled with the current date, the course code, curriculum period id and suffix 'gradebook' (e.g., 2020-04-25_ELE_LRN_cperiod_12_gradebook)
Navigate to Admin > System Reports.
Scroll down to the Assessment Reports section and click on 'Assessment Summary Report'.
Select the appropriate cohort from the dropdown menu.
Add courses by clicking 'Show List', clicking on a course title, and clicking 'Add'. Remove unwanted courses by clicking on the course title and clicking 'Remove'.
Click 'Create Report'.
The results will display on the screen.
Navigate to Admin > System Reports.
Scroll down to the Assessment Reports section and click on 'Assessment Objective Summary'.
Select the appropriate cohort from the dropdown menu.
Add courses by clicking 'Show List', clicking on a course title, and clicking 'Add'. Remove unwanted courses by clicking on the course title and clicking 'Remove'.
Click 'Create Report'.
The results will display on the screen.
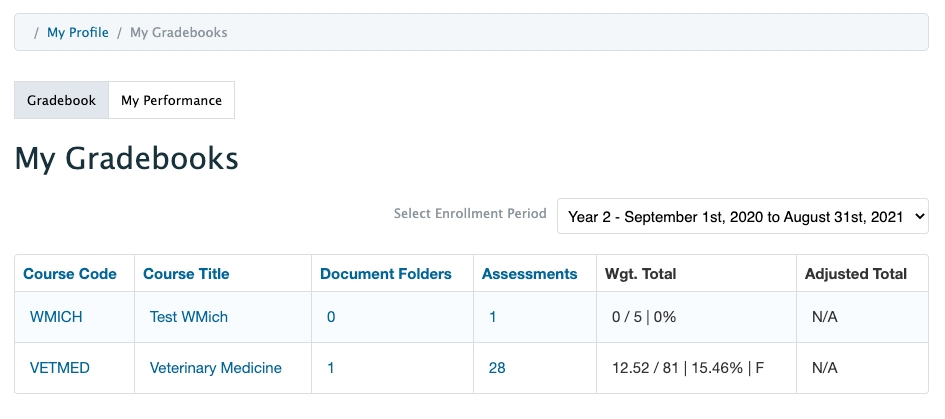
Learners can view their gradebooks by clicking on the user icon in the top right and selecting Gradebooks.
Use the enrolment period selector as needed to filter the gradebooks displayed.
The My Gradebooks page lists a learner's courses and displays the total number of assessments in a course gradebook, as well as their current grade for a course based on all grades entered so far. If document sharing or adjusted final grades are enabled for an organization, learners will also see columns showing that information.
Because administrators can configure whether or not gradebook assessments show to learners in their gradebooks (with or without grades entered), learners may see a higher assessments number on the gradebook overview page than they see when they access a detailed list of assessments per course.
The learner's weighted total as shown on the My Gradebooks page will ignores blank entries in the gradebook (e.g., any currently ungraded assessment) and will show the weighted total based on all assessments for which there is an entered grade.
The learner's Adjusted Total will only display if the database setting gradebook_adjusted_grades_enabled is in use. If it is, administrative users of the gradebook can enter an adjusted grade. This might reflect a student's completion of a professionalism requirement or something similar. Learners will see their adjusted total as a percentage and optionally as a grading scale, as long as the course gradebook has a grading scale defined.
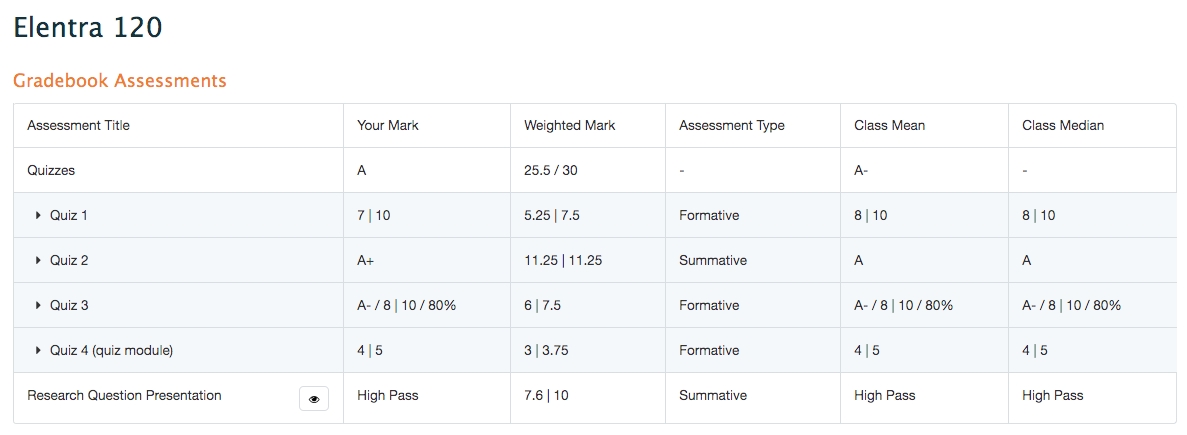
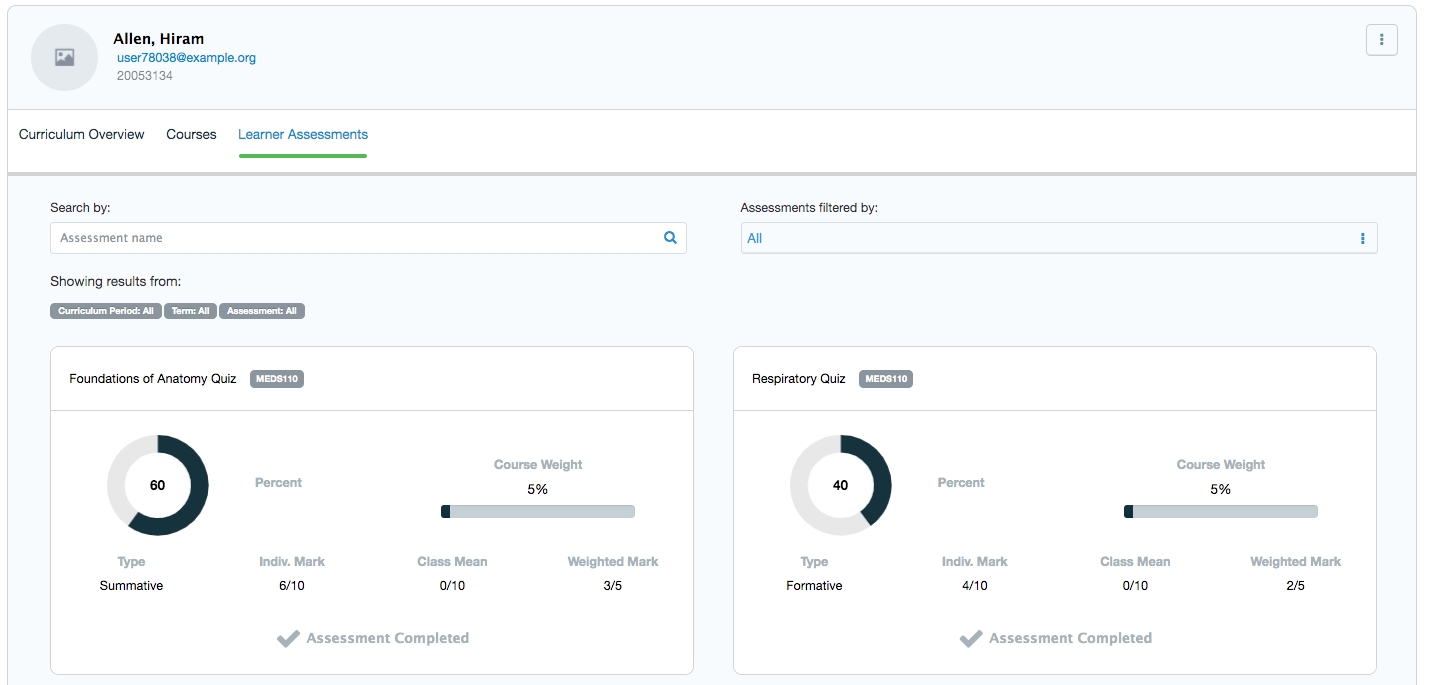
Learners can click on a course title to see a list of the assessments included in that course gradebook. Learners will see:
the assessment title (sorted by collection if applicable),
their mark (shown as marking scheme, grading scale or percentage depending on how the assessment was set up),
weighted mark,
assessment type (i.e., formative or summative), and,
the class mean and median (note that these can be hidden by making a change in the code).
If there is an assessment form attached to an assessment, learners will see an eye icon beside the assessment name. Learners can click on the eye icon to open the attached form and view any feedback provided to them (whether learners can see the form before it is completed or after or both will depend on the gradebook assessment settings).
Note in the example above that the mark is being displayed in a variety of ways. Quiz 1 shows the marking scheme (numeric), Quiz 2 shows the grading scale (letter grade), and Quiz 3 shows grading scale, marking scheme and percentage. Course administrators control how the marks are shown to learners when they build the gradebook assessments.
You can control whether leaners see the Class Mean and Class Median in their gradebooks using a database configuration. You will need developer assistance to change this.
Developers see "GRADEBOOK_DISPLAY_MEAN_GRADE""GRADEBOOK_DISPLAY_MEDIAN_GRADE" in the settings.inc.php file.
If the Learner Explorer is enabled for your organization, learners will see their Learner Explorer under the My Performance Tab on the My Gradebooks page.
Clicking on the My Performance tab will direct learners to the Learner Explorer. Elentra’s Learner Explorer allows learners to explore their progress throughout the curriculum based on the grades recorded and released in your course Gradebooks. (Note: tasks completed through the Assessment & Evaluation feature are not currently displayed in the Learner Explorer.)
The Curriculum Overview, Courses, and Learner Assessment tabs allow learners to view assessment data and see their progression through the program, their current grades in each course, and their grades on individual assessments as they are completed in each course.
For more details about each tab, please see here.
Learners can view their assignments (i.e., gradebook assessments that require a document to be submitted via a drop box) by clicking the user icon in the top right and selecting 'Assignments'.
Learners will see any assignments set to display for learners and will see their corresponding course and a due date if one has been created.
If an assignment has been graded using a form attached to the gradebook assessment learners will see an eye icon. They can click on the eye icon to view the completed form and any feedback provided to them by a grader.
Learners can also optionally filter their list of assignments to view those that apply to a specific course or curriculum period. Additionally, they can use the checkbox option to only see outstanding assignments.
To filter by Curriculum Period, click on the box and select an option from the dropdown menu.
To filter by Course, click on a course title. Use your keyboard and mouse to select multiple courses if needed.
Click Apply Filters after making your selections.
Once filters are applied the Filter button will show the number of filters in use.
Click on the Filter button to adjust filters or clear existing filters.
Note that the column headers (e.g., Due Date, Submitted) in the My Assignments table are clickable so that you can easily reverse the display order.
If learners are in the audience for a group assessment with a shared grade, they can view any feedback on a completed assessment and evaluation form attached to the assessment, regardless of which account the grader left the feedback on.
If the assessment has an associated drop box, learners will be able to see which group member uploaded something, and any comments left by the grader or other group members.
Any group members who did not submit a file will be able to see the file their peer submitted and the file the grader handed back (if applicable).
In the image below the logged in learner can see the file uploaded by their group member (Jane), the file handed back by the grader, the completed assessment form, and drop box comments (from grader and Nina). (In real practice you likely want to recommend one place for graders to provide narrative feedback; either an attached assessment form OR the assignment comment option.)
Elentra’s Learner Explorer allows faculty and staff users to explore a learner’s progress through courses based on the grades recorded in Course Gradebooks. (Please note that tasks completed through the Assessment and Evaluation module are not currently displayed in the Learner Explorer.)
Course Directors and Curricular/Program Coordinators can access the Learner Explorer for those learners who are enrolled in their courses. Faculty assigned as tutors to Course Groups can access the Learner Explorer only for learners with whom they have been associated.
The Curriculum Overview, Courses, and Learner Assessment tabs allow you to view assessment data for a learner to see their overall progress, their current grades in each course, and their grades on individual assessments as they are completed in each course.
The Learner Explorer is an optional tool in Elentra and can be turned on or off for an organization in the database. If you'd like to use Learner Explorer, please confirm with a developer that it is enabled for your organization.
Either click on the user icon in the upper right-hand corner of the screen and then click on the My Learners tab OR click on the Assessment and Evaluation icon in the top right and then click the My Learners tab under the Assessment and Evaluation heading.
First, select the current Curriculum Period (and course, if you are associated with more than one) from the curriculum period selector on the right-hand side of the page. This is will allow you to see only those learners whose data you have access to for that particular time frame.
Click on the hamburger icon on a learner's card and select Learner Explorer.
You will land on the Curriculum Overview tab.
Below the Learner Explorer heading, you can filter the results by curriculum period or search for a specific learner. You can use the Previous Learner and Next Learner buttons to move from one learner's Explorer to the next.
These components will persist as you click through the Curriculum Overview, Courses, and Learner Assessments tabs for each learner.
Use the hamburger icon on the learner's card to switch to the learner's CBME Dashboard or Assessments tabs.
The Curriculum Overview tab allows you to view the learner's progress across the program by viewing their current average grade across all courses in each Term of the curriculum.
Clicking on the View Courses button on each Term will direct you to a listing of all courses filtered by the Term in which they took place, so that you can view the learner’s grades for each course. From there, you can drill down to view their grades on each assessment within a particular course.
The Courses tab displays the learner's current grades in courses.
Use the Search Courses field to search for a specific course and the Courses filtered by dropdown menu to filter the courses by Curriculum Layout (e.g., Term).
Clicking on the View Assessments button on a course card will direct you to a listing of all of the assessments associated with the course, so that you can view the learner’s grades for each assessment associated that course.
The Learner Assessments tab displays the learner's current grade on all assessments stored in the Course Gradebook.
Use the Search by field to search for a specific assessment and the Assessments filtered by dropdown menu to filter the assessments shown by Course.
For each assessment, view the learner’s grade, the weight of the assessment toward the final course grade, their individual mark, class mean, and weighted mark.
As of Elentra ME 1.21, if you have the Learner Explorer enabled, learners will see an additional tab when looking at their Gradebook page to show them My Performance. Under this tab they will be able to see their own Learner Explorer.


