Loading...
Loading...
Loading...
Loading...
Loading...
Loading...
Loading...
Loading...
Loading...
Loading...
Loading...
Loading...
Loading...
Loading...
Loading...
An overview of Distributions and their management
New in ME 1.26!
The option for administrative users to disable initial task creation email notifications on distributions.
A database setting to make task expirty 23:59 for specified distribution types (assessment_tasks_expiry_end_of_day)
A distribution defines who will complete a task using what form, who or what the task is about, and when the task will be delivered and completed. Usually, administrative staff manage distributions to send tasks to learners, faculty, event participants, etc.
In most cases, when a distribution sends a task, users receive an email notification that a task has been created for them. They can also access tasks from their Assessment and Evaluation badge.
You can watch a recording about Distributions at collaborate.elentra.org (login required).
You must have one of the following permission levels to access this feature:
Medtech:Admin
Staff:Admin
Staff:PCoor (assigned to a course/program)
Faculty:Director (assigned to a course/program)
Distribution: defines who will complete a task using what form, who/what the task is about, and when the task should be delivered and completed
Assessor/Evaluator: The person completing a form/task
Target: The person, course, experience or other that the form/task is about
Distribution method: How the form/task is assigned to people (e.g. based on a date range, rotation schedule, event schedule, etc.)
Distribution wizard: Walks users through creating any distribution.
Rotation Schedule: Use a rotation schedule distribution to send forms based on a rotation schedule. This could include assessments of learners participating in a rotation, evaluation by learners of a specific rotation site or experience, etc.
Delegation: Use a delegation to schedule a distribution to be sent to an intermediate person who will later forward the tasks to the appropriate assessor/evaluator. For example, if you want to set up distributions in September, but it is unknown who learners will work with in January because a clinic schedule hasn't been set yet, you could send the distribution to a delegator to forward once the clinic schedule is known.
Learning Event Schedule: Use a learning event schedule distribution when you want to have participants evaluate an event, when you want participants to evaluate the faculty teaching particular types of events, or when you want faculty to assess the learners participating in certain types of events.
Date Range: Use a date range to create the most generic type. You could use this for faculty or course evaluations, or for assessment of learners at any point.
Ad Hoc: Used for assessments only, allows user to trigger an assessment when needed (differs from on demand workflows in that the distribution controls some things like the potential list of assessors)
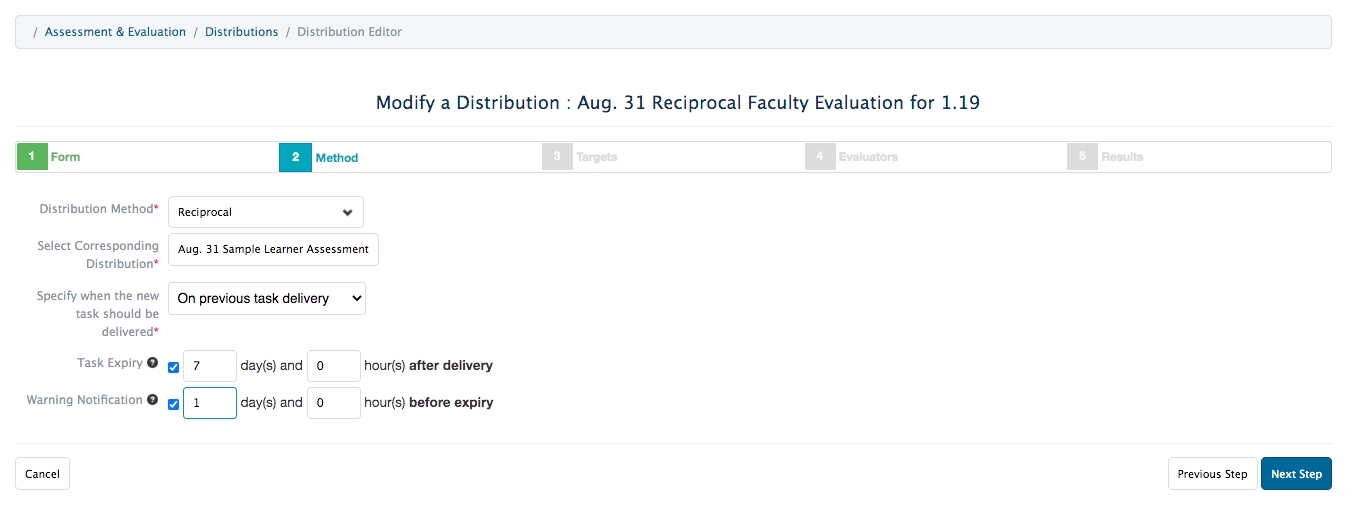
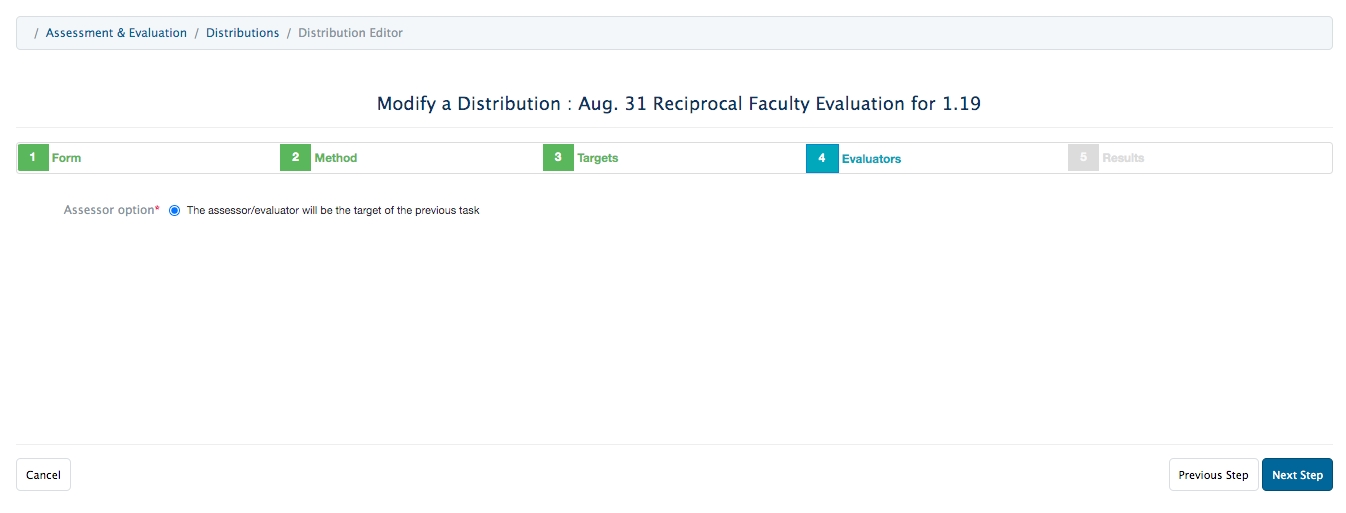
Reciprocal: Allows you to link two distributions so that one generates tasks based on the other (e.g., distribution 1 asks faculty to assess learners; once Faculty A has assessed Learner B, distribution 2 can be configured to get Learner B to evaluate Faculty A).
A date range distribution allows you to send a form to the appropriate assessors/evaluators in a specific date range.
Navigate to Admin>Assessment and Evaluation.
Click 'Distributions' above the Assessment and Evaluation heading.
Click 'Add New Distribution'.
Distribution Title: Provide a title. This will display on the list of Distributions that curriculum coordinators and program coordinators can view.
Distribution Description: Description is optional.
Task Type: Hover over the question mark for more detail about how Elentra qualifies assessments versus evaluations. If a distribution is to assess learners, it's an assessment. If it is to evaluate courses, faculty, learning events, etc. it is an evaluation. Notice that the language on Step 4 will change if you switch your task type, as will other steps of the wizard.
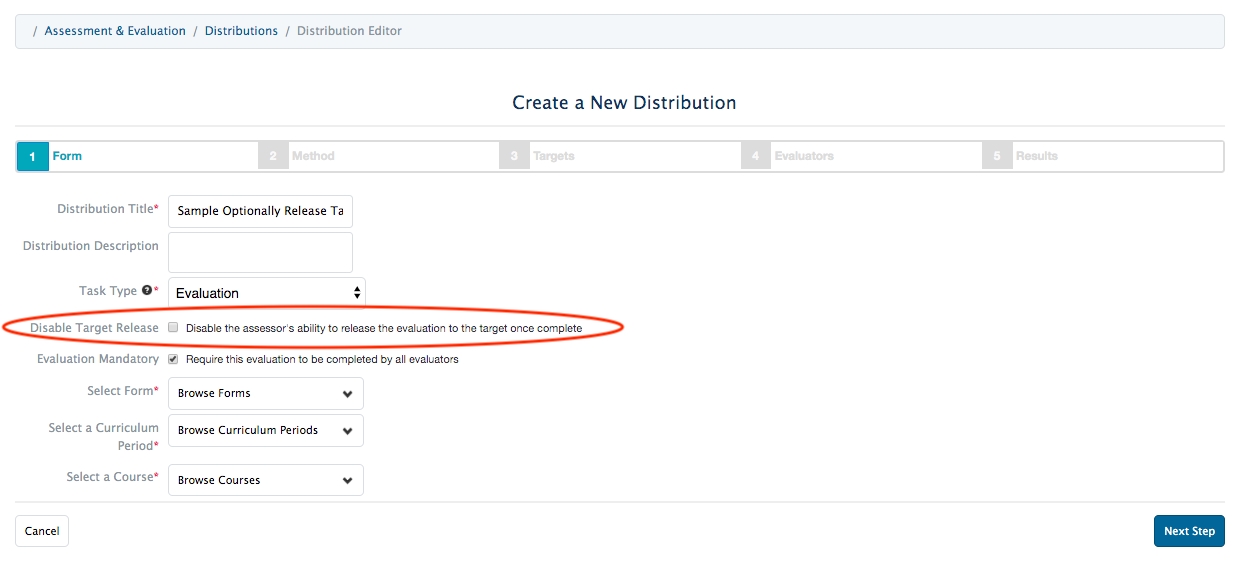
Disable Target Release: This will only display for Evaluations. If you do not want evaluators to be able to release the form to the target upon completion, check this box. If left unchecked, evaluators will be able to release the form to the target upon completion.
Assessment/Evaluation Mandatory: This will be checked off by default. Mandatory tasks can't be deleted by assessors/evaluators.
Disable Reminders: Check this box to exclude tasks from this distribution from reminder notification emails. This option will only display if specific database settings are enabled. If you check this box, assessors/evaluators will still be sent an initial task creation notification, but weekly reminder summary emails will be disabled.
Select Form: The form you want to distribute must already exist and you must have permission to access it; pick the appropriate form.
Select a Curriculum Period: The curriculum period you select will impact the list of available learners and associated faculty.
Select a Course: The course you select will impact the list of available learners and associated faculty.
Click 'Next Step'
Distribution Method: Select 'Date Range Distribution' from the dropdown menu.
Start Date: This is the beginning of the period the form is meant to reflect.
End Date: This is the end of the period the form is meant to reflect.
Delivery Date: This is the date the task will be generated and delivered to the assessors/evaluators. (The delivery date will default to be the same as the start date.)
Task Expiry Date: Optional. Set the date on which the tasks generated by the distribution will automatically expire (i.e. disappear from the assessor's task list and will no longer be available to complete). This tool was updated in ME 1.22 so that tasks expire at 11:59 pm on the day you select.
Warning Notification: If you choose to use the Task Expiry option, you'll also be able set an automatic warning notification if desired. This will send an email to assessors a specific number of days and hours before the task expires.
Delay Task Creation: This option relates specifically to creating a summary assessment task distribution. This allows you to create a distribution that will pull in and display completed tasks from other distributions. In effect, the assessor of the distribution you create will be able to see items from previously completed tasks and take them into account when completing their own task.
Select a distribution (note that you will only see distributions to which you have access).
Define how many tasks must be completed in the linked distribution(s) before the new distribution will take effect.
Enter a fallback date. This date represents when your distribution will create tasks whether or not the minimum number of tasks have been completed in the linked distribution.
You can adjust the fallback date on the fly and the distribution will adjust accordingly to only generate tasks as appropriate (previously created tasks will still remain).
If you set a fallback date that falls before the release date, the fallback date will be ignored.
The target is who or what the form is about.
Assessments/Evaluations delivered for: Use this area to specify the targets of the form.
For Assessments your options include: targets are the assessors (self-assessment), and learners (
For Evaluations your options include: faculty members, courses, course units (if in use), individuals regardless of role, external targets, and rotation schedules.
Select Targets: Here you can specify your targets using the dropdown selector.
CBME Options: This option applies only to schools using Elentra for CBME. Ignore it and leave it set to non CBME learners if you are not using CBME. If you are a CBME school, this allows you to apply the distribution to all learners, non CBME learners, or only CBME learners as required.
Target Attempt Options: Specify how many times an assessor can assess each target, OR whether the assessor can select which targets to assess and complete a specific number (e.g. assessor will be sent a list of 20 targets, they have to complete at least 10 and no more than 15 assessments but can select which targets they assess).
If you select the latter, you can define whether the assessor can assess the same target multiple times. Check off the box if they can.
Click 'Next Step'
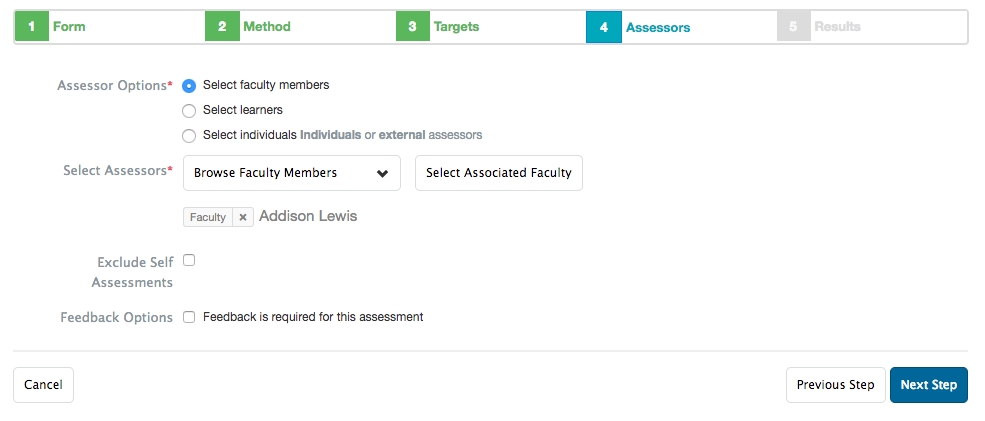
The assessors are the people who will complete the form.
There are three options:
Select faculty members
Browse faculty and click on the required names to add them as assessors
Select Associated Faculty will add the names of all faculty listed as course contacts on the course setup page
Exclude self-assessments: If checked, this will prevent the assessor from completing a self-assessment
Feedback Options: This will add a default item to the distribution asking if the faculty member met with the trainee to discuss their assessment.
Select learners
Click Browse Assessors and click on the appropriate option to add learners as assessors
Exclude self-assessments: If checked, this will prevent the assessor from completing a self-assessment
Select individuals external to the installation of Elentra
This allows you to add external assessors to a distribution
Begin to type an email, if the user already exists you'll see them displayed in the dropdown menu. To create a new external assessor, scroll to the bottom of the list and click 'Add External Assessor'
Provide first and last name, and email address for the external assessor and click 'Add Assessor'
Feedback Options: This will add a default item to the distribution asking if the faculty member met with the trainee to discuss their assessment.
Exclude Self Assessments: Check this to stop learners from completing a self-assessment
Feedback Options: Check this to add an item to the form requiring the target and assessor to confirm they spoke. More detail here.
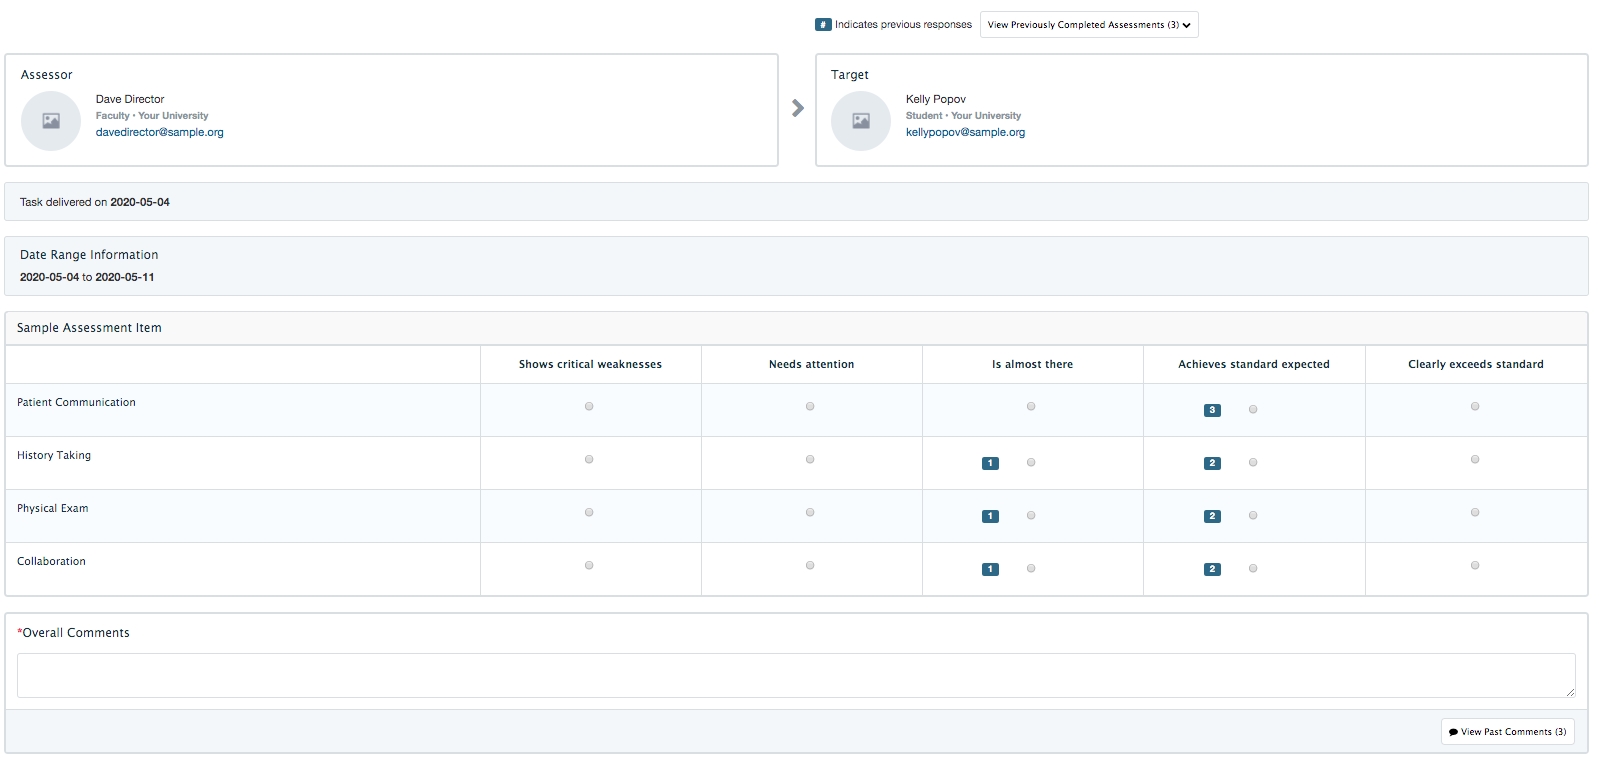
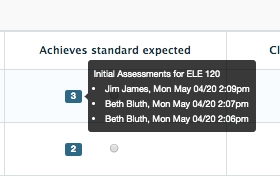
Give access to the results of previous assessments: This relates to Elentra's ability to provide a summary assessment task to users. If enabled, tasks generated by this distribution will link to tasks completed in the listed distributions. When users complete the summary assessment task they will be able to view tasks completed in the other distributions. For any items that are used on both forms, results from previously completed tasks will be aggregated for the assessor to view.
Click to add the relevant distribution(s).
Click 'Next Step'
You can immediately save your distribution at this point and it will generate the required tasks, but there is additional setup you can configure if desired.
Authorship: This allows you to add individual authors, or set a course or organization as the author. This may be useful if you have multiple users who manage distributions or frequent staffing changes. Adding someone as an author will allow them to more quickly access the distribution from their distribution list.
Distributions are automatically accessible to all users with staff:admin group and role permissions.
Adding a course permission will make the distribution show, without filters applied, to program coordinators and faculty directors associated with the course.
Adding an org. permission will make the distribution accessible to anyone with administrative access to Assessment & Evaluation. (Note that most users will need to apply filters to access the distribution.)
Target Release: These options allow you to specify whether the targets of the distribution can see the results of completed forms.
Task List Release:
"Targets can view tasks completed on them after meeting the following criteria" can be useful to promote completion of tasks and is often used in the context of peer assessments. Targets will only see tasks completed on them after they have completed the minimum percentage of their tasks set by you.
Target Self-Reporting Release: This controls whether targets can run reports for this distribution (i.e. to generate an aggregated report of all responses). When users access their own A+E they will see a My Reports button. This will allow them to access any reports available to them.
Target Self-Reporting Options: This allows you to specify whether or not comments included in reports are anonymous or identifiable. (This will only be applied if you have set reports to be accessible to the targets.)
Reviewers: This allows you to set up a reviewer to view completed tasks before they are released to the target (e.g. a staff person might review peer feedback before it is shared with the learner).
Check off the box to enable a reviewer.
Click Browse Reviewers and select a name from the list. Note that this list will be generated based on the course contacts (e.g. director, curriculum coordinator) stored on the course setup page.
Notifications and Reminders:
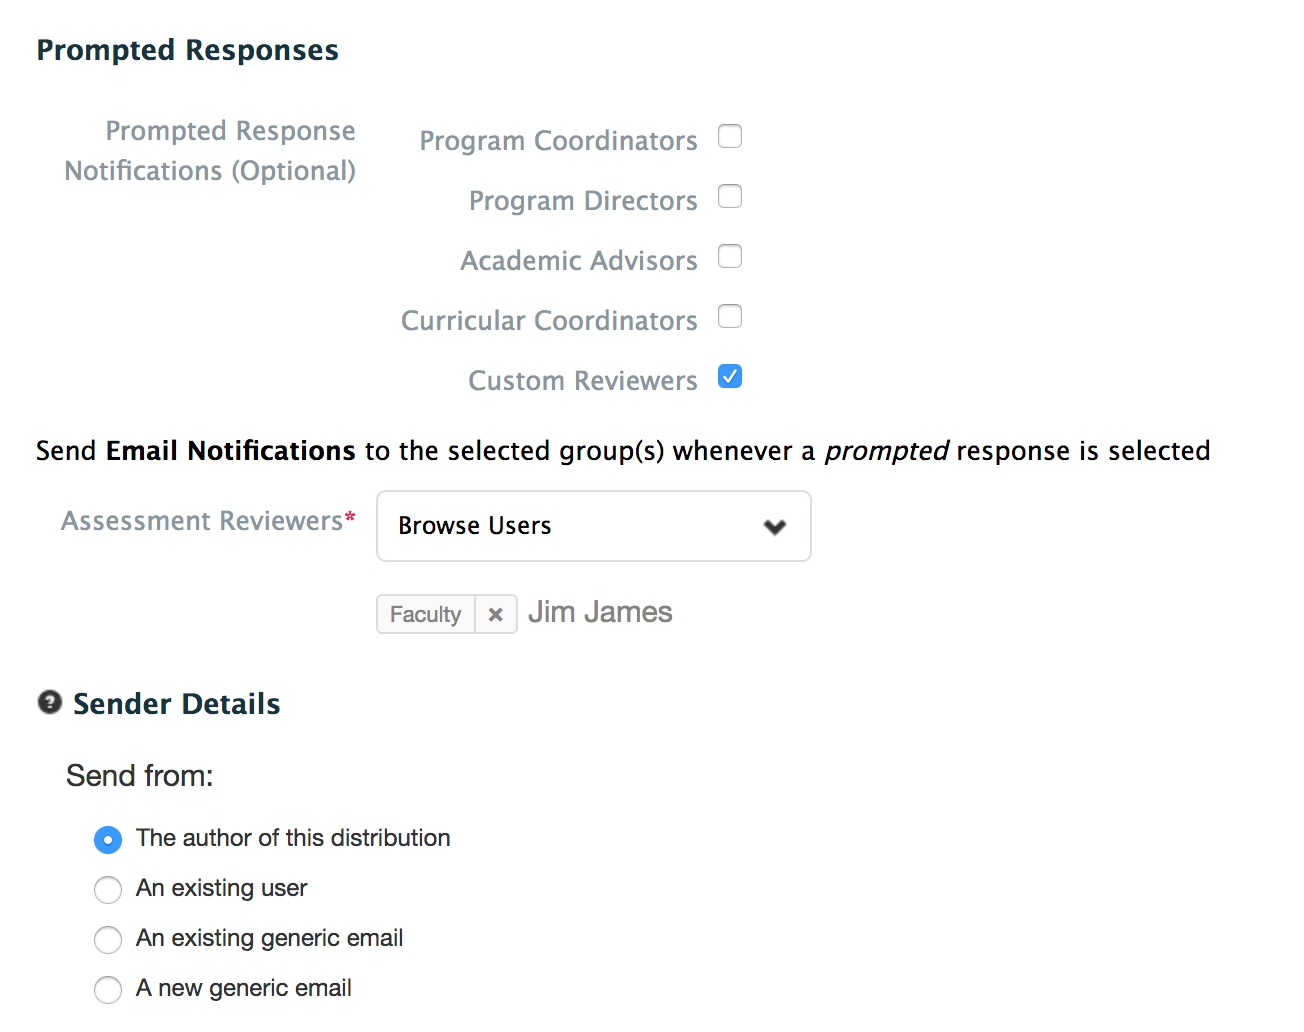
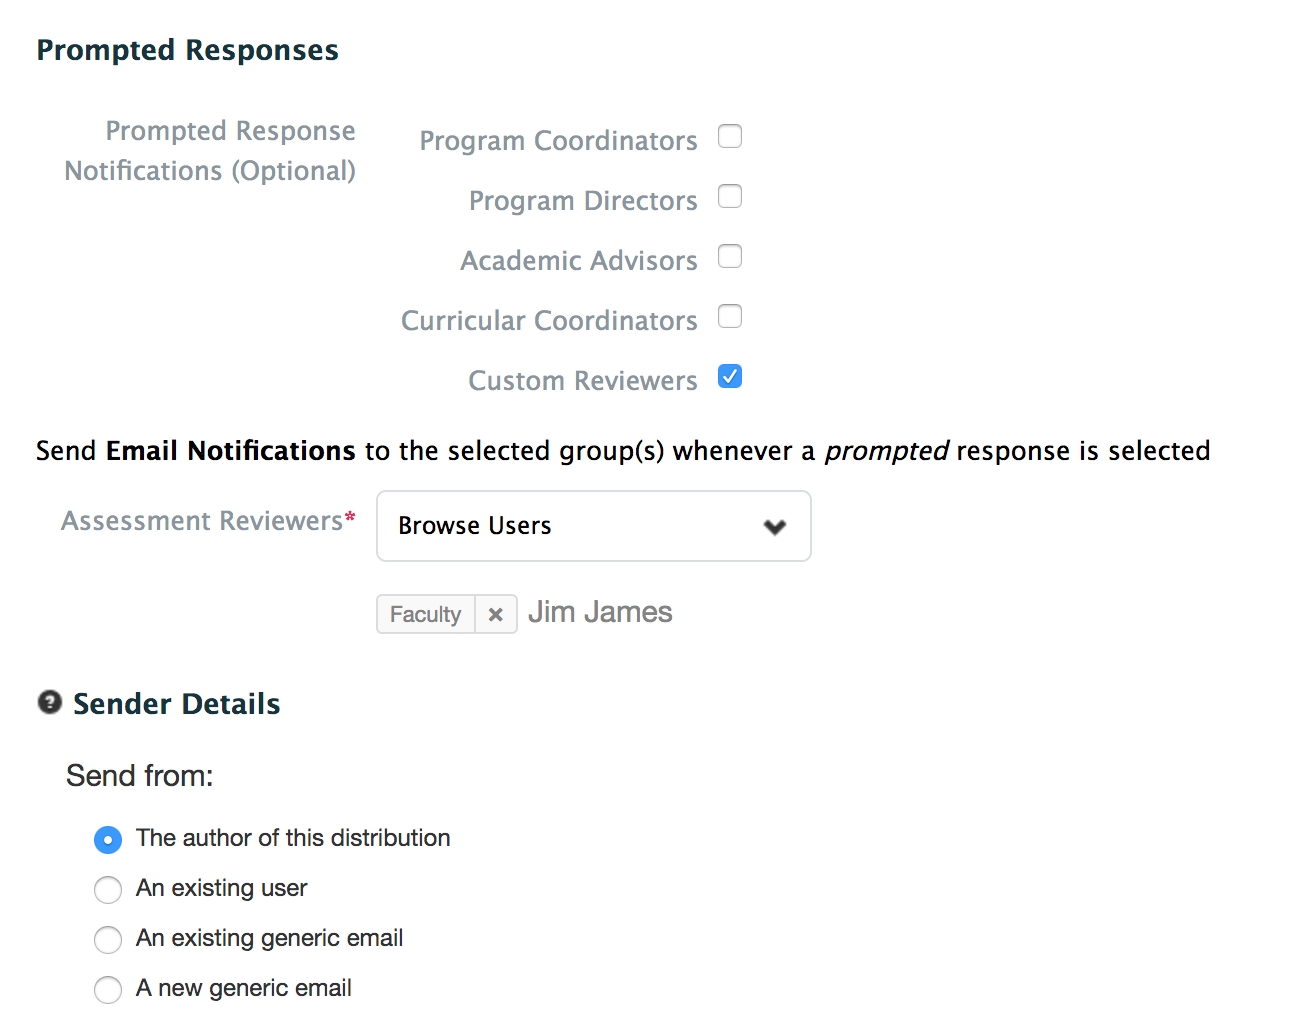
Prompted Responses: This allows you to define whom to send an email to whenever a prompted response is selected on a form used in the distribution. For example, if you have an item asking about student completion of a procedure and "I had to do it" was set as a prompted/flagged response, any time "I had to do it" is picked as an answer an email notification will be sent.
You can optionally select to email Program Coordinators, Program/Course Directors, Academic Advisors, Curricular Coordinators, or you can add a Custom Reviewer. If you select to add a Custom Reviewer you can select their name from a searchable list of users.
Sender Details: Define the email address that notifications and reminders will be sent from for a distribution.
Options are the distribution author, an existing user, an existing generic email, or a new generic email.
To create a new generic email provide a name and email address. This will be stored in the system and available to other users to use as needed.
Click 'Save Distribution'.
Disable Target Release option on Evaluations
In ME 1.14 Elentra introduced a way for learners to optionally release completed evaluation tasks to the targets of the task. In effect, a learner can complete an evaluation of a faculty member and choose to immediately release the completed task to said faculty member. The faculty member will see who the feedback came from (in contrast, if you allow faculty to run reports on a distribution of which they are a target, they do not see the names of the evaluators).
While advantageous in some circumstances, allowing learners to optionally release completed evaluation tasks to faculty is not desirable to all organisations. To allow organisations to customize how they want to treat individually completed evaluations, some database settings can be used.
To disable the target release option at a organisation level, a record must be added to the database settings table for each organisation.
shortname: disable_target_viewable_release_override
organisation_id: <the_intended_org_id>
value: 1
To disable the target release option at a course level an entry must be created in the course_settings table with the following values:
course_id: <the_intended_course_id>
shortname: disable_target_viewable_release_override
value: 1
An entry should be created for each course/organisation that must have the release option disabled.
Finally, if you wish to provide flexibility to use the target release option per distribution, do not apply the database settings and instead teach your administrative staff to toggle the checkbox that says “Disable the assessor's ability to release the evaluation to the target once complete” on Step 1 of the distribution wizard.
The Disable Target Release option will only be visible on Evaluation tasks and it does not impact a faculty member's ability to create a report on a distribution (that is still controlled by the distribution in Step 5 of the distribution wizard).
To see what the learner experiences when allowed to optionally release completed evaluation tasks, please see here.
By default, all assessment distributions have the task release set to immediately release tasks to targets when they are completed. One case where an administrator may not want this is in the case of Peer Assessment, where the learners should not be able to see individually completed and identified tasks.
To allow institutions to prevent this from happening due to administrative error of not setting the appropriate settings, a database setting was introduced in Elentra ME 1.21 (peer_assessment_target_release_enabled). This setting is disabled by default.
With the setting enabled, if an assessment distribution’s targets and assessors are both LEARNERS, the Task List Release will be set to Targets cannot view tasks completed on them, the Target Self-Reporting Release will be set to Targets can immediately view reports for tasks completed on them, and the Target Self-Reporting Options will be set to Comments are anonymous.
Conditions that need to be met in the distribution wizard to be considered a peer assessment:
The target is considered to be a learner when a distribution uses one of the following:
Date range based distribution, pick the “Select learners” option
Rotation based distributions, pick the “The targets for this Distribution are learners” or “The targets for this Distribution are peers” options
Date range delegation based distribution, pick the “Select learners” option
Rotation based delegation distributions, pick the “The targets for this Distribution are learners” or “The targets for this Distribution are peers” options
Event based distribution, pick the “Attendees who are enrolled in events with the selected event types” option
The distribution delivery type is adhoc
The assessor is considered to be a learner when a distribution uses one of the following:
Date range based distribution, pick the “Select learners” option
Rotation based distribution, pick the “The assessors for this Distribution are learners” option
Date range delegation based distribution, pick the “Select learners” option
Rotation based delegation distribution, pick the “The assessors for this Distribution are learners” option
Event based distribution, pick the “The assessors for this Distribution are attendees enrolled in the event” option
Ahdoc distribution, pick the “Select learners” option
With the above considered, if both the target and assessor are determined to be learners, then the distribution is a peer assessment that can then use the new rules assuming that the database setting is enabled.
In this context, we use the term off-service to mean learners who are completing rotations outside their home program (e.g. a family medicine resident on a pediatrics rotation).
Clinical Experiences > Rotation Scheduler includes support for off-service rotations or slots. When an administrator builds rotations she can optionally create off-service slots and make them available to all other programs or specific programs. The following information assumes you are an organization using off-service slots and refers to rotation-based distributions. (This page does not discuss automated rotation evaluations nor rotation evaluations completed on demand via workflows.)
As the home program you can:
Create assessment tasks targeting your learners while they are on an off-service rotation.
Report on assessment tasks targeting your learners while they were on an off-service rotation.
For distributions you created, you can view results via the Learner Assessments report or the Learner Reports (Aggregated).
For distributions created by host programs, but targeting your learners, you can only view results via Learners Reports (Aggregated).
Create evaluation tasks asking your learners to evaluate their experience on an off-service rotation.
View individual responses and download a Weighted CSV of your learners' responses to an evaluation of their off-service experience (do this via the Completed Distribution Report); up to and including ME 1.17 a home program cannot use the Rotation Evaluation (Aggregated) Report to see an overview of their learners' experience on an off-service rotation (whether the distribution was set up by the home or host program).
As the host program you can:
Create assessment tasks targeting visiting, off-service learners while they are on your rotation.
Report on assessment tasks targeting visiting, off-service learners while they were on your rotation.
Create evaluation tasks asking visiting, off-service learners to evaluate their experience on your rotation.
Report on evaluation tasks completed by visiting learners to your rotation, as long as you created the distribution. If the home program created an evaluation asking their learners to evaluate your rotation or faculty, you will not be able to access the results.
In effect, up to and including ME 1.17, neither the home program nor the host program can create a Rotation Evaluation (Aggregated) Report to view responses of off-service learners to off-service rotation evaluations created by the home program.
Sample use cases for copying a distribution include to complete assessments/evaluations in the context of small groups (i.e., copy the distribution so have one for each group, then change the targets and assessors/evaluators as needed), to edit distributions for use in the subsequent academic year (i.e., copy the distribution, then change the cperiod as required), etc.
Note that Elentra does not support copying a distribution and changing the distribution method. If you change the method of a distribution you will need to reenter the required information in the subsequent steps.
Navigate to Admin>Assessment & Evaluation.
Click 'Distributions'.
Use the search tool to look for the distribution you want to copy. Click the down arrow beside the search bar to apply filters to refine your search results.
Click on the cog icon to the right of the distribution you want to copy. Select 'Copy Distribution'.
Edit the information in each step of the distribution wizard as needed and save your work.
Editing a distribution can have unanticipated effects and it is recommended that whenever possible, you test the impact of your edits in a staging environment.
Editing the Expiry Date: If an expiry date has been applied to the active distribution, you can edit the expiration date to 're-open' tasks to the targets who haven't completed them yet. Those tasks will be visible to the targets the day after the update is made to the expiry date (because the job that runs behind the scenes to deliver tasks runs at night). A developer can run the job immediately if it is time sensitive.
Changing the Targets: If you add a new targets to a distribution, the system will reopen the task for the assessor/evaluator to allow them to complete the task on the new target.
Editing the Rotation Schedule of Targets Associated with a Distribution: Will cause new tasks to be delivered to the assessor.
Changing the Reviewer of a Distribution: Will cause the distribution to redeliver previously delivered tasks; be sure to apply a Release Date when making this change.
Changing the Target Release Options in Step 5: Changes the visibility of tasks/reports retroactively for all completed tasks.
If you want to change a distribution partway through its use but you want to leave all existing tasks active, you can copy the distribution, alter it as needed, and then retire the original distribution on a defined date. When you retire a distribution, you preserve any existing data and pending tasks but prevent future tasks from generating.
To retire one distribution, click the menu cog to the right of the distribution name and select 'Retire Distribution'.
To retire multiple distributions at once, click the checkbox beside distribution names and click the 'Retire Distribution' button.
Set a Retirement Date for the distribution(s). As of this date, no more tasks will generate for this distribution.
Click 'Retire'
You will get a success message and can click to return to the Distribution index.
Retired distributions will still display on the list of Distributions, but they will have a small orange clock beside the name to show they have been retired.
An informational notice will be included on distributions that are set to retire soon. The notice will be seen when you access the Progress Report for a distribution.
If you delete a distribution you will no longer see it in the list of Distributions and it can't be recovered through the user interface.
Navigate to Admin>Assessment & Evaluation.
Click 'Distributions'.
Use the search bar to look for the distribution you want to delete. Click the down arrow beside the search bar to apply filters to refine your search results.
Click the checkbox beside the name of the distributions you want to delete.
Click the red Delete Distributions button.
Confirm your decision.
Navigate to Admin>Assessment & Evaluation.
Click 'Distributions'.
Use the search bar to look for the distribution you want to manage. Click the down arrow beside the search bar to apply filters to refine your search results. You will only see distributions to which you have access.
Click on the cog icon to the right of the distribution you want to copy. Select 'View Distribution Report'.
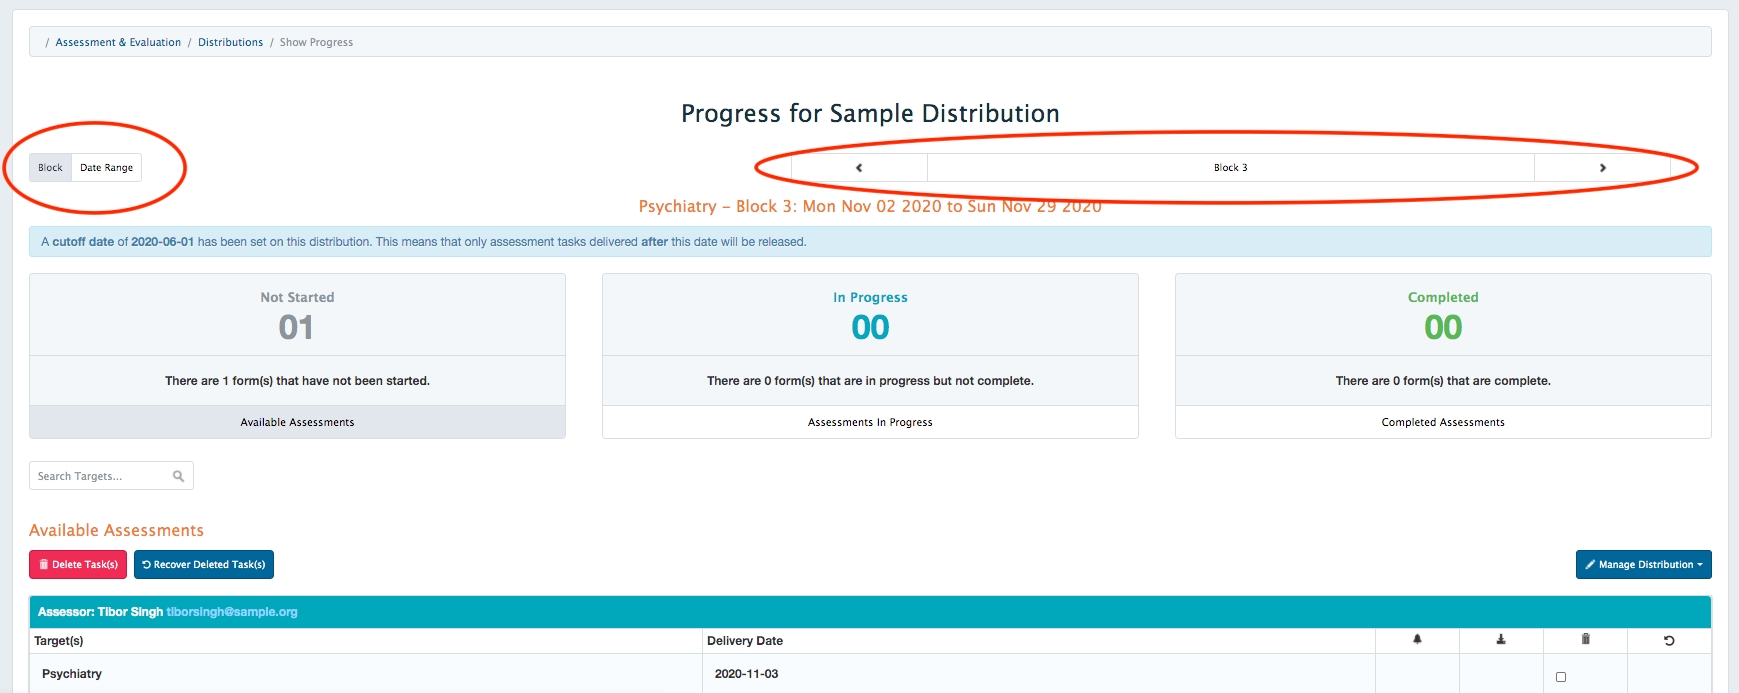
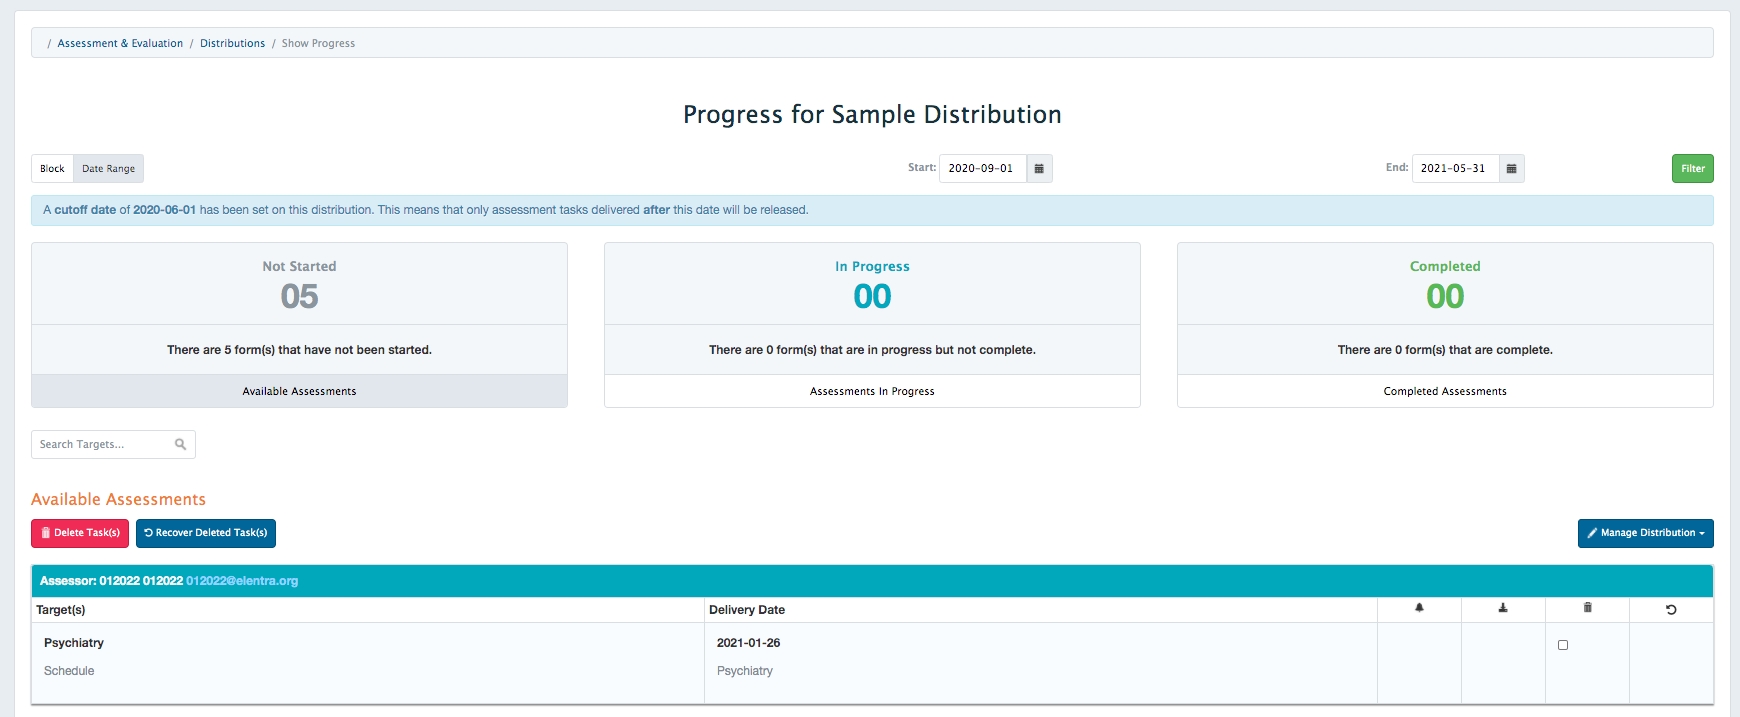
Review progress. Click on any category (Pending, In Progress, Completed) to view more details about specific targets and assessors.
Pending tasks have not yet been started. In Progess tasks have been started but not complete. Completed tasks are done and have been submitted.
To delete tasks tick off the box below the garbage icon on each task card and then click the red Delete Task(s) button.
To send reminders to those with incomplete forms, tick off the box below the bell icon on each task card and then click the blue Manage Distribution button and select Send Reminders from the dropdown list. To select all tasks for reminders click on the bell icon.
Review your choices and, if correct, click Confirm Reminders. You will get a green success message.
To add a task to a distribution, click the blue Manage Distribution button and select 'Add a Task' from the dropdown list. Complete the required information and click 'Confirm Task'.
Viewing progress results for learning event-based distributions: Program coordinators who set up such distributions should view progress from their My Assessments page.
Many of the functions described above can also be completed at an individual task level when logged into the system as a program coordinator or faculty director.
Click the Assessment and Evaluation badge at the top right (beside the logout button).
Click the My Learners tab.
Click on the appropriate tab for a learner (e.g. CBME, Assessments, Logbook).
When looking at a user's Assessment & Evaluation dashboard, some users will be able to send reminders, remove tasks, and download PDFs of selected tasks from their assigned learners or faculty.
The Distribution Wizard is the five step tool that takes administrators through the process of building a distribution. The specific information entered on each step of the Distribution Wizard will depend on whether you are creating an assessment or evaluation and the distribution method you select. Below is some general information about the options on each step.
Note that a distribution will not save until all 5 steps of the wizard are complete.
Navigate to Admin>Assessment & Evaluation.
Click 'Distributions'.
Click 'Add New Distribution'.
This will open a five-step wizard that walks you through creating a distribution. The following is a high level overview of each step. The exact options on each step will depend on the type of distribution you are building. Additional details for each distribution method are included on separate pages.
On this step you define some basics like which form you are going to send out, and the relevant course and cperiod.
Assessment Mandatory: If this is checked off, assessors/evaluators who receive a task from this distribution will not be able to to delete it. The task will remain on their A&E task list until it expires or is deleted by a distribution administrator.
Disable Initial Task Email: Introduced in ME 1.26 this option allows administrative users to opt-out of having Elentra sent initial task email notifications to assessors/evaluators. (Applies on to non-delegation based distributions).
On this step you define the type of distribution you'd like to build (e.g., date-based, rotation-based).
Task Expiry: Check this to apply an expiry date to tasks. After the expiry date has passed, users will no longer be able to complete the task.
Delay Task Creation
This option refers to the Summary Assessment Task options supported by Elentra.
Other options will display depending on the type of distribution being built.
There is a database setting a developer can configure if you want to force the expiry date of certain distribution methods to always be 23:59 on a given day (assessment_tasks_expiry_end_of_day).
On this step you define the target of the task. This could be learners, faculty, events, or courses depending on the type of distribution being used.
On this step you define the assessors or evaluators who will complete the task. This could be learners or faculty courses depending on the type of distribution being used.
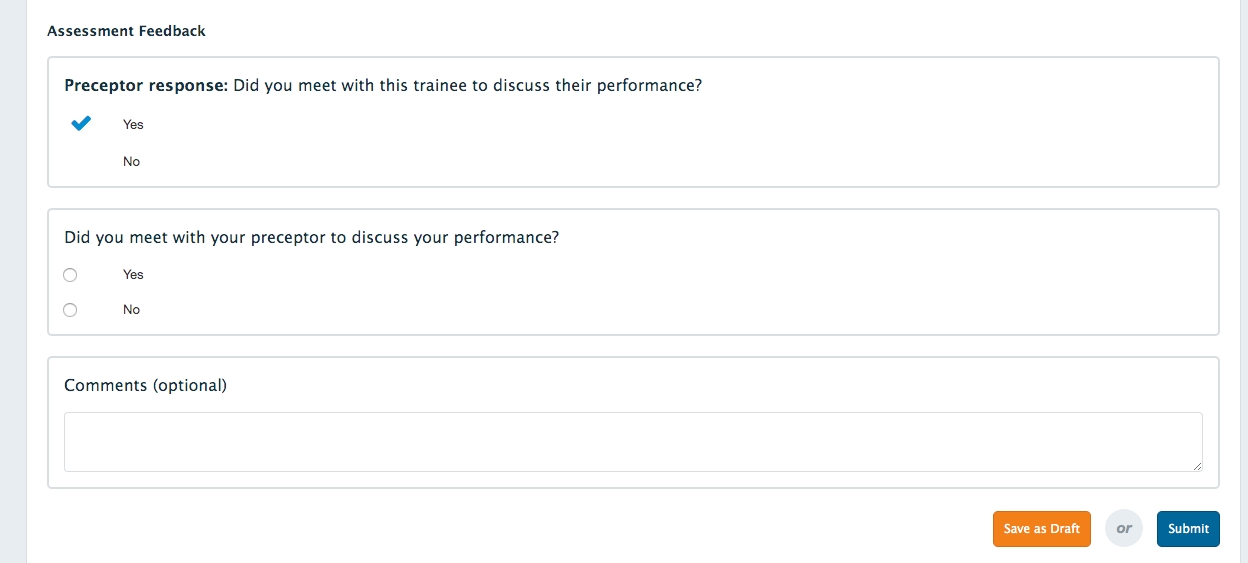
When completing a distribution you will notice a "Feedback Options" section in Step 4 if the assessor is set to faculty members (it will not appear when the assessor/evaluator is set to learners). If you check this off it will add an item to the form for this distribution asking both the assessor and the target whether or not they met to discuss the target's performance (see sample text below).
You might choose to use this option and add the item if you want to collect data on how often preceptors are meeting with learners.
In effect, this tool adds two items to a form. The first item will appear as above for the assessor to complete. Once the form is completed it will be stored in the learner's "Tasks Completed On Me" tab. The learner can access the form from there, and the learner will also receive an email notification that they can take action on the form.
The form is available for the learner to complete and answer the same question from their perspective. The comment box is available for learners to record any additional details.
Currently there is no reporting tool to compare learner and assessor responses, although they can be viewed on any completed forms. There is also no visual cue to an admin user that the response from the learner is pending; if there is no learner response displaying it means the learner hasn't answered the question.
On Step 5 you can immediately save your work, or make some adjustments to the distribution options.
This allows you to add individual authors, or set a course or organization as the author. This may be useful if you have multiple users who manage distributions or frequent staffing changes. Adding someone as an author will allow them to more quickly access the distribution from their distribution list.
Distributions are automatically accessible to all users with staff:admin group and role permissions.
Adding a course permission will make the distribution show, without filters applied, to program coordinators and faculty directors associated with the course.
Adding an org. permission will make the distribution accessible to anyone with administrative access to Assessment & Evaluation. (Note that most users will need to apply filters to access the distribution.)
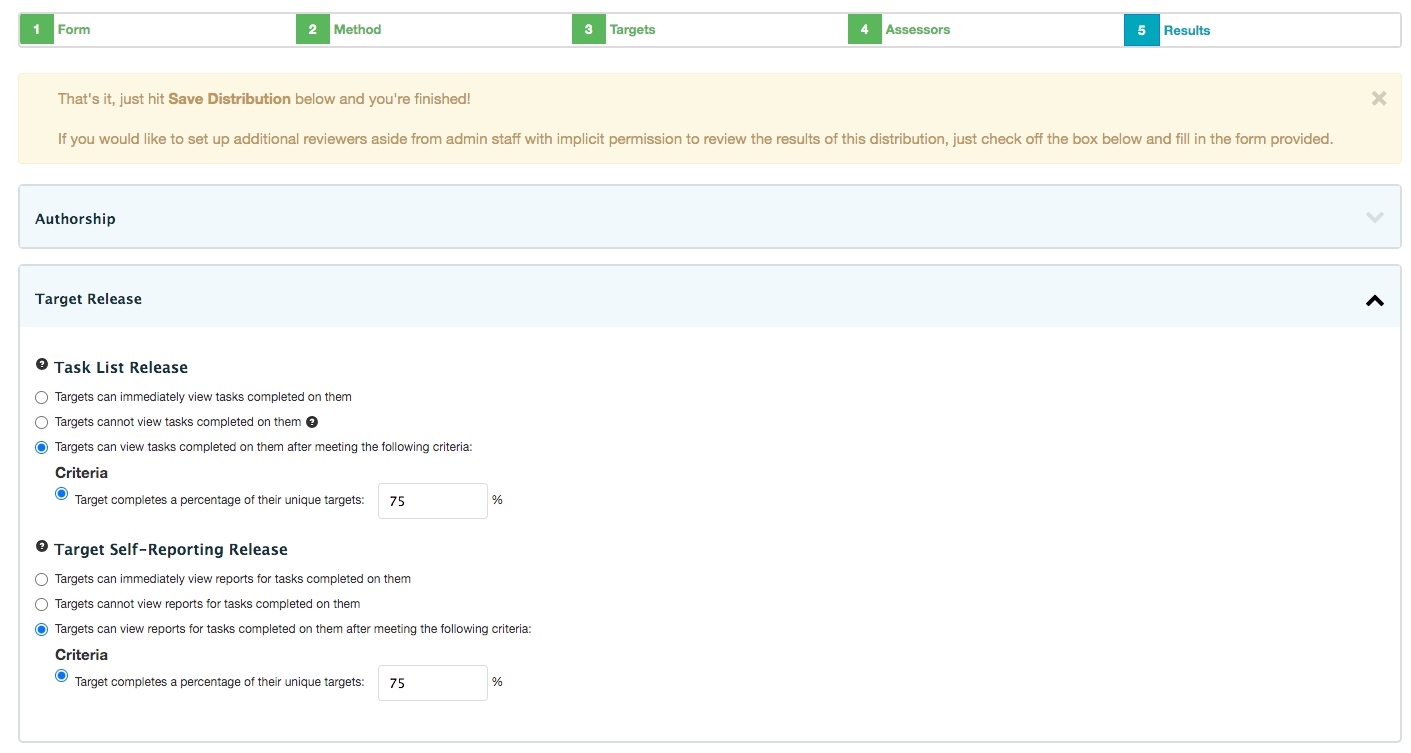
Task List Release
This section lets you decide whether and how to allow targets of tasks to view tasks completed on them.
"Targets can view tasks completed on them after meeting the following criteria" can be used to motivate learners to complete their assigned tasks. Learners will only see tasks completed on them after they have completed the minimum percentage of their tasks set by you.
Target Self-Reporting Release
This controls whether targets can run reports on themselves for this distribution.
If given access, users will be able to generate an aggregated report of all responses on tasks in a distribution from their A+E badge and the My Reports button.
"Targets can view reports for tasks completed on them after meeting the following criteria" can be used to motivate learners to complete their own assigned tasks before seeing the results of tasks completed on them. Targets will only be able to run reports on themselves after they have completed the minimum percentage of their tasks set by you.
The "Targets can view tasks/reports after meeting the following creiteria" options are typically used for peer assessments. In the example above, if a learner were working with several peers in a small group and they were required to assess each other, the learner would have to complete 75% of their assigned peer assessments before they would be able to view the feedback provided to them by their peers.
Please note that these settings are specific to a single distribution only. This tool does not require users to have completed a percentage of tasks across all distributions.
This controls whether users can view the names of their assessors when reviewing comments left on completed tasks.
If you have set your distribution to release individual tasks, targets will be able to view individual results and the names of assessors, so the option to make comments anonymous makes the most sense when you are never going to release individual assessments, but are allowing self-reporting.
This allows you to set up a reviewer to view completed tasks before they are released to the target (e.g. a staff person might review peer feedback before it is shared with the learner).
Check off the box to enable a reviewer.
Click Browse Reviewers and select a name from the list. Note that this list will be generated based on the course contacts (e.g. director, curriculum coordinator) stored on the course setup page.
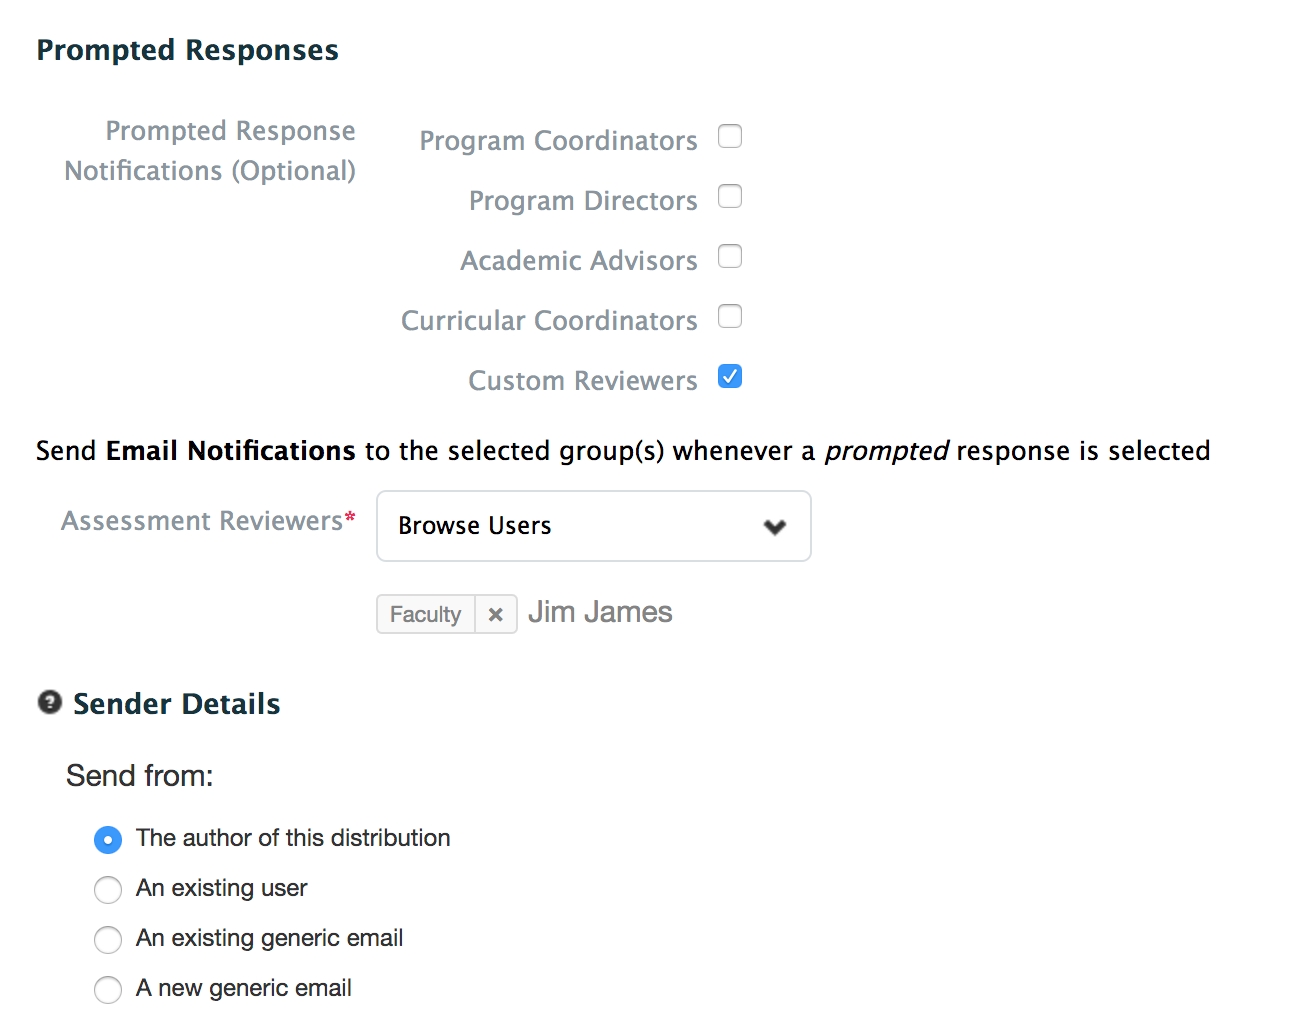
Prompted Responses: This allows you to define whom to send an email to whenever a prompted response is selected on a form used in the distribution. For example, if you have an item asking about student completion of a procedure and "I had to do it" was set as a prompted/flagged response, any time "I had to do it" is picked as an answer an email notification will be sent.
You can optionally select to email Program Coordinators, Program/Course Directors, Academic Advisors, Curricular Coordinators, or you can add a Custom Reviewer. If you select to add a Custom Reviewer you can select their name from a searchable list of users.
Sender Details: Define the email address that notifications and reminders will be sent from for a distribution.
Options are the distribution author, an existing user, an existing generic email, or a new generic email.
To create a new generic email provide a name and email address. This will be stored in the system and available to other users to use as needed.
Rotation Based Distributions allow you to set up a distribution based on a rotation schedule. This means you can easily send a form to all enrolled learners to be delivered when they are actively in the rotation. Note that you must have rotations built using the Clinical Experience Rotation Scheduler to use this distribution method.
Navigate to Admin>Assessment and Evaluation.
Click 'Distributions' above the Assessment and Evaluation heading.
Click 'Add New Distribution'.
Distribution Title: Provide a title. This will display on the list of Distributions that curriculum coordinators and program coordinators can view.
Distribution Description: Description is optional.
Task Type: Hover over the question mark for more detail about how Elentra qualifies assessments versus evaluations. If a distribution is to assess learners, it's an assessment. If it is to evaluate courses, faculty, learning events, etc. it is an evaluation. Notice that the language on Step 4 will change if you switch your task type.
Disable Target Release: If you do not want assessors/evaluators to be able to release the form to the target upon completion, check this box. If left unchecked, assessors/evaluators will be able to release the form to the target upon completion.
Assessment/Evaluation Mandatory: This will be checked off be default.
Disable Initial Task Email: Introduced in ME 1.26 this option allows administrative users to opt-out of having Elentra sent initial task email notifications to assessors/evaluators. (Applies to non-delegation based distributions).
Disable Reminders: Check this box to exclude this distribution from reminder notification emails.
Select Form: The form you want to distribute must already exist; pick the appropriate form.
Select a Curriculum Period: The curriculum period you select will impact the list of available learners and associated faculty.
Select a Course: The course you select will impact the list of available learners and associated faculty.
Click 'Next Step'
Distribution Method: Select 'Rotation Distribution' from the dropdown menu.
Rotation Schedule: Select the appropriate rotation schedule from the dropdown menu.
Specific Sites: Select a site if you wish to include only targets from a specific site on this distribution.
Release Date: This tells the system how far back on the calendar to go when creating tasks. Hover over the question mark for more detail.
Delivery Type:
Basic delivery (single): allows you to send a single evaluation task repeatedly, once per block, or once per rotation.
Dynamic delivery rules (multiple): allows you to deliver multiple evaluation tasks at specific intervals during a rotation. For example, if you have a 5-month rotation, and you’d like to deliver an interim evaluation at the 2-month mark and the 4-month mark, you can set a rule for the distribution to do so.
If you select Basic delivery (single), then select your Delivery Period:
Choose between delivering tasks repeatedly, once per block, or once per rotation.
Repeatedly means you set how often during the rotation the task sends (e.g. every 5 days)
Once per block means that for each booking the learner has in a rotation they will be sent a task
Once per rotation means that consecutive bookings (i.e., two or more back-to-back blocks) will be treated as one unit of time
For each delivery period, additional customization allows you to control the timing of the distribution (e.g. 1 day after the start of the block, or 3 days before the end of the rotation).
Options are before/after the start, before/after the middle, and before/after the end.
In this sample schedule, a 'Once per block' delivery for the IM rotation would send learner 012022 three tasks - one each for Blocks 1, 2, and 3. A 'Once per rotation' delivery for the IM rotation would send learner 012022 two tasks - one for Blocks 1+2, and one for Block 4.
Note that if learners have consecutive bookings at different sites they will not be treated as one rotation. For example a 'Once per rotation' delivery for the IM rotation for Tibor would result in two assessment tasks because he is at Hospital 1 and then Hospital 2.
If you select Dynamic deliver rules (multiple), then set your delivery rules.
Identify the specific delivery rules depending on the length of a rotation (you identify the length of the rotation in months, weeks, or days).
If you enter an integer larger than 1 for the number of tasks, you will be able to define when each task will be delivered (percent of the way through the rotation) and a visualization will be supplied by the Task bar below.
Clicking on Add new delivery will allow you to add additional delivery schedules that depend on the length of the rotation, which allows you to set different parameters for shorter rotations and longer rotations.
As noted in the interface, “larger” rules take precedence over smaller ones. So if you had a 0-1 month rule and a 0-2 month rule, the 0-2 month would supersede the other.
Remember: if a learner's schedule has two or more of the same rotation scheduled in a row, the system will treat them as a single rotation.
You can have as many rules as you want, but they must be contiguous (e.g., 0-2 months, 2-4 months, 4-6 months) to avoid leaving learners without an assessment.
Examples of Dynamic Delivery Scenarios:
If you would like two interim assessment tasks delivered for any rotation 5 to 8 months in length, you could identify that for a 5 – 8-month rotation, task one should be delivered at 40% of the way through the rotation and task 2 should be delivered at 80% of the way through the rotation. Then, for a learner on a 5-month rotation, the interim task would be delivered at 2 months into the rotation and again at 4 months into the rotation, for example.
If you would like three tasks delivered for any rotation 3 – 6 months in length, you could set task one at 25% through the rotation, task 2 at 50% through the rotation, and task 3 at 75% through the rotation, which would represent delivery of the task at ¼ of the way through the rotation, 1/2 the way through the rotation, and ¾ of the way through each 3-month, 4- month, 5-month, or 6-month rotation that a learner might be scheduled on.\
Task Expiry: If you check this box, the tasks generated by the distribution will automatically expire (i.e., disappear from the assessor's task list and no longer be available to complete). You can customize when the task will expire in terms of days and hours after the delivery.
Warning Notification: If you choose to use the Task Expiry option, you'll also be able to turn on a warning notification if desired. This can be set up to send an email a specific number of days and hours before the task expires.
The target is who or what the form is about (e.g., learners, faculty members, a rotation). Note that you'll only see the option to set the rotation or faculty member as a target if you are creating an evaluation.
Assessments will be delivered for: Use this area to specify the target of the form.
Targets are the assessors (self assessment): use this for self-assessments. Learners will be delivered a task where they are both the target and assessor.
Targets are learners
Learner Options:
All learners in this rotation
Learners from My Program/Outside of my Program: This refers to organizations that use on and off-service rotation slots (usually PGME programs).
Checking My Program will target leaners who are scheduled in the rotation AND enrolled in the course.
Checking Outside of my program will target learners who are scheduled in the rotation but enrolled in a different course than that in which the rotation exists.
Learner Levels: This refers to learner levels usually used in CBME enabled organizations. Checking a learner level will restrict the distribution to target only learners at that learner level. Leaving all boxes unchecked will target all learners, regardless of their learner level.
Additional Learners
Click Browse Additional Learners. Search for a learner and check the box beside the learner name. To delete a learner, click the x beside their name.
Specific learners in this rotation: Use the drop down selector to add the required learners. (Hover over a learner name to see their profile information.)
CBME Options: This will display whether you select All Learners or Specific Learners. This option applies only to schools using Elentra for CBME. Ignore it and leave it set to non CBME learners if you are not using CBME. If you are a CBME school, this allows you to apply the distribution to all learners, non CBME learners, or only CBME learners as required.
Targets are peers
This option allows for targets who have completed the rotation to assess all of their peers in the rotation block.
CBME Options: This option applies only to schools using Elentra for CBME. Ignore it and leave it set to non CBME learners if you are not using CBME. If you are a CBME school, this allows you to apply the distribution to all learners, non CBME learners, or only CBME learners as required.
Targets for this Distribution will be determined by the Assessor
With this option, the assessor/evaluator selects the target based on their role and distribution assessor options when they are completing the task.
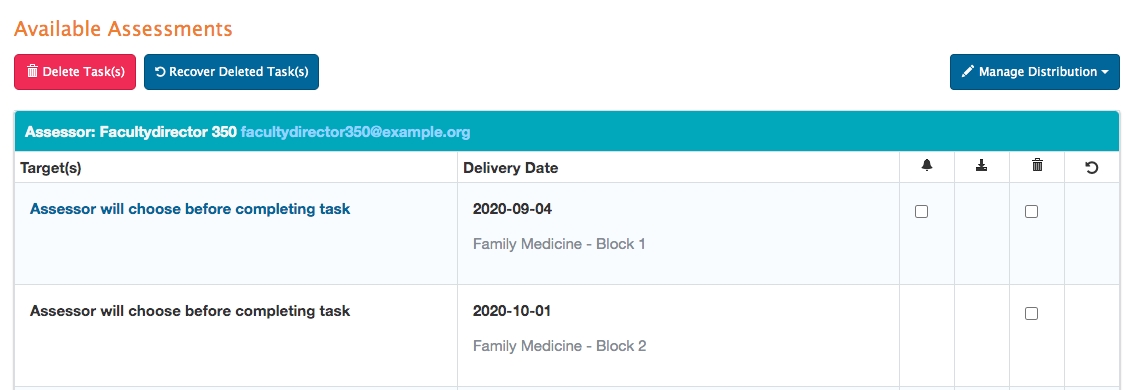
In the Distribution Progress Report, administrators will see the target listed as "Assessor will choose before completing task."
Target Attempt Options: Specify how many times an assessor can assess each target, OR whether the assessor can select which targets to assess and complete a specific number (e.g. assessor will be sent a list of 20 targets, they have to complete at least 10 and no more than 15 assessments but can select which targets they assess).
If you select the latter, you can define whether the assessor can assess the same target multiple times. Check off the box if they can.
Click 'Next Step'
The assessors are the people who will complete the form.
Assessor Options:
Assessors are learners
Learner Options: All Learners of Specific Learners
All Learners: Select all learners in the rotation or specific learners in the rotation
All learners: Select from My Program and/or Outside of my program, use the drop down selector to add additional learners
Specific learners in the rotation: Use the drop down selector to add required learners
Additional Learners: Check this option to add additional learners from outside the program.
Assessors are faculty members
Browse faculty and click on the required names to add them as assessors
Select Associated Faculty: This tool will pull the names of faculty listed on the course setup page as associated faculty
Assessors are preceptors associated with a rotation schedule
This allows you to associated this distribution with all preceptors affiliated with the rotation based on the slot bookings made for learners. The distribution will dynamically update based on changes made to the rotation schedule.
Select individuals regardless of role (Individuals or external assessors)
This allows you to add external assessors to a distribution
Begin to type an email, if the user already exists you'll see them displayed in the dropdown menu. To create a new external assessor, scroll to the bottom of the list and click 'Add External Assessor'
Provide first and last name, and email address for the external assessor and click 'Add Assessor'
Exclude Self Assessments: Check this to stop learners from completing a self-assessment.
Feedback Options: This will only display when the assessors are faculty. Checking the box will add a default item to the distribution asking if the faculty member met with the trainee to discuss their assessment.
Give access to the results of previous assessments: This relates to Elentra's ability to provide a summary assessment task to users. If enabled, tasks generated by this distribution will link to tasks completed in the listed distributions. When users complete the summary assessment task they will be able to view tasks completed in the other distributions. For any items that are used on both forms, results from previously completed tasks will be aggregated for the assessor to view.
Click to add the relevant distribution(s).
Currently for rotation-based distributions there is no option to configure minimum tasks completed on linked distributions nor a fallback date for the summary assessment task.
Click 'Next Step'
You can immediately save your distribution at this point and it will generate the required tasks, but there is additional setup you can configure if desired.
Authorship: This allows you to add individual authors, or set the distribution to be accessible to everyone with A+E access in a course or organization. (This may be useful if you have multiple users who manage distributions or frequent staffing changes.)
Target Release: These options allow you to specify whether the targets of the distribution can see the results of completed forms.
Task List Release:
"Targets can view tasks completed on them after meeting the following criteria" can be useful to promote completion of tasks and is often used in the context of peer assessments. Targets will only see tasks completed on them after they have completed the minimum percentage of their tasks set by you.
Target Self-Reporting Release: This controls whether targets can run reports for this distribution (i.e. to generate an aggregated report of all responses). When users access their own A+E they will see a My Reports button. This will allow them to access any reports available to them.
Target Self-Reporting Options: This allows you to specify whether or not comments included in reports are anonymous or identifiable. (This will only be applied if you have set reports to be accessible to the targets.)
Reviewers: This allows you to set up a reviewer to view completed tasks before they are released to the target (e.g. a staff person might review peer feedback before it is shared with the learner).
Check off the box to enable a reviewer.
Click Browse Reviewers and select a name from the list. Note that this list will be generated based on the course contacts (e.g. director, curriculum coordinator) stored on the course setup page.
Notifications and Reminders:
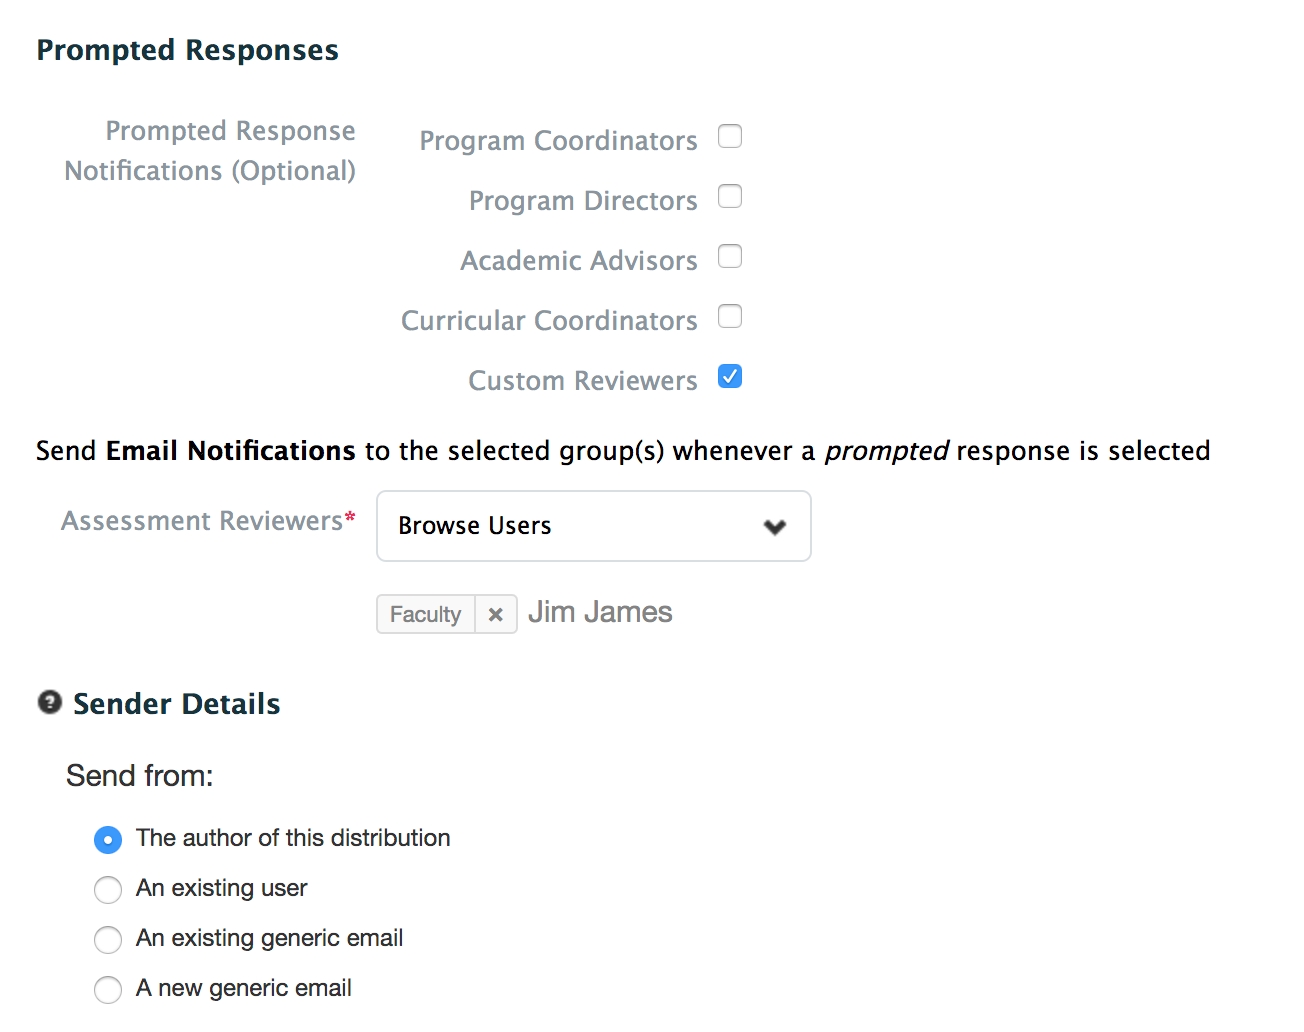
Prompted Responses: This allows you to define whom to send an email to whenever a prompted response is selected on a form used in the distribution. For example, if you have an item asking about student completion of a procedure and "I had to do it" was set as a prompted/flagged response, any time "I had to do it" is picked as an answer an email notification will be sent.
You can optionally select to email Program Coordinators, Program/Course Directors, Academic Advisors, Curricular Coordinators, or you can add a Custom Reviewer. If you select to add a Custom Reviewer you can select their name from a searchable list of users.
Sender Details: Define the email address that notifications and reminders will be sent from for a distribution.
Options are the distribution author, an existing user, an existing generic email, or a new generic email.
To create a new generic email provide a name and email address. This will be stored in the system and available to other users to use as needed.
Click 'Save Distribution'.
Currently this feature only supports using completing one task per distribution. Even if you configure Step 3: Targets, Target Attempt Options to be more than one (which the user interface does allow), the system will not be able to support assessors/evaluators choosing more than one target per distribution.
After the distribution is created, the distribution progress page will show targets as "Assessor will choose before completing task."
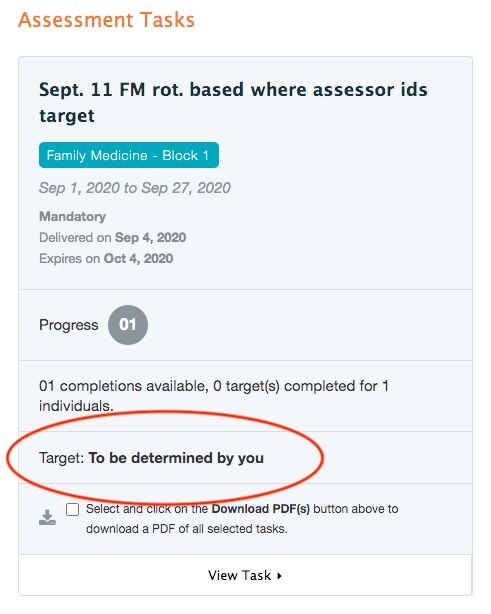
When an assessor/evaluator accesses the task they will see that the target is to be defined by them.
When completing the task, the assessor/evaluator will define their target.
If an existing distribution needs to be changed we recommend retiring the existing distribution and creating a new one. Additional details here.
For rotation-based distributions users might also edit a rotation schedule and individual learner bookings and that can impact any existing distributions.
If you are using a rotation-based distribution that relies on the clinical experience rotation schedule to determine the assessor (based on scheduled preceptors), updating a booking by changing the preceptor AFTER tasks have already been generated and delivered will result in the existing task being removed from the distribution progress report and a new one generating for the newly assigned preceptor. However, the original task will not automatically be removed from the original assessor's A&E task list. If the task was optional they will be able to delete it themselves, however, if the task was mandatory, at this point the best option is for an administrator to find the task from the Admin > A & E Dashboard and delete it there.
Currently, this feature is designed to support learner assessments only. A distribution set up as an evaluation will not work within the context of the ad hoc feature.
An ad hoc distribution allows an administrator to set up a form that is available to a specific audience, during a specific time frame, and can be initiated on demand by learners or faculty. A potential use case is a clinical environment where it is unknown which learners will work with which assessors. Using an ad hoc distribution, administrative staff can set up the distribution then allow learners or faculty to trigger the assessment and provide details about who the target or assessor in the situation was.
One advantage of using an ad hoc distribution over a workflow is that you will have a distribution report to review and monitor task completion for the specific distribution.
Please be aware of the following when using ad hoc distributions:
Users can only select 'complete and confirm via PIN' or 'send blank form' as form completion methods (you can't currently begin a form and send it via email or use the self-assess and send blank form options).
When setting the targets of a distribution you can only use cohort and individuals (you can't currently set the distribution up with a course audience or course group as the target).
The available assessors list will be based on course contacts from the course setup page.
Use the ad hoc distribution for assessments only.
There are some database settings that can be used to tailor the use of the ad hoc distributions. If you want to change these you will need help from a developer.
You can restrict the ability to initiate the form to only targets or only assessors (by default it is set to allow both to initiate forms). (settings: assessment_triggered_by_assessor and assessment_triggered_by_target)
You can turn on or off the ability to allow forms to be completed and confirmed via PIN or to send a blank form (by default the system will allow both). (settings: assessment_method_complete_and_confirm_by_pin and assessment_method_send_blank_form)
Permissions: Anyone with access to Admin > Assessment & Evaluation will be able to create an ad hoc distribution. For default installations this will include Medtech: Admin, Staff:Admin, Faculty:Admin, Staff:PCoordinator and Faculty:Directors.
Navigate to Admin > Assessment & Evaluation.
Click 'Distributions' above the Assessment and Evaluation heading.
Click 'Add New Distribution'.
Distribution Title: Provide a title. This will display on the list of Distributions that curriculum coordinators and program coordinators can view. In addition, this distribution title will be used by learners and faculty to access the form. For this reason, a clear title including a course or use is recommended (e.g. Clinical Skills Week 1 History).
Distribution Description: Description is optional.
Task Type: Hover over the question mark for more detail about how Elentra qualifies assessments versus evaluations. If a distribution is to assess learners, it's an assessment. If it is to evaluate courses, faculty, learning events, etc. it is an evaluation. Notice that the language on Step 4 will change if you switch your task type as will other steps of the wizard.
Assessment Mandatory: This will be checked off be default. Currently this information is recorded but does not impact how a task displays to a user.
Disable Initial Task Email: Introduced in ME 1.26 this option allows administrative users to opt-out of having Elentra sent initial task email notifications to assessors/evaluators. (Applies to non-delegation based distributions).
Select Form: The form you want to distribute must already exist and you must have permission to access the form; pick the appropriate form from the dropdown menu.
Select a Curriculum Period: The curriculum period you select will impact the list of available learners and associated faculty.
Select a Course: The course you select will impact the list of available learners and associated faculty.
Click 'Next Step'.
Distribution Method: Select 'Adhoc' from the dropdown menu.
Start Date: This is the beginning of the period the form is meant to reflect.
End Date: This is the end of the period the form is meant to reflect.
Task Expiry: Optional. Set the date on which the tasks generated by the distribution will automatically expire (i.e. disappear from the assessor's task list and no longer be available to complete). Tasks will expire at 12:00 AM on the day that you select, so it is best to select the day after your intended expiry date.
Delay Task Creation: This option relates specifically to creating a summary assessment task distribution. This allows you to create a distribution that will pull in and display completed tasks from other distributions. In effect, the assessor of the distribution you create will be able to see items from previously completed tasks and take them into account when completing their own task.
Select a distribution (note that you will only see distributions to which you have access).
Define how many tasks must be completed in the linked distribution(s) before the new distribution will take effect.
Enter a fallback date. This date represents when your distribution will create tasks whether or not the minimum number of tasks have been completed in the linked distribution.
You can adjust the fallback date on the fly and the distribution will adjust accordingly to only generate tasks as appropriate (previously created tasks will still remain).
If you set a fallback date that falls before the release date, the fallback date will be ignored.
Click 'Next Step'.
The target is who or what the form is about. You will only set specific targets if you are creating an assessment; if you are creating an evaluation you will not set a target list.
Select Targets: Use this area to specify the targets of the form.
When setting the targets of an ad hoc distribution for an assessment you can only use cohort and individuals (you can't currently set the distribution up with a course audience or course group as the target).
Target Attempt Options: Specify how many times an assessor can assess each target, OR whether the assessor can select which targets to assess and complete a specific number (e.g. assessor will be sent a list of 20 targets, they have to complete at least 10 and no more than 15 assessments but can select which targets they assess).
If you select the latter, you can define whether the assessor can assess the same target multiple times. Check off the box if they can.
Click 'Next Step'.
The assessors are the people who will complete the form. Currently, ad hoc distributions only support making faculty who are course contacts assessors. That means the faculty must be listed on the Course Setup tab as Associated Faculty or as Course Director.
There are three options:
Select faculty members
Browse faculty and click on the required names to add them as assessors
Select Associated Faculty to add the names of all faculty listed on the course setup page
Select learners
Click Browse Assessors and click on the appropriate option to add learners as assessors
Select individuals external to the installation of Elentra
This allows you to add external assessors to a distribution
Begin to type an email, if the user already exists you'll see them displayed in the dropdown menu. To create a new external assessor, scroll to the bottom of the list and click 'Add External Assessor'
Provide first and last name, and email address for the external assessor and click 'Add Assessor'
Exclude Self Assessments: Check this to stop learners from completing a self-assessment
Give access to the results of previous assessments: This relates to Elentra's ability to provide a summary assessment task to users. If enabled, tasks generated by this distribution will link to tasks completed in the listed distributions. When users complete the summary assessment task they will be able to view tasks completed in the other distributions. For any items that are used on both forms, results from previously completed tasks will be aggregated for the assessor to view.
Click to add the relevant distribution(s).
Click 'Next Step'
You can immediately save your distribution at this point and it will generate the required tasks, but there is additional setup you can configure if desired.
Authorship: This allows you to add individual authors, or set the distribution to be accessible to everyone with A&E access in a course or organization. (This may be useful if you have multiple users who manage distributions or frequent staffing changes.)
Target Release: These options allow you to specify whether the targets of the distribution can see the results of completed forms.
Task List Release:
"Targets can view tasks completed on them after meeting the following criteria" can be useful to promote completion of tasks and is often used in the context of peer assessments. Targets will only see tasks completed on them after they have completed the minimum percentage of their tasks set by you.
Target Self-Reporting Release: This controls whether targets can run reports for this distribution (i.e. to generate an aggregated report of all responses). When users access their own A+E they will see a My Reports button. This will allow them to access any reports available to them.
Target Self-Reporting Options: This allows you to specify whether or not comments included in reports are anonymous or identifiable. (This will only be applied if you have set reports to be accessible to the targets.)
Reviewers: This allows you to set up a reviewer to view completed tasks before they are released to the target (e.g. a staff person might review peer feedback before it is shared with the learner).
Check off the box to enable a reviewer.
Click Browse Reviewers and select a name from the list. Note that this list will be generated based on the course contacts (e.g. director, curriculum coordinator) stored on the course setup page.
Notifications and Reminders:
Prompted Responses: This allows you to define whom to send an email to whenever a prompted response is selected on a form used in the distribution. For example, if you have an item asking about student completion of a procedure and "I had to do it" was set as a prompted/flagged response, any time "I had to do it" is picked as an answer an email notification will be sent.
You can optionally select to email Program Coordinators, Program/Course Directors, Academic Advisors, Curricular Coordinators, or you can add a Custom Reviewer. If you select to add a Custom Reviewer you can select their name from a searchable list of users.
Sender Details: Define the email address that notifications and reminders will be sent from for a distribution.
Options are the distribution author, an existing user, an existing generic email, or a new generic email.
To create a new generic email provide a name and email address. This will be stored in the system and available to other users to use as needed.
Click 'Save Distribution'.
Once an ad hoc distribution has been created you can monitor its progress from Admin > Assessment & Evaluation. Click on Distributions, and then the name of the distribution.
The Show Progress screen you:
Not Started (forms that have been triggered but not started)
In Progress (forms that have been triggered, started, and saved in draft mode)
Completed (forms that have been triggered and completed).
Click on any of the labels to view the names of the targets and assessors and delivery dates.
Administrative staff can also send reminders, and add and delete tasks from here.
After an ad hoc distribution has been set up (remember it may take up to a day for your distribution to become active depending on when behind the scenes cron jobs happen), learners and faculty can initiate a task from their main dashboard.
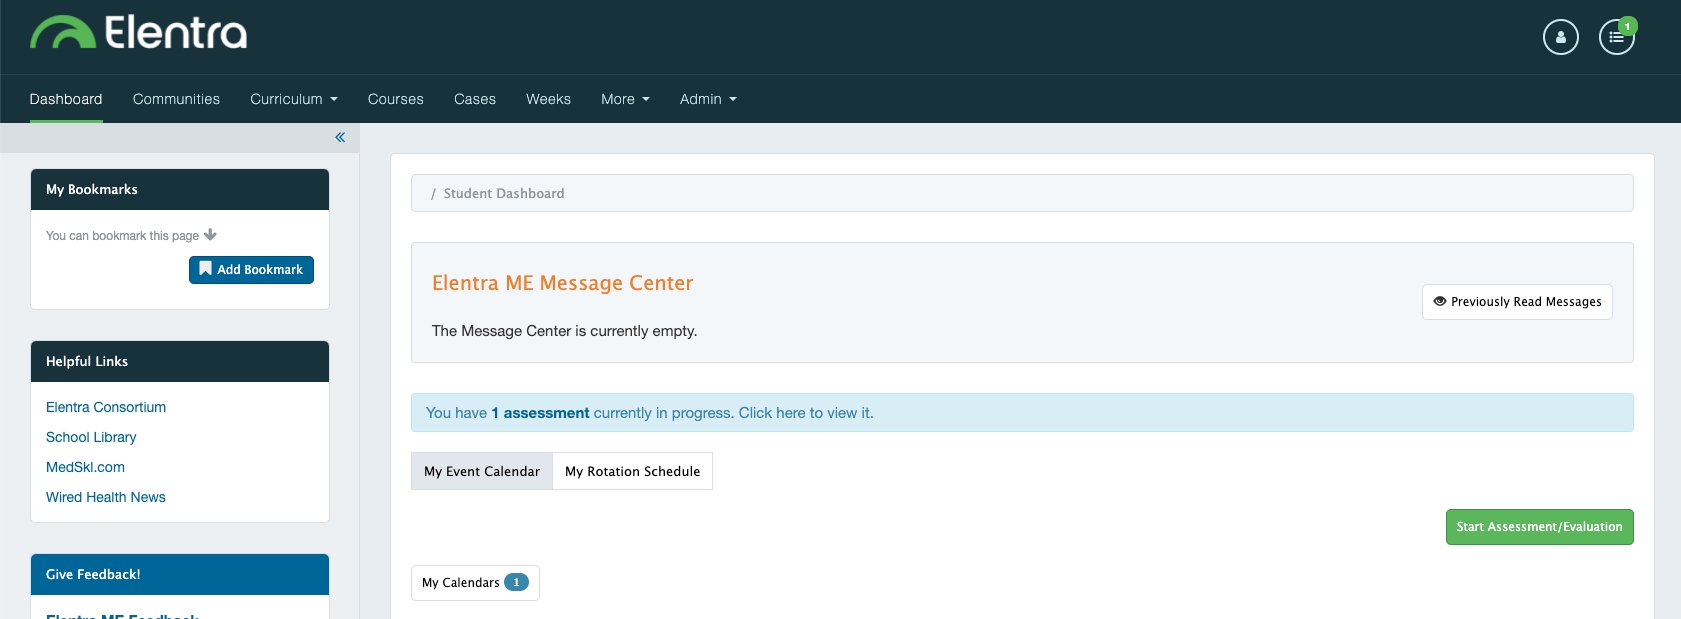
From the dashboard, click 'Start Assessment/Evaluation'.
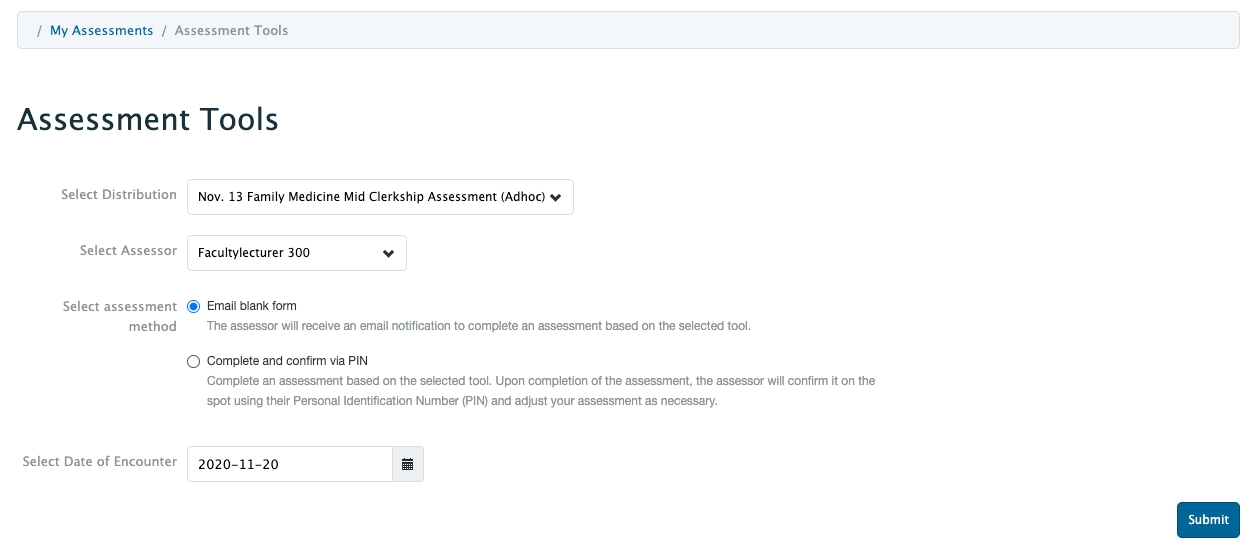
Click the Adhoc Distributions tab to move to the correct menu to initiate a task.
Select a distribution (begin to type a distribution name to quickly filter the list).
Select an assessor. Hover over an assessor name to see their photo (if uploaded) and details about them including email and course affiliation.
Select the assessment method. (The methods of completion available to users can be configured in the database for an organization. Speak to a developer if you want to change which assessment methods are available to users.)
Email blank form will send a copy of the form to the selected assessor.
If the assessor has a PIN set the system will automatically default to Complete and confirm via PIN as the assessment method.
Select a date of encounter.
Click 'Submit'.
If the learner selected 'Email blank form', the assessor will receive an email alerting them to the task; additionally, they will see the task added to their Assessment Tasks list accessible from their A&E badge in the dashboard header.
If the learner selected Complete and confirm via PIN, the form will display on the screen. The learner can begin to complete the form, then pass the device to the assessor. When the form is complete, the assessor can enter their PIN to confirm and complete the form.
Note that if a form triggered using Complete and confirm via PIN is saved as a draft, the learner will need to reopen the form when in the company of the assessor to have the form completed.
After a form is completed, the learner's ability to view it will depend on the distribution settings. If the distribution allows the learners to view the tasks, they will be able to view them from their Tasks Completed on Me list accessed from their A&E badge in the dashboard header.
From the dashboard, click 'Start Assessment/Evaluation'.
Click the Adhoc Distributions tab to move to the correct menu to initiate a task.
Select a distribution (begin to type a distribution name to quickly filter the list).
Select a target. Hover over a target name to see their photo (if uploaded) and details about them including email, group and role (e.g. student, 2022) and enrolled courses.
Select a date of encounter.
Click 'Begin Assessment'.
The form will display on the screen.
The faculty member can complete the form and Save as Draft or Submit. Note that if the user saves the form as draft, they will have to reopen and complete it at a later date.
The faculty member can delete the task if they triggered it in error.
The faculty member can forward the task to another faculty member if needed.
Faculty can view their draft forms, or forms that leaners have triggered to them from their Assessment & Evaluation badge located in the dashboard header. The tasks to be completed will display in the Assessment Tasks list.
\
You can use a delegation distribution to send tasks to a delegator who can then forward the tasks to the appropriate assessor/evaluator. The use case for this might be setting up a distribution at the beginning of the year and not knowing exactly which preceptors will be working in a specific environment. You can send the distribution to a staff member who can forward the tasks once a clinic schedule is set or send the distribution to a user who is actually the target of the task and can then delegate the task to the appropriate assessor/evaluator.
Navigate to Admin > Assessment and Evaluation.
Click 'Distributions' above the Assessment and Evaluation heading.
Click 'Add New Distribution'.
Distribution Title: Provide a title. This will display on the list of Distributions that curriculum coordinators and program coordinators can view.
Distribution Description: Description is optional.
Task Type: Hover over the question mark for more detail about how Elentra qualifies assessments versus evaluations. If a distribution is to assess learners, it's an assessment. If it is to evaluate courses, faculty, learning events, etc. it is an evaluation. Notice that the language on Step 4 will change if you switch your task type.
Disable Target Release: This will only display for Evaluations. If you do not want evaluators to be able to release the form to the target upon completion, check this box. If left unchecked, evaluators will be able to release the form to the target upon completion.
Assessment/Evaluation Mandatory: This will be checked off be default.
Disable Initial Task Email: This option will not be enforced on Delegation Distributions so should be ignored.
Disable Reminders: Check this box to exclude this distribution from reminder notification emails.
Select Form: The form you want to distribute must already exist; pick the appropriate form.
Select a Curriculum Period: The curriculum period you select will impact the list of available learners and associated faculty.
Select a Course: The course you select will impact the list of available learners and associated faculty.
Click 'Next Step'
Distribution Method: Select 'Delegation' from the dropdown menu.
Delegator: Click Browse Delegators and select the appropriate name from the dropdown menu. You can only select one delegator.
Delegation Options:
Delegation based on date range
Delegation based on rotation schedule
Delegator Type:
The delegator is an individual
The delegator is the target
From this point forward the distribution wizard will be configured based on whether you selected a date range or rotation-based distribution. Please refer the the help pages for those two methods for additional details.
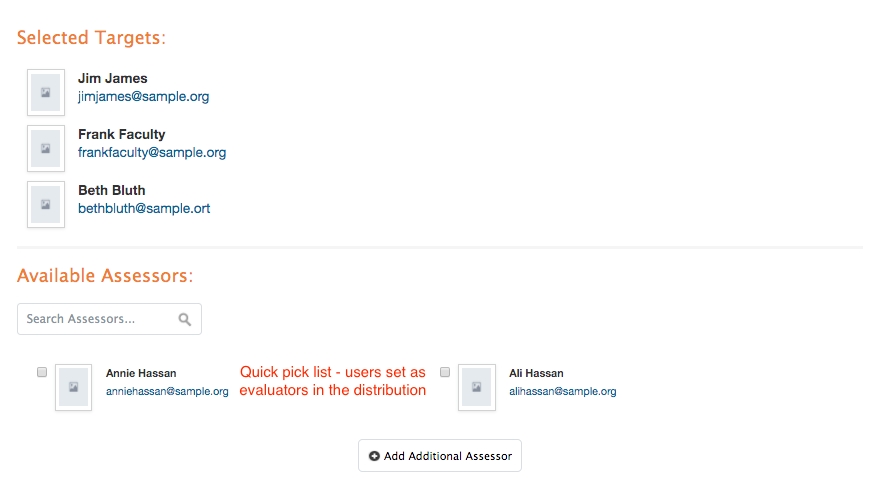
You can optionally add Assessors for a delegation distribution. The users you add to this list will be made available to the delegator to select from a quick pick list. The delegator will optionally be able to search for and add additional assessors/evaluators as needed.
If you don't want to define any assessors, check "The assessors for this Delegation Distribution are unknown."
A distribution based on a learning event schedule allows you to schedule forms to be sent out where the targets of the distribution are the attendees of the event OR faculty who taught the event OR a specific event within the selected event type.
Navigate to Admin>Assessment and Evaluation.
Click 'Distributions' above the Assessment and Evaluation heading.
Click 'Add New Distribution'.
Distribution Title: Provide a title. This will display on the list of Distributions that curriculum coordinators and program coordinators can view.
Distribution Description: Description is optional.
Task Type: Hover over the question mark for more detail about how Elentra qualifies assessments versus evaluations. If a distribution is to assess learners, it's an assessment. If it is to evaluate courses, faculty, learning events, etc. it is an evaluation. Notice that the language on Step 4 will change if you switch your task type. The task type will also dictate other fields available throughout the wizard.
Disable Target Release: This will only display for Evaluations. If you do not want evaluators to be able to release the form to the target upon completion, check this box. If left unchecked, evaluators will be able to release the form to the target upon completion.
Assessment/Evaluation Mandatory: This will be checked off be default.
Disable Reminders: Check this box to exclude this distribution from reminder notification emails.
Assessment/Evaluation Mandatory: This will be checked off by default. Mandatory tasks can't be deleted by assessors/evaluators.
Disable Initial Task Email: Introduced in ME 1.26 this option allows administrative users to opt-out of having Elentra sent initial task email notifications to assessors/evaluators. (Applies to non-delegation based distributions).
Select Form: The form you want to distribute must already exist; pick the appropriate form.
Select a Curriculum Period: The curriculum period you select will impact the list of available learners and associated faculty.
Select a Course: The course you select will impact the list of available learners and associated faculty.
Click 'Next Step'
Distribution Method: Select 'Learning Event Schedule' from the dropdown menu.
Select Event Type: Select the appropriate event type(s) from the dropdown menu. You can select multiple event types as needed.
Release Date: This tells the system how far back on the calendar to go when creating tasks. Hover over the question mark for more detail.
Task Expiry: If you check this box, the tasks generated by the distribution will automatically expire (i.e. disappear from the assessors task list and no longer be available to complete). You can customize when the task will expire in terms of days and hours after the delivery.
Warning Notification: If you choose to use the Task Expiry option, you'll also be able to turn on a warning notification if desired. This can be set up to send an email a specific number of days and hours before the task expires.
Delay Task Creation: This option relates specifically to creating a summary assessment task distribution. This allows you to create a distribution that will pull in and display completed tasks from other distributions. In effect, the assessor of the distribution you create will be able to see items from previously completed tasks and take them into account when completing their own task.
Select a distribution (note that you will only see distributions to which you have access).
Define how many tasks must be completed in the linked distribution(s) before the new distribution will take effect.
Enter a fallback date. This date represents when your distribution will create tasks whether or not the minimum number of tasks have been completed in the linked distribution.
You can adjust the fallback date on the fly and the distribution will adjust accordingly to only generate tasks as appropriate (previously created tasks will still remain).
If you set a fallback date that falls before the release date, the fallback date will be ignored.
The target is who or what the form is about.
If you are creating an Evaluation:
Evaluations delivered for:
Faculty who taught events with the selected event types (this will generate an evaluation for any faculty member who taught the event type specified in the Method section, e.g. lecture, lab, etc.)
Events with the selected event types (this will generate an evaluation for any event of the event type specified in the Method section)
Target Attempt Options: Specify how many times an evaluator can evaluate each target, OR whether the evaluator can select which targets to assess and complete a specific number (e.g. evaluator will be sent a list of 20 targets, they have to complete at least 10 and no more than 15 evaluations but can select which targets they evaluate).
If you select the latter, you can define whether the evaluator can evaluate the same target multiple times. Check off the box if they can.
Click 'Next Step'
If you are creating an Assessment:
Assessments delivered for: Currently, the only option here is attendees who are enrolled in events with the specified event type.
Target Attempt Options: Specify how many times an assessor can assess each target, OR whether the assessor can select which targets to assess and complete a specific number (e.g. assessor will be sent a list of 20 targets, they have to complete at least 10 and no more than 15 assessments but can select which targets they assess).
If you select the latter, you can define whether the assessor can assess the same target multiple times. Check off the box if they can.
Click 'Next Step'
The assessors/evaluators are the people who will complete the form.
Assessor Options
Assessors/evaluators are attendees enrolled in the event
Attendee Options (note that you must be using Elentra's attendance module within events to use this feature)
Send to all enrolled audience attendees that attended the event
Sent to all enrolled attendees, even if they did not attend
Send this assessment to a percentage of enrolled attendees that attended the event
You supply the percentage; this option will randomly select the appropriate number of attendees and send them tasks. You'll be able to see which users have been sent the task after the distribution is saved.
Note: If you use this option and individual tasks are deleted (by a user or by an administrator), new tasks will generate in order to meet the required percentage. This can occur even if the task is deleted long after the relevant event. As such, you may consider using an expiry date when selecting to send tasks to a percentage of attendees.
Assessors/evaluators are faculty members associated with the event
This will send the distribution to the faculty listed on the event (e.g. teacher, tutor, etc.)
Assessors/evaluators are external to the installation of Elentra
This allows you to add external assessors/evaluators to a distribution
Begin to type an name or email, if the user already exists you'll see them displayed in the dropdown menu. To create a new external user, scroll to the bottom of the list and click 'Add External Assessor/Evaluator'
Provide first and last name, and email address for the external assessor and click 'Add Assessor/Evaluator'
Give access to the results of previous assessments: This relates to Elentra's ability to provide a summary assessment task to users. If enabled, tasks generated by this distribution will link to tasks completed in the listed distributions. When users complete the summary assessment task they will be able to view tasks completed in the other distributions. For any items that are used on both forms, results from previously completed tasks will be aggregated for the assessor to view.
Click to add the relevant distribution(s).
Currently for learning event based distributions there is no option to configure minimum tasks completed on linked distributions nor a fallback date for the summary assessment task.
Click 'Next Step'
You can immediately save your distribution at this point and it will generate the required tasks, but there is additional setup you can configure if desired. (Not all options will display depending on the other parameters of the distribution.)
Authorship: This allows you to add individual authors, or set the distribution to be accessible to everyone with A+E access in a course or organization. (This may be useful if you have multiple users who manage distributions or frequent staffing changes.)
Target Release: These options allow you to specify whether the targets of the distribution can see the results of completed forms.
Task List Release:
"Targets can view tasks completed on them after meeting the following criteria" can be useful to promote completion of tasks and is often used in the context of peer assessments. Targets will only see tasks completed on them after they have completed the minimum percentage of their tasks set by you.
Target Self-Reporting Release: This controls whether targets can run reports for this distribution (i.e. to generate an aggregated report of all responses). When users access their own A+E they will see a My Reports button. This will allow them to access any reports available to them.
Target Self-Reporting Options: This allows you to specify whether or not comments included in reports are anonymous or identifiable. (This will only be applied if you have set reports to be accessible to the targets.)
Reviewers: This allows you to set up a reviewer to view completed tasks before they are released to the target (e.g. a staff person might review peer feedback before it is shared with the learner).
Check off the box to enable a reviewer.
Click Browse Reviewers and select a name from the list. Note that this list will be generated based on the course contacts (e.g. director, curriculum coordinator) stored on the course setup page.
Notifications and Reminders:
Prompted Responses: This allows you to define whom to send an email to whenever a prompted response is selected on a form used in the distribution. For example, if you have an item asking about student completion of a procedure and "I had to do it" was set as a prompted/flagged response, any time "I had to do it" is picked as an answer an email notification will be sent.
You can optionally select to email Program Coordinators, Program/Course Directors, Academic Advisors, Curricular Coordinators, or you can add a Custom Reviewer. If you select to add a Custom Reviewer you can select their name from a searchable list of users.
Sender Details: Define the email address that notifications and reminders will be sent from for a distribution.
Options are the distribution author, an existing user, an existing generic email, or a new generic email.
To create a new generic email provide a name and email address. This will be stored in the system and available to other users to use as needed.
Click 'Save Distribution'.
New in ME 1.20!
Reciprocal distributions can now be created for delegation-based distributions.
The Reciprocal Distribution method allows an administrator to set up a distribution that delivers tasks based on the status of tasks delivered by another distribution. Reciprocal tasks can be delivered either when the corresponding distribution tasks are delivered (i.e., the corresponding distribution tasks don't have to be completed in order for corresponding tasks be be delivered by the reciprocal distribution) or when the corresponding distribution tasks are completed (i.e., the corresponding distribution tasks must be completed in order for the reciprocal distribution tasks to be delivered).
The distribution off of which the reciprocal distributions is based must be either a date range-based, rotation-based and delegation distributions.
An example of a reciprocal distribution might be that you set up a Learner Assessment distribution that delivers tasks to an assessor to assess learner performance; when those are delivered, you'd also like the learners being assessed by the assessors identified in the Learner Assessment distribution to automatically receive an Evaluation task to complete on their assessor.
Build the distribution off of which you would like the reciprocal distribution to run; note that this distribution must use either a date range, rotation-based or delegation distribution method.
E.g., an admin wants a faculty evaluation task sent to the target of an assessment so that the learner can evaluate to the assessor, first set up the assessment distribution.
Build a second distribution that will look at the first distribution in order to deliver tasks
E.g., in the example given above, the next step would be to set up the evaluation distribution.
When building the second distribution, select the distribution method of Reciprocal Distribution on Step 2: Method
When Reciprocal Distribution is chosen, the admin can then select the corresponding distribution they want the current distribution to be based on.
The next step allows the admin to select either "I want this distribution to deliver a task each time the corresponding distribution delivers a task" or "I want this distribution to deliver a task each time a task from corresponding distribution is completed".
Step 3: Targets: allows the admin to select "The targets of this distribution will be determined by the corresponding distribution."
Step 4: Assessors/Evaluators: allows the admin to select "The assessors (or evaluators) of this distribution will be determined by the corresponding distribution."
Step 5: the selections available on Step 5 of the distribution will be determined by the type of distribution (assessment or evaluation) that was selected in Step 1.
After you have created your first distribution, based on which you would like tasks delivered by a reciprocal distribution, create a corresponding reciprocal distribution.
In this particular example, a faculty evaluation distribution is being created to deliver tasks based on a previous learner assessment distribution; i.e., the first distribution will ask faculty to assess a learner; based on that distribution, this reciprocal distribution will ask the learner to complete an evaluation of the faculty who assessed them.
Enter a Distribution Title and make it as descriptive as possible.
The optional Distribution Description allows you to clarify the intention of the task and will appear on the task card on the assessor/evaluator’s My Assessments page.
Select Assessment or Evaluation from the Task Type dropdown (depending on the type of distribution you to create). This selection is important; it will determine available settings in the Distribution Wizard going forward.
In this case, Evaluation is selected.
Leave the Disable Target Release checkbox unticked if you would like the evaluator to be able to choose to release their completed evaluation to the target.
Leave the Assessment/Evaluation Mandatory checkbox ticked if the assessment/evaluation is considered mandatory.
Disable Initial Task Email: Introduced in ME 1.26 this option allows administrative users to opt-out of having Elentra sent initial task email notifications to assessors/evaluators. (Applies to non-delegation based distributions).
Leave the Disable Reminders checkbox unticked if you would like the tasks in this distribution to be included in the weekly reminder summary email notification. If you place a tick in this checkbox, initial task creation email notifications will be sent, but weekly reminder summary emails will be disabled.
Select a form using the Browse Forms dropdown.
Select a curriculum period from the Browse Curriculum Periods dropdown.
Select a course/program from the Browse Programs dropdown.
Click Next Step to move on to Step 2: Method.
Note: the ‘Previous Step’ button allows you to navigate back to Step 1. You can cancel out of the distribution on any page; it will only be saved once you complete all 5 steps.
Select a Distribution Method from the dropdown: choose Reciprocal.
Select the Corresponding Distribution: from the list of distributions that you have access to, select the distribution whose tasks you want your reciprocal distribution's task delivery to be based on.
Specify when the new task should be delivered: identify when you would like the tasks generated by your reciprocal distribution to be delivered based on the corresponding distribution.
On previous task delivery: tasks will be delivered by the reciprocal distribution when the corresponding tasks are delivered, regardless of whether or not they are actually completed.
On previous task completion: tasks will be delivered by the reciprocal distribution only when the associated tasks on the corresponding distribution are completed.
Task Expiry: If you check this box, the tasks generated by the distribution will automatically expire; i.e., they will disappear from the evaluator’s task list and no longer be available to complete. You can customize when the task will expire in terms of days and hours after the delivery. When in doubt, leave this field blank.
Warning Notification: If you choose to use the Task Expiry option, you'll also be able to turn on a warning notification if desired. This can be set up to send an email a specific number of days and hours before the task expires.
Click Next Step to move on to Step 3: Targets.
Targets are the object of the assessment: those learners whose academic performance is being assessed.
Target option: select the target will be the assessor/evaluator of the previous task.
Target attempt options: (always select the first choice, the second choice is for peer assessments). Leave the default setting of: Assessors can assess each target a minimum of (1) times and a maximum of (1) times.
Click Next Step to move on to Step 4: Assessors/Evaluators.
Select an Assessor/Evaluator Option: select the assessor/evaluator will be the target of the previous task.
Click Next Step to move on to Step 5: Results.
The Results settings are optional. If you do not wish to edit them, simply click the Save Distribution button. Otherwise, click on a heading to toggle a section open.
**Authorship:**This allows you to add individual authors or set the distribution to be accessible and editable by everyone with A&E access in a program/course or organization. This may be useful if you have multiple users who manage distributions or frequent staffing changes.
Choose an Author Type from the dropdown: Individual, Organization or Course (Program)
Individual Author names can be added using the Distributions Authors search box.
Target Release: This option was created for Undergraduate Medicine and can be skipped over by Postgraduate Medicine programs. This option allows you to specify whether the targets of the distribution can see the aggregated results of completed forms. Note: completed evaluation tasks are automatically hidden from target view by the system.
Task List Release: “Targets can view tasks completed on them after meeting the following criteria” can be useful to promote completion of tasks and is often used in the context of peer assessments. Targets will only see tasks completed on them after they have completed the minimum percentage of their own tasks set by you.
Target Self-Reporting Release: This controls whether targets can run reports for this distribution; i.e., to generate an aggregated report of all responses. When users access their own A&E badge, they will see a ‘My Reports’ button. This will allow them to access any reports available to them.
Target Self-Reporting Options: This allows you to specify whether or not comments included in reports are anonymous or identifiable. This will only be applied if you have set reports to be accessible to the targets.
Reviewers: This allows you to set up a reviewer to view completed tasks before they are released to the target; e.g., a staff person might review peer feedback before it is shared with the learner. They can decide to forward the form to the target or to hide the form from the target.
Check off the box to enable a reviewer.
Click Browse Reviewers and select a name from the list. Note: This list will be generated based on the course/program’s contacts (e.g., director, curriculum coordinator) stored on the course Setup page.
Prompted Response Notifications can be enabled to send selected individuals an email message when evaluators choose a response that has been flagged on the form as a ‘prompted response’. E.g., if you have an item asking about student completion of a procedure and "I had to do it" was set as a prompted/flagged response, a notification can be delivered to the individual(s) you identify in this step. You can optionally select to email the Evaluation Reviewers, Program Coordinators, Program/Course Directors, or Distribution Authors.
Click Save Distribution. The distribution will be ‘live’ as of the next day. It will be triggered when a learner is on the rotation and forms will be sent out on the date defined by the rules you set up.
When tasks are created, if the criteria for delivering the task has not yet been met, you'll see that detail in the distribution progress report.
Note that in a rotation based distribution you are able to toggle between a block view and date range view of the distribution report. When using Block view you can view completion per block and switch blocks as needed using the forward and back arrows.
Additionally, if the target option for a distribution was that the assessor/evaluator would define their target when completing a task, pending tasks will display the target as to be defined.
Elentra's Summary Assessment Task option allows you to create a distribution that allows the assessor for said distribution to view the results of previously completed tasks (on a per distribution basis).
Please note that this feature is currently for distributed assessment tasks only. Additionally, it can't be used with form templates and tasks triggered on-demand (i.e., CBME tools).
Summary assessment tasks are configured through regular distributions. Within the instructions for each distribution, you'll see additional notes about the options to enable for summary assessment tasks (i.e., the Delay Distribution Availability option on Step 2: Method, and the Give access to the results of previous assessments option on Step 4: Assessors/Evaluators).
Users completing a summary assessment task can:
View aggregate data (but not average scores) for any items that were included on tasks in associated distributions and the summary assessment task (note, the assessment item ids on each form must match for this feature to work)
2. View comments from tasks from associated distributions and see the date, time, assessor and distribution
3. Search for and view completed tasks from associated distributions, even if not all items are included on the summary assessment task
While reviewing previous tasks, easily navigate between distributions, tasks, or learners as needed.\
When administrators configure a distribution to create summary assessment tasks, they can:
Define which previous distributions to link to (associated distributions)
For date based distributions and adhoc distributions only:
Optionally define a minimum number of tasks to be completed in the associated distribution(s) before summary assessment tasks are generated
Optionally define a failsafe date on which to send the summary assessment task, even if minimum numbers tasks in associated distributions have not been achieved
If a summary assessment task has been completed and then more tasks are completed in the associated/evidence distributions, will the summary assessment task reopen to be edited?
Not automatically. If an admin user wants to manually reopen the summary assessment task so that the assessor can edit their responses, they can do so. Note that if the task was already made visible to learners, editing it may cause confusion.\
What happens if you set the delivery date for the distribution before the fallback date? The fallback date will be ignored.\
How soon after the tasks in the associated distributions are completed will the summary assessment task be created? The summary assessment task will be eligible to be created as soon as the tasks in the associated distributions are completed. When the tasks actually get delivered to the assessor will depend on the schedule of some behind the scenes tasks (cron jobs) that your installation of Elentra performs. At many schools, the tasks will be delivered the next day.\
Feedback Options: Check this to add an item to the form requiring the target and assessor to confirm they spoke. More detail .
Complete and confirm via PIN will allow the learner to immediately view and start the form, then have the assessor sign off on the form using his/her PIN. (For information on setting user PINs, please see .)
Please see for more information about how to complete a delegation task.
New in ME 1.20!
Updates to the way that Forwarded Tasks display in distribution progress reports.
After a distribution is created you can view a distribution progress report. Reports include an overview of the tasks generated and not started, the tasks in progress and completed tasks. Click on any of the status cards to display the individual tasks in each status category.
From the Distribution Report you can also complete a variety of actions including: deleting a task, recovering a deleted task, sending a reminder, adding a task, downloading completed tasks, and completing a task on someone's behalf. For some distribution types you can also generate a weighted csv report from the Distribution Report.
More details about these actions are available in the Administrator Use section.
As of Elentra ME 1.20 we have updated how distribution progress reports show forwarded tasks. Previously, forwarded tasks were no longer visible on the relevant distribution progress page. Now, after a task has been forwarded, it will still display on the distribution progress report, listed under a new assessor/evaluator, and will display a 'forwarded' label.
Please note that a forwarded task will only show on the distribution progress report when it has been forwarded one time. If it is forwarded a second time it will be gone from the distribution progress report view.


