Currently, this feature is designed to support learner assessments only. A distribution set up as an evaluation will not work within the context of the ad hoc feature.
An ad hoc distribution allows an administrator to set up a form that is available to a specific audience, during a specific time frame, and can be initiated on demand by learners or faculty. A potential use case is a clinical environment where it is unknown which learners will work with which assessors. Using an ad hoc distribution, administrative staff can set up the distribution then allow learners or faculty to trigger the assessment and provide details about who the target or assessor in the situation was.
One advantage of using an ad hoc distribution over a workflow is that you will have a distribution report to review and monitor task completion for the specific distribution.
Please be aware of the following when using ad hoc distributions:
Users can only select 'complete and confirm via PIN' or 'send blank form' as form completion methods (you can't currently begin a form and send it via email or use the self-assess and send blank form options).
When setting the targets of a distribution you can only use cohort and individuals (you can't currently set the distribution up with a course audience or course group as the target).
The available assessors list will be based on course contacts from the course setup page.
Use the ad hoc distribution for assessments only.
There are some database settings that can be used to tailor the use of the ad hoc distributions. If you want to change these you will need help from a developer.
You can restrict the ability to initiate the form to only targets or only assessors (by default it is set to allow both to initiate forms). (settings: assessment_triggered_by_assessor and assessment_triggered_by_target)
You can turn on or off the ability to allow forms to be completed and confirmed via PIN or to send a blank form (by default the system will allow both). (settings: assessment_method_complete_and_confirm_by_pin and assessment_method_send_blank_form)
Permissions: Anyone with access to Admin > Assessment & Evaluation will be able to create an ad hoc distribution. For default installations this will include Medtech: Admin, Staff:Admin, Faculty:Admin, Staff:PCoordinator and Faculty:Directors.
Navigate to Admin > Assessment & Evaluation.
Click 'Distributions' above the Assessment and Evaluation heading.
Click 'Add New Distribution'.
Distribution Title: Provide a title. This will display on the list of Distributions that curriculum coordinators and program coordinators can view. In addition, this distribution title will be used by learners and faculty to access the form. For this reason, a clear title including a course or use is recommended (e.g. Clinical Skills Week 1 History).
Distribution Description: Description is optional.
Task Type: Hover over the question mark for more detail about how Elentra qualifies assessments versus evaluations. If a distribution is to assess learners, it's an assessment. If it is to evaluate courses, faculty, learning events, etc. it is an evaluation. Notice that the language on Step 4 will change if you switch your task type as will other steps of the wizard.
Assessment Mandatory: This will be checked off be default. Currently this information is recorded but does not impact how a task displays to a user.
Disable Initial Task Email: Introduced in ME 1.26 this option allows administrative users to opt-out of having Elentra sent initial task email notifications to assessors/evaluators. (Applies to non-delegation based distributions).
Select Form: The form you want to distribute must already exist and you must have permission to access the form; pick the appropriate form from the dropdown menu.
Select a Curriculum Period: The curriculum period you select will impact the list of available learners and associated faculty.
Select a Course: The course you select will impact the list of available learners and associated faculty.
Click 'Next Step'.
Distribution Method: Select 'Adhoc' from the dropdown menu.
Start Date: This is the beginning of the period the form is meant to reflect.
End Date: This is the end of the period the form is meant to reflect.
Task Expiry: Optional. Set the date on which the tasks generated by the distribution will automatically expire (i.e. disappear from the assessor's task list and no longer be available to complete). Tasks will expire at 12:00 AM on the day that you select, so it is best to select the day after your intended expiry date.
Delay Task Creation: This option relates specifically to creating a summary assessment task distribution. This allows you to create a distribution that will pull in and display completed tasks from other distributions. In effect, the assessor of the distribution you create will be able to see items from previously completed tasks and take them into account when completing their own task.
Select a distribution (note that you will only see distributions to which you have access).
Define how many tasks must be completed in the linked distribution(s) before the new distribution will take effect.
Enter a fallback date. This date represents when your distribution will create tasks whether or not the minimum number of tasks have been completed in the linked distribution.
You can adjust the fallback date on the fly and the distribution will adjust accordingly to only generate tasks as appropriate (previously created tasks will still remain).
If you set a fallback date that falls before the release date, the fallback date will be ignored.
Click 'Next Step'.
The target is who or what the form is about. You will only set specific targets if you are creating an assessment; if you are creating an evaluation you will not set a target list.
Select Targets: Use this area to specify the targets of the form.
When setting the targets of an ad hoc distribution for an assessment you can only use cohort and individuals (you can't currently set the distribution up with a course audience or course group as the target).
Target Attempt Options: Specify how many times an assessor can assess each target, OR whether the assessor can select which targets to assess and complete a specific number (e.g. assessor will be sent a list of 20 targets, they have to complete at least 10 and no more than 15 assessments but can select which targets they assess).
If you select the latter, you can define whether the assessor can assess the same target multiple times. Check off the box if they can.
Click 'Next Step'.
The assessors are the people who will complete the form. Currently, ad hoc distributions only support making faculty who are course contacts assessors. That means the faculty must be listed on the Course Setup tab as Associated Faculty or as Course Director.
There are three options:
Select faculty members
Browse faculty and click on the required names to add them as assessors
Select Associated Faculty to add the names of all faculty listed on the course setup page
Select learners
Click Browse Assessors and click on the appropriate option to add learners as assessors
Select individuals external to the installation of Elentra
This allows you to add external assessors to a distribution
Begin to type an email, if the user already exists you'll see them displayed in the dropdown menu. To create a new external assessor, scroll to the bottom of the list and click 'Add External Assessor'
Provide first and last name, and email address for the external assessor and click 'Add Assessor'
Exclude Self Assessments: Check this to stop learners from completing a self-assessment
Feedback Options: Check this to add an item to the form requiring the target and assessor to confirm they spoke. More detail here.
Give access to the results of previous assessments: This relates to Elentra's ability to provide a summary assessment task to users. If enabled, tasks generated by this distribution will link to tasks completed in the listed distributions. When users complete the summary assessment task they will be able to view tasks completed in the other distributions. For any items that are used on both forms, results from previously completed tasks will be aggregated for the assessor to view.
Click to add the relevant distribution(s).
Click 'Next Step'
You can immediately save your distribution at this point and it will generate the required tasks, but there is additional setup you can configure if desired.
Authorship: This allows you to add individual authors, or set the distribution to be accessible to everyone with A&E access in a course or organization. (This may be useful if you have multiple users who manage distributions or frequent staffing changes.)
Target Release: These options allow you to specify whether the targets of the distribution can see the results of completed forms.
Task List Release:
"Targets can view tasks completed on them after meeting the following criteria" can be useful to promote completion of tasks and is often used in the context of peer assessments. Targets will only see tasks completed on them after they have completed the minimum percentage of their tasks set by you.
Target Self-Reporting Release: This controls whether targets can run reports for this distribution (i.e. to generate an aggregated report of all responses). When users access their own A+E they will see a My Reports button. This will allow them to access any reports available to them.
Target Self-Reporting Options: This allows you to specify whether or not comments included in reports are anonymous or identifiable. (This will only be applied if you have set reports to be accessible to the targets.)
Reviewers: This allows you to set up a reviewer to view completed tasks before they are released to the target (e.g. a staff person might review peer feedback before it is shared with the learner).
Check off the box to enable a reviewer.
Click Browse Reviewers and select a name from the list. Note that this list will be generated based on the course contacts (e.g. director, curriculum coordinator) stored on the course setup page.
Notifications and Reminders:
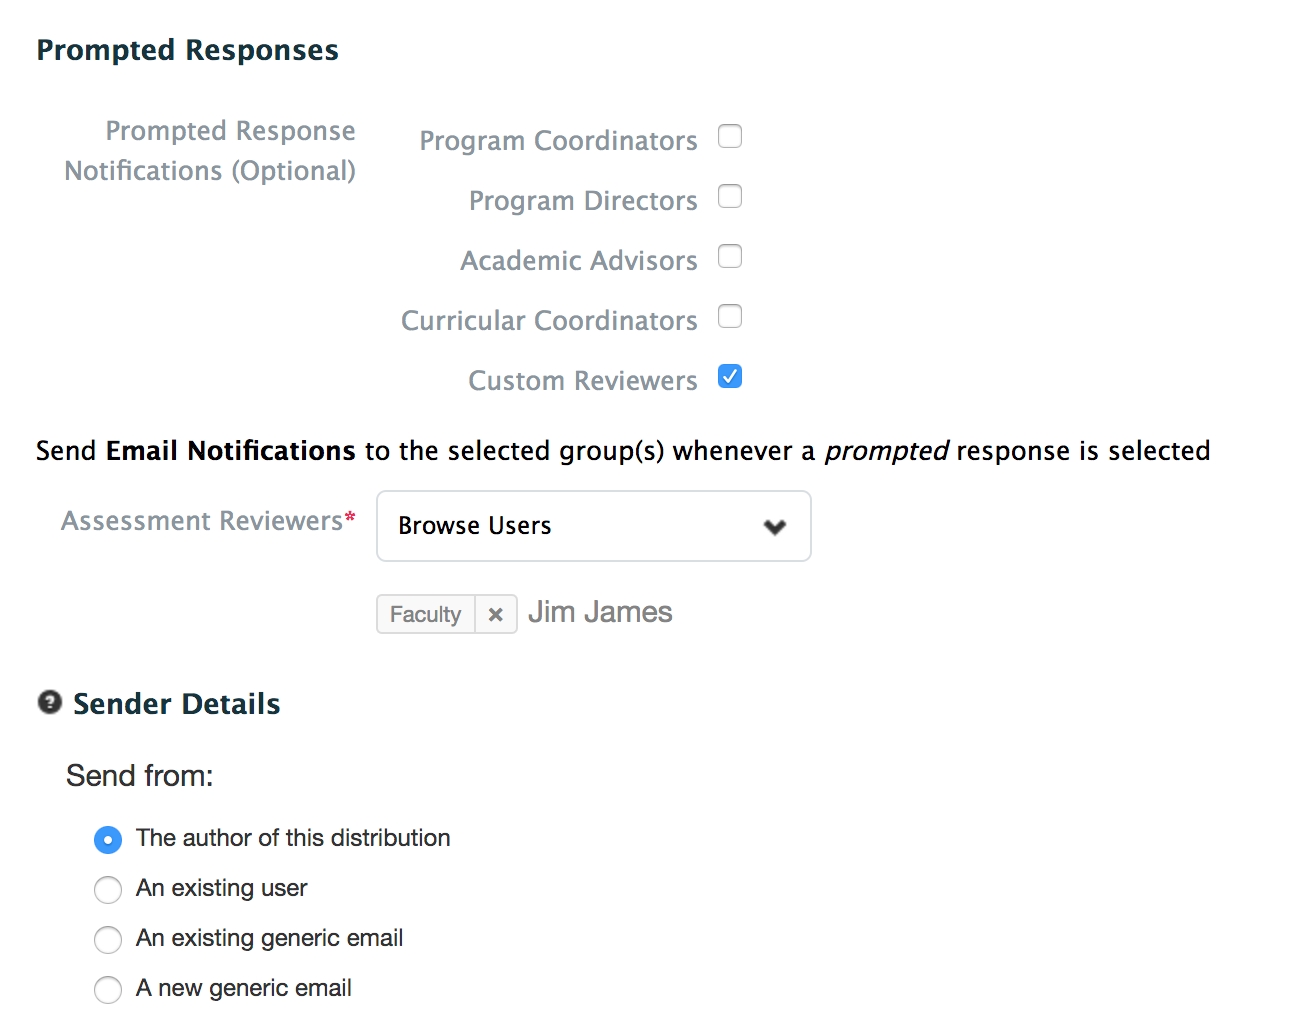
Prompted Responses: This allows you to define whom to send an email to whenever a prompted response is selected on a form used in the distribution. For example, if you have an item asking about student completion of a procedure and "I had to do it" was set as a prompted/flagged response, any time "I had to do it" is picked as an answer an email notification will be sent.
You can optionally select to email Program Coordinators, Program/Course Directors, Academic Advisors, Curricular Coordinators, or you can add a Custom Reviewer. If you select to add a Custom Reviewer you can select their name from a searchable list of users.
Sender Details: Define the email address that notifications and reminders will be sent from for a distribution.
Options are the distribution author, an existing user, an existing generic email, or a new generic email.
To create a new generic email provide a name and email address. This will be stored in the system and available to other users to use as needed.
Click 'Save Distribution'.
Once an ad hoc distribution has been created you can monitor its progress from Admin > Assessment & Evaluation. Click on Distributions, and then the name of the distribution.
The Show Progress screen you:
Not Started (forms that have been triggered but not started)
In Progress (forms that have been triggered, started, and saved in draft mode)
Completed (forms that have been triggered and completed).
Click on any of the labels to view the names of the targets and assessors and delivery dates.
Administrative staff can also send reminders, and add and delete tasks from here.
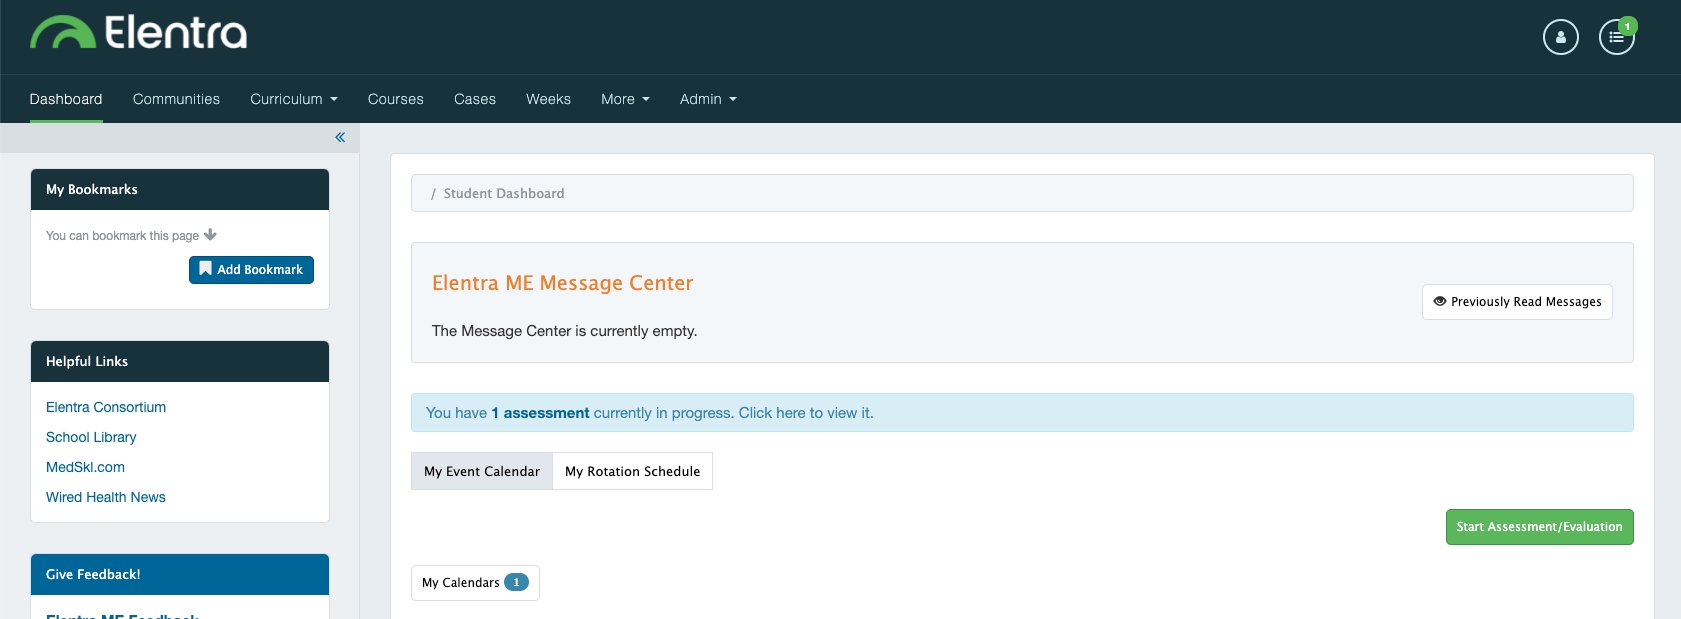
After an ad hoc distribution has been set up (remember it may take up to a day for your distribution to become active depending on when behind the scenes cron jobs happen), learners and faculty can initiate a task from their main dashboard.
From the dashboard, click 'Start Assessment/Evaluation'.
Click the Adhoc Distributions tab to move to the correct menu to initiate a task.
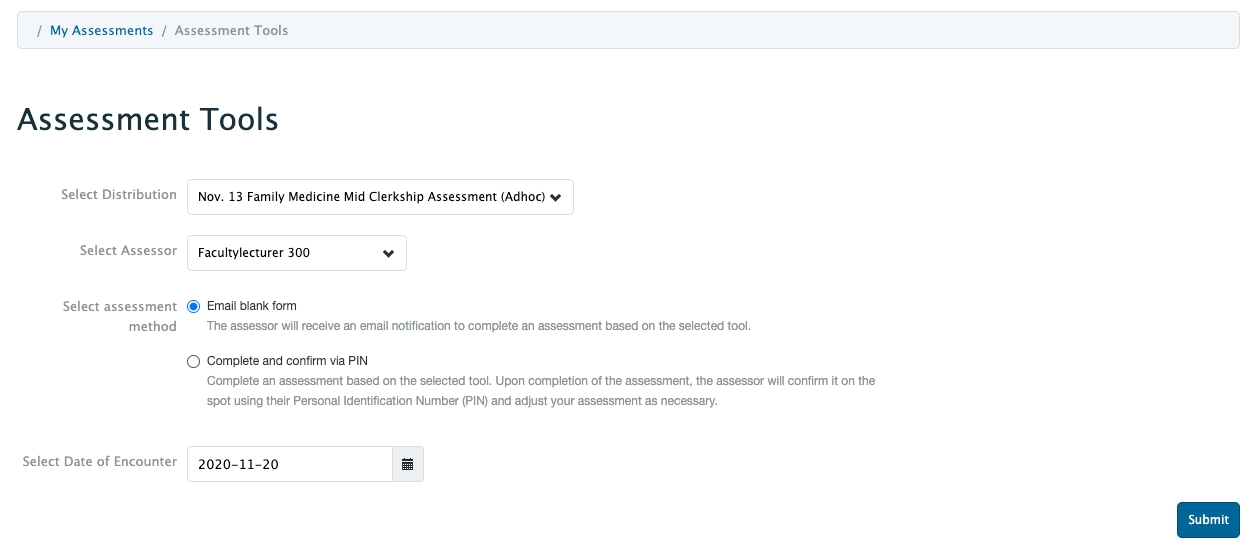
Select a distribution (begin to type a distribution name to quickly filter the list).
Select an assessor. Hover over an assessor name to see their photo (if uploaded) and details about them including email and course affiliation.
Select the assessment method. (The methods of completion available to users can be configured in the database for an organization. Speak to a developer if you want to change which assessment methods are available to users.)
Email blank form will send a copy of the form to the selected assessor.
Complete and confirm via PIN will allow the learner to immediately view and start the form, then have the assessor sign off on the form using his/her PIN. (For information on setting user PINs, please see here.)
If the assessor has a PIN set the system will automatically default to Complete and confirm via PIN as the assessment method.
Select a date of encounter.
Click 'Submit'.
If the learner selected 'Email blank form', the assessor will receive an email alerting them to the task; additionally, they will see the task added to their Assessment Tasks list accessible from their A&E badge in the dashboard header.
If the learner selected Complete and confirm via PIN, the form will display on the screen. The learner can begin to complete the form, then pass the device to the assessor. When the form is complete, the assessor can enter their PIN to confirm and complete the form.
Note that if a form triggered using Complete and confirm via PIN is saved as a draft, the learner will need to reopen the form when in the company of the assessor to have the form completed.
After a form is completed, the learner's ability to view it will depend on the distribution settings. If the distribution allows the learners to view the tasks, they will be able to view them from their Tasks Completed on Me list accessed from their A&E badge in the dashboard header.
From the dashboard, click 'Start Assessment/Evaluation'.
Click the Adhoc Distributions tab to move to the correct menu to initiate a task.
Select a distribution (begin to type a distribution name to quickly filter the list).
Select a target. Hover over a target name to see their photo (if uploaded) and details about them including email, group and role (e.g. student, 2022) and enrolled courses.
Select a date of encounter.
Click 'Begin Assessment'.
The form will display on the screen.
The faculty member can complete the form and Save as Draft or Submit. Note that if the user saves the form as draft, they will have to reopen and complete it at a later date.
The faculty member can delete the task if they triggered it in error.
The faculty member can forward the task to another faculty member if needed.
Faculty can view their draft forms, or forms that leaners have triggered to them from their Assessment & Evaluation badge located in the dashboard header. The tasks to be completed will display in the Assessment Tasks list.
\


