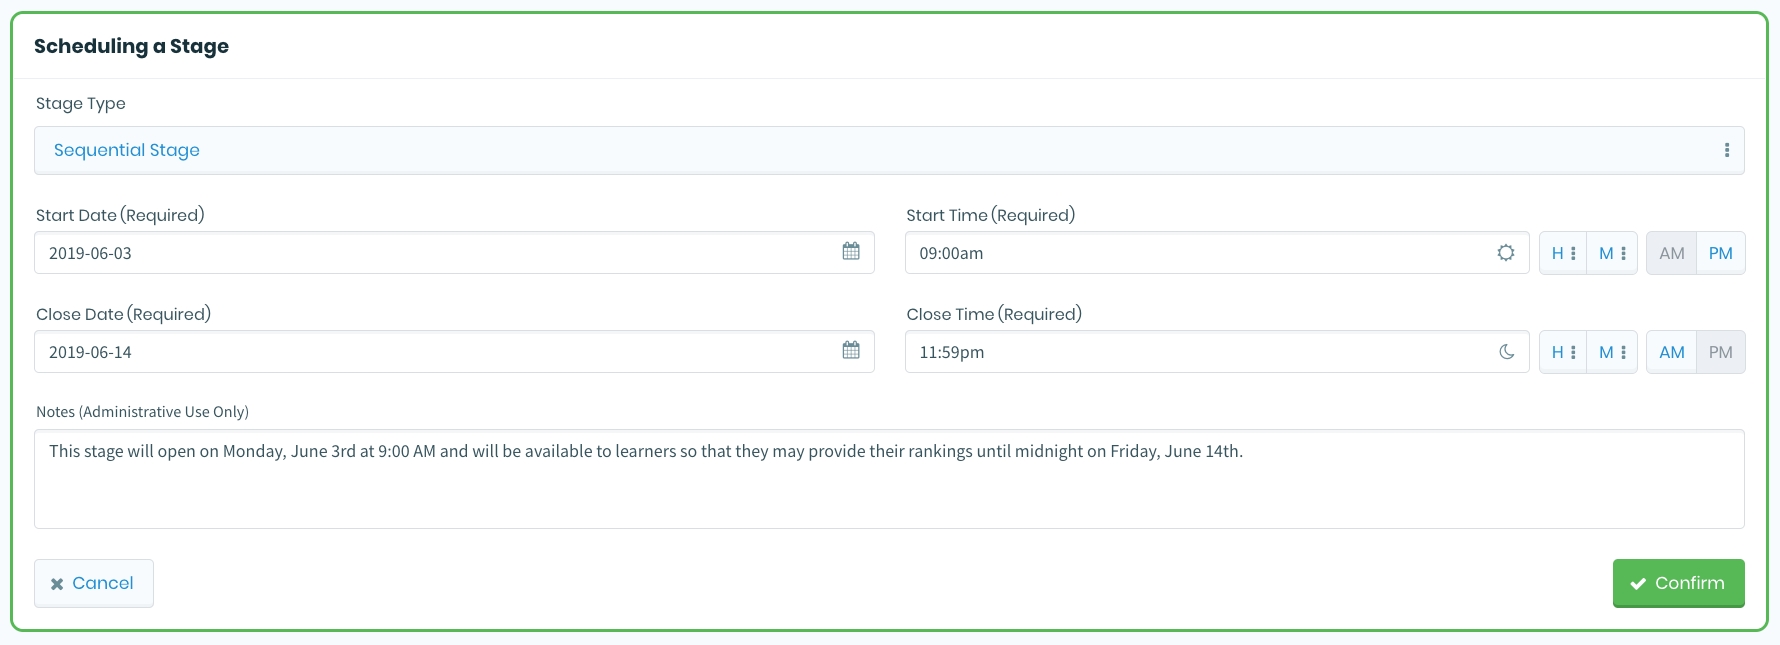
Each Stage Card has its own Edit button. When this button is clicked, the selected Stage will be opened in a form similar to the one used when Creating a Stage, with the existing data pre-populated. All fields except for the Stage Type will be editable.
Note: Much like when editing a lottery's visibility date and time, modifying the open and close dates for a stage can sometimes cause unexpected behaviour, such as when one stage is rescheduled such that it overlaps another. Be cautious when adjusting the scheduled window during which the stage will be open to learners.
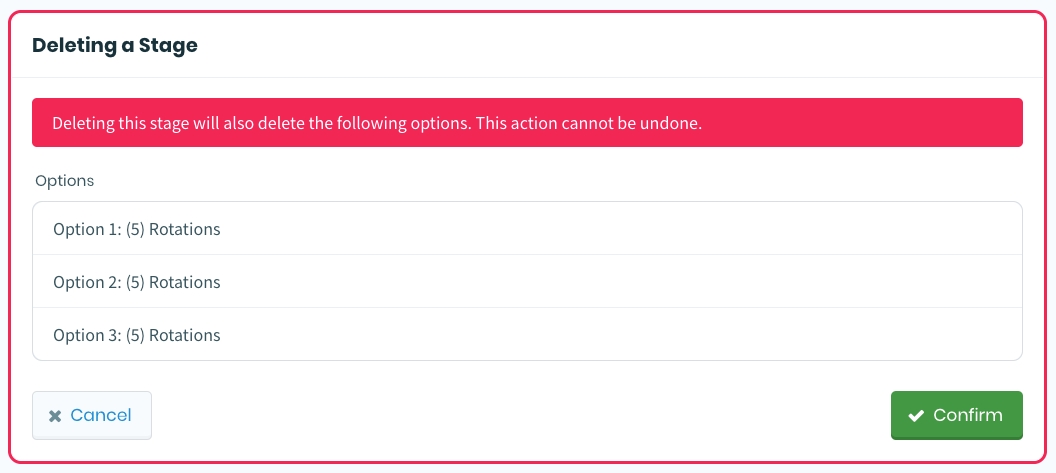
Each Stage Card also has its own Delete button. When this button is clicked, a confirmation dialogue box will be shown, to verify that the stage should indeed be deleted. A warning notice will be displayed above a minimalistic summary outlining all of the associated Options that will be deleted along with the stage, if the Confirm button is selected.
Once you've created a Lottery for your specified curriculum period, your next step should be to create a Stage. To get started from the Lotteries Overview, click the Manage Stages button on your Lottery Card. This will take you to the Stages Overview, which displays a simplified card representing the Lottery you are currently focused on, and a list of stages underneath it, called the Stage Schedule.
Once you've arrived in the Stages Overview, click the action button off to the right-hand side, labelled Schedule a Stage. This will open up the form for scheduling a stage.
This form will prompt you for some details in order to proceed. The first step is to determine which Stage Type should be used. Currently the only option is "Sequential", which means that each Option will be comprised of a sequence of rotations. In future Elentra ME updates, you will be able to choose alternatives to "Sequential", such as "Singular" (each Option consists of a single rotation), or "Site" (learners rank their preferred sites for rotations, as opposed to Options containing rotations).
Moving on from the Stage Type field, you'll need to set a couple of date and time pairs, one for the Start Date/Time, and another for the Close Date/Time. These two moments in time represent the range of time that the stage will be available to learners. When the value set for the Start Date/Time is reached, the stage's status will change to "Open" and learners will begin the process of logging in and ranking the Options that have been created for the stage. This means that you should always ensure that you schedule a stage's starting point far enough in advance that you have enough of time to manage your Options beforehand.
To set a date and time, begin by clicking the calendar icon to the right of the date input. This will open a small calendar. Click on any valid day to set the desired date. You can use the single chevron arrows on either side of the current month to navigate to the previous or next month, while the doubled chevron arrows will achieve the same result, but for the year.
You may also edit the time of day by using the H (hour) and M (minute) drop-downs to select the desired 12-hour time, and use the button group to the right to toggle between AM and PM.
The Notes field is entirely optional, but provides administrators with a handy place to add any additional, relevant information that they feel is helpful. Once ready, click the Confirm button. After the process completes, you will be returned to the Stages Overview, where you will now see your newly created Stage Card in the list. As indicated by the status badge ("Options Required"), you're now ready to start creating and managing Options.
Each stage that appears in the stacked Stages List is represented as a separate Stage Card, which provides administrators with useful controls, and information about the status and details of a stage.
A stage card is divided into three parts - a header, a body, and a footer. The card header displays the type of stage (Sequential, Singular, or Site), and off to the right-hand side, a toggle that expands or collapses the stage card. An upward-pointing chevron icon means the stage has been expanded, while a downward-pointing chevron indicates the stage is in its collapsed, default state.
The body of a stage card contains information pertaining to the timeframe and duration of the stage, as well as a Status Badge that indicates what state the stage is currently in. When the stage card is expanded, by clicking the downward-pointing chevron button at the right of the card header, a text input field becomes visible, where administrators may add any pertinent Notes.
The footer of a Stage Card contains several buttons and controls, most of them context-specific. Because these controls are context specific, and are determined by the stage status, a list of these possible statuses is provided below, along with screenshots of each card's appearance.
The Stage is currently lacking any administrator-defined Options. You may Edit or Delete the Stage, or click Manage Options to begin creating Options for Learners to rank.
The Stage has one or more Options defined, and is awaiting its open date. You may add or modify existing Options before then by clicking the Manage Options button, or Edit/Delete the Stage if necessary.
The Stage is open to learners so they can provide their Option rankings. Because Learners are actively ranking the Options, the button to navigate to the Options Overview is labelled as View Options, and will take you to the overview in a read-only, non-modifiable state.
The ranking process has ended, and drafting of Schedule Variations may be initiated. As Learners have already ranked their Options, you may only View Options, with the Options Overview presented **** in its read-only, non-modifiable state. Your next step is to specify the number of Schedule Variations to generate (1 - 5) based off of the Learner feedback, and click the Draft Schedule(s) button to initiate the drafting process.
Drafting has commenced and the algorithm is in the process of generating Schedule Variations. All controls will be locked down until the drafting process has completed.
The drafting process has generated at least one viable Schedule Variation. You may still View Options (presented in their read-only state), or click Redraft Schedule(s) to generate a specified number of new Schedule Variations. If you do not need to perform a redraft, clicking Review Schedules will allow you to review the generated Schedule Variations.
The drafting process did not generate any viable Schedule Variations. This means the specified number of Schedule Variations were generated, however none of the variations are viable (inviability is usually due to a variation having one or more Learners who could not successfully be scheduled any rotations). You may View Options to inspect them in a read-only state, Review Schedules to check the variations to see where they went awry, Delete the Stage, or Redraft Schedule(s) to try again.
A Schedule Variation from the drafting process has been merged into the Lottery's working schedule. You may View Options in their read-only state or Delete the Stage.
The Stages Overview is reached by clicking the Manage Stages button in the footer of a Lottery Card. It is a focused view that displays a list of all existing stages (represented as separate Stage Cards), which are associated with the selected lottery.
A simplified version of the selected lottery card appears at the top of the page, and just above that is a Lotteries link with a backwards-facing chevron button, which when clicked will return the administrator back to the Lotteries Overview.
Each stage associated with the selected lottery will be represented in this list as an individual Stage Card. Just above this list of cards, there are controls for searching through and sorting the list of stages. To search for a specific stage by type, you may use the Search Stages input field, or adjust the Sort By selector **** to arrange the list in ascending or descending order, by either the title or date.


