Loading...
Loading...
Loading...
Loading...
Loading...
Loading...
Loading...
Loading...
Loading...
Loading...
Loading...
Loading...
Loading...
Loading...
Loading...
Loading...
Loading...
Loading...
Loading...
Loading...
Loading...
If exam questions are stored in Word or other word processing software, users can copy and paste the information and bulk import questions to Elentra. Specific formatting is required. Curriculum tags and labels can be included in the file import.
Navigate to Admin > Manage Exams.
Click on ‘Migrate ExamSoft’ from the left sidebar Manage Exams section.
Click on the Import sub-tab.
Optionally select a label.
Select a default course.
Select a default assessment type.
Paste in the question(s) text. Note that specific formatting is required.
Click Import.
To format your questions, begin with “type:” followed by a space and then one of the following question type codes:
mc_h for Multiple Choice Horizontal
mc_v for Multiple Choice Vertical
short for Short Answer
essay for Essay
match for Matching text Text
mc_h_m for Multiple Choice Horizontal (multiple responses)
mc_v_m for Multiple Choice Vertical (multiple responses)
fnb for Fill in the Blank
You can also indicate the following information for any question, although it is optional:
description (this is short description or title of the question)
rationale
correct_text (this can be used for short answer or essay questions)
code
locked response(s) - this allows you to lock a response option on a question if you intend to randomize question response options when you post the exam
curriculum tags - this allows you to import curriculum tags with your questions.
To import curriculum tags you must know the curriculum tag id. Ids can be found in Admin > Manage Curriculum. When you open a curriculum tag set, toggle to the table view of curriculum tags (use icons beside 'Add Tag'), and if ID is not a visible field, add a column by clicking the columns selector (under the Import from CSV button) and adding the ID column.
Example Question Format:
1. Which are vowels? a. a b. e c. i d. All of the above answer: d type: mc_v locked: d curriculum_tags: 3454, 3421
Each question shows the minimal amount of information required. It is recommended that you also provide description, rationale, etc.
Multiple choice vertical questions have a type of "mc_v". They include one or more answer choices, and an attribute "answer" for the letter of the correct answer. An example is shown below.
What is your favorite color? a. red b. green c. blue
answer: a type: mc_v
Multiple choice vertical questions with multiple responses have a type of "mc_v_m". They include one or more answer choices, and one or more "answer" attributes for the letter(s) of the correct answer(s). An example is shown below.
Which of these are blue? a. sky b. ocean c. trees
Where is your favorite color? type: short
answer: a answer: b or answer: a, b type: mc_v_m
Multiple Choice Horizontal
Multiple choice horizontal questions follow the same format as multiple choice vertical, but with a type of "mc_h". They can have 5 answer choices at most. An example is shown below. Note that questions presented in horizontal view to learners will not have the strikethrough feature available when learners take an exam.
What is your favorite color? a. red b. green c. blue
answer: a type: mc_h
Multiple choice horizontal questions with multiple responses have a type of "mc_h_m". They include 1-5 answer choices, and one or more "answer" attributes for the letter(s) of the correct answer(s). An example is shown below. Note that questions presented in horizontal view to learners will not have the strikethrough feature available when learners take an exam.
Which of these are blue? a. sky b. ocean c. trees
answer: a answer: b or answer: a, b type: mc_h_m
Short answer questions have a type of "short" and require only the question stem although it is recommended to provide correct text and rationale. An example is shown below.
Where is your favorite color? type: short
Essay questions have a type of "essay" and require only the question stem although it is recommended to provide correct text and rationale. An example is shown below.
What is your favorite color and why (3-5 sentences)? type: essay
Matching questions have a type of "match". They have one or more answer choices, one or more item stems, and the same number of correct answers as item stems. The answer choices are shown as options for each item stem. The item stems are a piece of text or a question that corresponds to one of the answer choices. The correct answer for an item stem is identified by the answer choice's letter. The correct answer attributes are assumed to be in the same order as the item stem attributes. An example is shown below. Note that when learners answer this type of question the system does not automatically eliminate responses (i.e., a learner can put answer c as a match for multiple stems). When scoring a matching question the system uses an all or none system (for questions where you can give partial scores use multiple choice, multiple responses). An example is shown below.
This is the matching question stem. a. This is the first answer choice. b. This is the second answer choice. c. This is the third answer choice. item: This is the first item stem, its correct answer is choice C. answer: c item: This is the second item stem, its correct answer is choice A. answer: a type: match
Text questions are are generally used as instruction text for further questions. Text questions have a type of "text" and require no other special attributes. An example is shown below.
The next three questions cover the following scenario: A patient arrives at your family medicine clinic at 2:30 on a Friday afternoon... type: text
Fill in the blank questions have a type of "fnb". The blanks are indicated by the string "?" in the question stem. Fill in the blank questions can have an "answer" attribute for each blank indicating possible correct answers for that blank; the possible correct answers are separated by pipe characters, "|". These "answer" attributes refer to the blanks in order. An example is shown below, in which the first blank has possible correct answers of "woodchuck", "beaver", or "marmot", and the second blank has possible correct answers of "woodchuck", "hamster", and "groundhog". An example is shown below.
How much wood could a ? chuck if a ? could chuck wood? answer: woodchuck|beaver|marmot answer: woodchuck|hamster|groundhog type: fnb
Elentra Exams allows users to create questions, import existing questions, create and post exams, have learners complete exams in a secure online environment, allow faculty to grade exam questions, and run reports on exam results.
While the module is called Exams, it can be used to deliver quizzes or other knowledge-based assessments. To complete performance-based assessments of learners, please seeAssessment & Evaluation.
At a high level, in the Exams module you can:
Create questions (e.g., multiple choice, matching, fill in the blank, short answer) that can be assigned courses, curriculum tags, and/or labels (labels allow defined users to access questions for read or write purposes)
Group questions together into exams (questions can be used on multiple exams) and define a point value for each question
Configure settings for an exam including randomization of questions, and the format of question delivery (e.g., one question per page)
Deliver an exam to learners by posting it to a learning event; define time limits, set learner accommodations, set security options, and configure how you'll release scores and feedback to learners on each exam post
Configure exam posts to include option features like a calculator and self-timer for learners to access
Add graders to an exam post so they can grade short answer and essay questionsLink an exam post to a gradebook assessment so the assessment is automatically populated once an exam is complete
You can watch a recording about Exams at collaborate.elentra.org (login required).
Most faculty and staff users can access Admin > Manage Exams. The additional actions they can take will depend on your institution's access-control list (ACL) and whether the user is associated with a course or exam label.
By default, only staff:admin users can create Labels and add users to Labels. Those Labels then grant access to read/write abilities within the exam module.
Elentra can support giving learners read and write access to exam questions through Labels. In addition to creating a Label and assigning learners to it, students must have the 'Student Admin' flag set in their user profile. This flag allows a learner to access Admin > Manage Exams.
Only users with medtech:admin permissions can migrate questions from another exam software.
To use Exams, you must have the following set up:
Course(s)
Learners assigned as a course audience
At least one learning event to post the exam and deliver it to learners
Database Setting
Use
exams_purpose_mode
Value can be "permissive" or "restrictive". If "restrictive", then the Exam Purpose must be either Summative or Formative. If "permissive", it can be either, both, or none.
exam_security_options
Use to control the visibility of exam security options. Defaults to basic,seb,rp_now,examity. You can optionally add respondus.
respondus_launch_prefix
This is a 2 letter organisation-specific code. The Elentra prefix is set as default: na
respondus_secret_1
This is the encryption key required by the browser, for testing purpose.
respondus_secret_2
This is the encryption key required by the browser, for testing purpose.
respondus_download_win
These define the download URLs of the browser for each platform. By default, the download link from Respondus is set, but this should be hosted locally as they may be changed unexpectedly by Respondus.
respondus_download_lab
respondus_download_msi
respondus_download_macos
Exam questions can be built through the user interface or can be imported. Elentra currently supports a variety of question types:
multiple choice (with optional multiple responses)
short answer
essay
matching
text
fill in the blank
Before creating exam questions, you may want to create Labels so that you can assign Labels to questions as needed.
Users can add individual questions through the user interface, import questions in bulk through a text box, or migrate questions, images, and responses from another exam management tool (this option is only available to medtech:admin users). This section addresses how to create individual questions in the user interface; see here for additional information on importing questions from another exam tool.
Currently only staff:admin can create questions by default. To grant a user the ability to view, edit or create questions, assign that user to a label or course.
The Question Management feature handles permissions via two methods: course association and label association.
Course Associations Any course contact will be able to access questions that are associated with that course.
Note that Course Contact access to questions is controlled through the access control list (a database table in Elentra) so that it can be configured for an institution's need. For example, you could adjust things so that Associated Faculty have the ability to save drafts of questions/groups, but not publish them.
Label Associations Labels are built in Elentra and you can associate individuals with one or more labels. For each association you make, you can control whether the user can read or write questions, groups and exams (in this case groups refers to question groups).
To allow learners to create questions, you must also mark them as "Student Admin" in their user profile.
When you build a question through the user interface, you will walk through several tabs to add the required information.
You will need to complete the first two tabs ("Setup" and "Details") before access to the other tabs becomes available.
The ability to Publish a Question is available on this tab.
Assessment Type (Formative or Summative): These categories will be applied in future when exams you create must be flagged as Summative or Formative. You'll only be able to apply Formative questions to Formative Exams, and Summative questions to Summative Exams.
Question Code: This optional code field can be completed according to the guidelines set by your institution.
Associated Courses: If a question is assigned to a course, by default, course contacts for that course (e.g. Course Director, Curriculum Coordinator, Program Coordinator, Associated Faculty) will have access to all questions associated with the course.
Associated Labels: If question is assigned to a label, any permissions set up in that label will be applied to the question.
More than one label can be applied to a question. That means that if you want to associate a question with more than one specialty, more than one body system, or more than one topic, labels lets you do that.
Note that this replaces Exam Folders in previous versions of Elentra.
Question Version: Note, for new questions this will be blank.
A question must be associated with either a label or a course. It can be associated to both.
For organizations that used Exams before software upgrades in ME 1.23, all existing questions will be set to summative.
The ability to Publish a Question is available on this tab.
The Details tab allows you to specify the type of question, the question stem, description and options if applicable.
Available fields for all question types:
Questions
Question Type: Select the required question type.
Multiple Choice questions support single or multiple responses.
Question Text: Provide the question stem or prompt.
Use the options in the rich text editor to add images or media to a question.
Question Description: Add a descriptive title.
Rationale: Add a question rationale. Rationale is shown to learners when they get feedback on their exam and can explain a question answer or provide additional detail.
Answers
Answers get added after you tab to or select the next question in a list.
Select the arrow up or down beside an answer, or drag and drop them into any order you desire.
Set which answers have been marked as right and wrong via a toggle on the right side.
Optionally provide a per-answer rationale from the three dot menu on the right side of the response card.
Note that this does not currently display to learners so is just for information storage.
Optionally lock an answer in a specific position (if applicable) from the three dot menu on the right side of the response card.
For additional field details please see Additional Question Type Details below.
Ability to Preview a Question Select the "Preview Question" button at the bottom of the screen to see how the question will appear to Learners.
Ability to Save a Draft of a Question Save a Question as a draft, meaning users can work on that draft over time without worrying it may be accidentally associated to an exam.
Click Save Draft to unlock access to the additional steps in the Question wizard.
Changes are saved automatically on this tab after an interaction is performed.
The Status tab allows you to configure various statuses to indicate different conditions of a question or reflect workflows.
Question statuses are displayed on the Question Index.
Question Status This is a read-only select box to indicate the current status and other available statuses. To change this use the appropriate actions on Details or Setup or on the Question Index.
Review Status Allows you to flag the question to indicate a review is "Requested", "Approved", or "Rejected".
Translation Status If your institution supports multiple languages this status is made available. It will allow you to indicate a translation is "Requested" or "Completed".
A comment field is available to track the history or provide context for the statuses set.
System statuses like Draft/Publish can only be changed by the appropriate action, not on the Status tab. Selecting either Draft/Publish will always create a new version.
The Groups tab displays a list of any Question Groups this question currently belongs to.
You can read the description or jump to the index page for the group as well.
The Exams tab displays a list of any Exams this question has been associated with.
You can easily see all the other questions attached to that exam, any posts for that exam and preview the exam as a learner.
Correct Text: Serves as a guide for graders and will be displayed to them when they are grading the exam.
Maximum number of characters for essay format is set to 65,535.
Currently essay questions and short answer questions are treated slightly differently in the Learner Feedback Report (available after an exam is completed). Essay questions will show the complete response, while short answer questions will be cut off.
Create a blank in the Question Text by typing "_?_"
An answer field will be created for each blank that is detected. Add as many answers as are possible, separating answers with a comma.
Click Add after you have entered the answer(s).
Note that a question cannot start with a blank.
Fill in the blank answers are case sensitive. You may wish to include two answers (e.g. cardiac arrest and Cardiac Arrest) to ensure learners are properly credited for their answers.
Graders can manually grade fill in the blank questions if needed.
Add one list of terms as items.
Add the corresponding list of terms as answers.
For each item, pick the correct answer from the dropdown selector.
When the learner completes the question, they'll see a list of items and choose an answer from an dropdown selector.
Multiple choice questions presented in horizontal view will not have the strikethrough feature available when learners take an exam.
Optionally set the toggle to indicate whether a learner is expected to provide multiple responses to a prompt.
If multiple responses is enabled, complete the additional fields:
Grading Scheme
Partial: This will give partial credit for every correct reaction (e.g. selecting a correct answer AND not selecting an incorrect answer). By default, Elentra divides the total point value across the number of response options and awards credit for each response option which is correctly responded to (selected if correct, not selected if not correct).
All or Nothing: A learner must ace the question to score points. If they miss an answer (whether they select an incorrect answer or miss selecting a correct answer), the learner will get 0 points.
Partial with additional penalty: This will give partial credit for every correct reaction and will penalize a learner for an incorrect answer. Elentra divides the total point value across the number of response options and awards credit for each response option which is correctly responded to (selected if correct, not selected if not correct) and deducts credit for an incorrect answer. You can optionally change the value of each answer using the answer weight options.
Maximum number of responses
Define how many responses a learner will be permitted to enter.
Answer Weight
This optional feature allows you to support weighting different response options in partial or partial with additional penalty grading schemes.
Answers will be equally weighted by default. If you adjust their weights you can tailor the points awarded to a learner when partial and partial with additional penalty grading schemes are used.
Sample Use Cases
Assume a MC question has 2 correct responses and 2 incorrect responses where the correct responses are worth 40% each and the incorrect responses are worth 10% each. If a learner picks 1 correct response and 1 incorrect response, their score will be the following under each grading scheme:
Partial Grading Scheme: Learner scores 0.5 (+0.4 for identifying 1 correct answer, +0 for not selecting a correct response, +0 for selecting an incorrect response, +0.1 for not selecting an incorrect response)
All of Nothing Grading Scheme: Learner scores 0
Partial with additional penalty Grading Scheme: Learner scores 0 (+0.4 for identifying 1 correct answer, +0.1 for not selecting an incorrect answer, -0.4 for missing 1 correct answer, -0.1 for selecting an incorrect answer)
Correct Text: Serves as a guide for graders and will be displayed to them when they are grading the exam.
Currently essay questions and short answer questions are treated slightly differently in the Learner Feedback Report (available after an exam is completed). Essay questions will show the complete response, while short answer questions will be cut off.
Text questions are designed to allow an exam creator to insert information in an exam.
From the Setup or Details tab of an existing question you can optionally create a copy of that question.
When viewing the Question Text on the Details tab, the Question Text will be prefaced with "Copy of." The newly created copy will automatically be given draft status and will maintain the existing details and tags.
When viewing the question index you can make changes to multiple questions at once to enhance productivity when using the Question Index. These actions include:
Group questions
Set status
Set course
Set curriculum tags
This process will open the curriculum tag selector and show you the tags already assigned, which question is assign with which tag.
Tags added will be applied to every question selected via checkbox
You are able to un-assign tags via this method as well
Reactivate retired questions
Any time you make a change to a published question, a new version will be created. A new version will be created for any change—correcting a typo, linking the question to additional curriculum tags, altering a response option, etc.
When creating exams, you can add a question with multiple versions and choose to select an older version if desired. Do this by clicking on the forward/back arrow icon. If a question has changed since you created an exam, you will be given a notification for that and can update your exam to reflect the newest version of that question; however, you can still elect to use the old version of the question if you prefer. If the forward back arrow icon is blue, you’re not using the most recent version of a question on an exam.
Versions listed in the modal will let you preview the previous version to be better able to compare what changed. Reverting to a previous version will create a new version based on that previous version, thereby preserving the complete history of a question.
Creating a new version of a question is as easy as making a change on a question and publishing or saving that version as a draft.
Retiring a question is a new type of system status for questions. It allows you to prevent a question from being attached to new exams or being used in new exam posts when attached to existing exams. These are the features of a retired question:
Not eligible to any new exam
Excluded from new posts of existing exams
Has a comment field when retiring as to why something is being retired
Filtered out from the question index unless you opt to filter to view retired questions
Can reactivate retired questions and then will become available for use on exams again
Filter question bank to show retired questions
Check off the questions you want to reactivate
Click Reactivate (at bottom right)
Only a question not attached to any existing exams can be deleted, otherwise we recommend Retiring that question. Deleting a question will remove it from a Question Group.
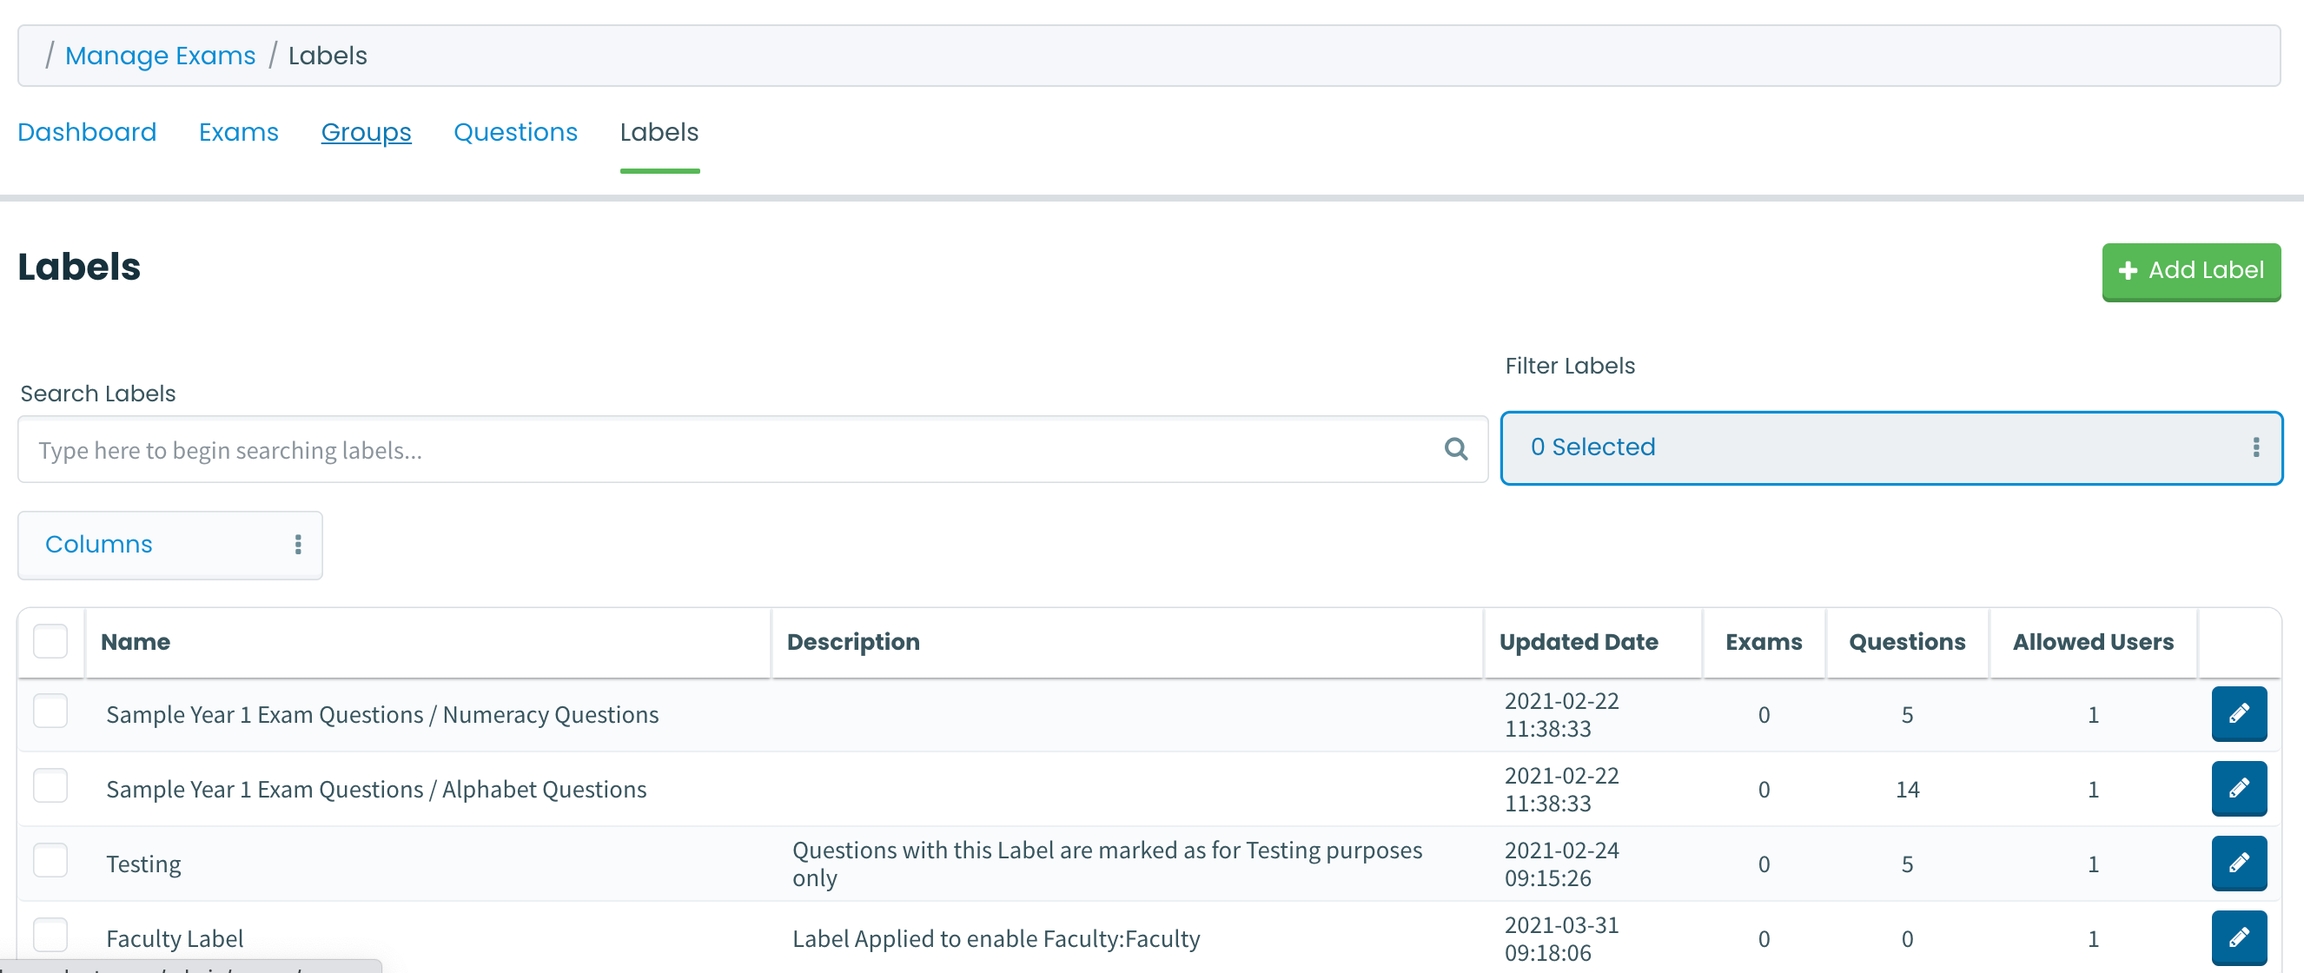
In Elentra ME 1.23 and higher, labels replace folders. Like folders, labels can be associated with specific users to give those users access to questions assigned that label. More than one label can be assigned to a question which gives you maximum flexibility in identifying when questions from your bank are used (e.g. associated with a course and a specialty topic and something else as needed).
The Label Index allows you to easily search and filter labels attached to exams & questions. You can decide which columns are visible (searchable).
Deleting a label will remove it from any associated questions and remove any permissions associated with that label.
Only staff:admin can create labels.
To create a label:
Give the Label a name
Optionally give the Label a description
Specify the users that should be given permissions for anything associated with this label
For each user set if they should have Read Only or Read and Write permissions.
Note: Currently the permissions table for each user only affects questions, it does not affect exams or groups.
The use of labels extends any existing ACL rules for a question. If a question has both a course and label applied Elentra first uses the course contacts table, if fails to authorize at course level, it will check label and grant access as appropriate.
If labels have conflicting permissions and one question is tagged with both, the permissions are cumulative (so a user will get their highest permissable access).
The Question Groups interface mimics the features and experience of the Question Index. This includes the ability to search and filter by assessment type, language, course, exam, updated by author and updated date. You can also choose which columns are visible, thus searchable.
Select the "Show Tags" button to view all the tags associated with Questions within this group.
Select the "Show Associated Exams" button to view all the exams associated with Questions within this group.
Select "Remove Selected Question Groups" to remove the group from the Index. Questions within that group will not be deleted.
Currently only staff:admin users can create question groups.
The Setup tab allows you to specify the tile, an optional description, and to set if this Question Group will contain either Summative or Formative questions.
The Questions tab allows you to easily browse the Question Index, and attach the needed Questions via the same search and filter interface from the Question Index.
You can easily reorder the questions using the drag and drop method, or by selecting the up and down arrow on each individual item.
You can easily remove questions from a group on this tab as well.
Each question has corresponding interactions to show you versions, associated exams, associated curriculum tags, other groups that question is a part of, associated exam types and any statuses applied to a question.
The Exams tab displays any exams associated with questions in this group.
You can also see the other exam questions attached to that exam, posts from that exam and even preview the exam itself.
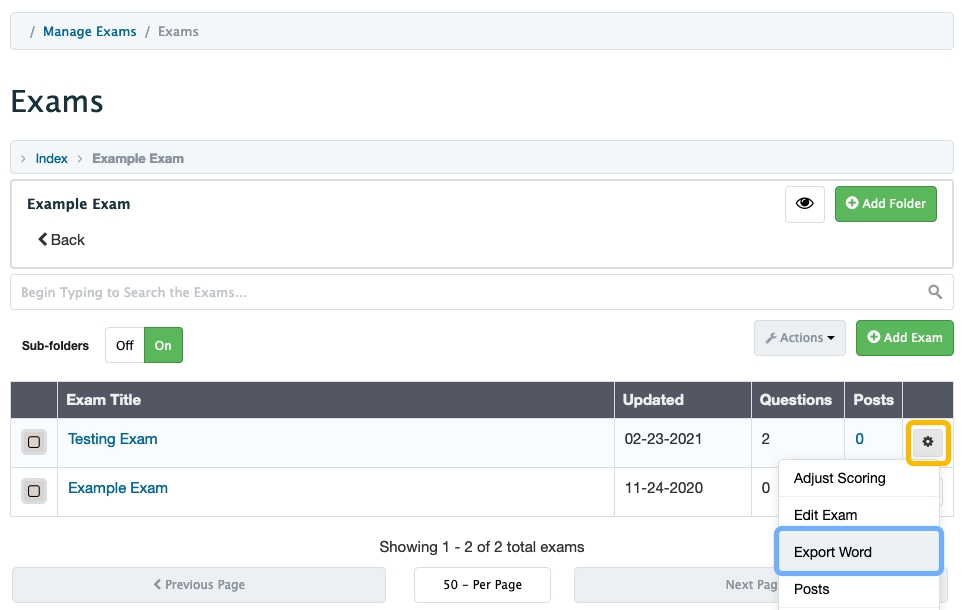
In the Exams section, click the coloured exam folder under the Index.
Click the Settings Wheel to select Export Word option. The download will complete within the browser.
An administrator can select the language of an exam when exporting to a Word (.doc) file.
When an exam is bilingual, before the download window appears, a pop-up modal is displayed asking a user to choose whether to download the data in English or another language.
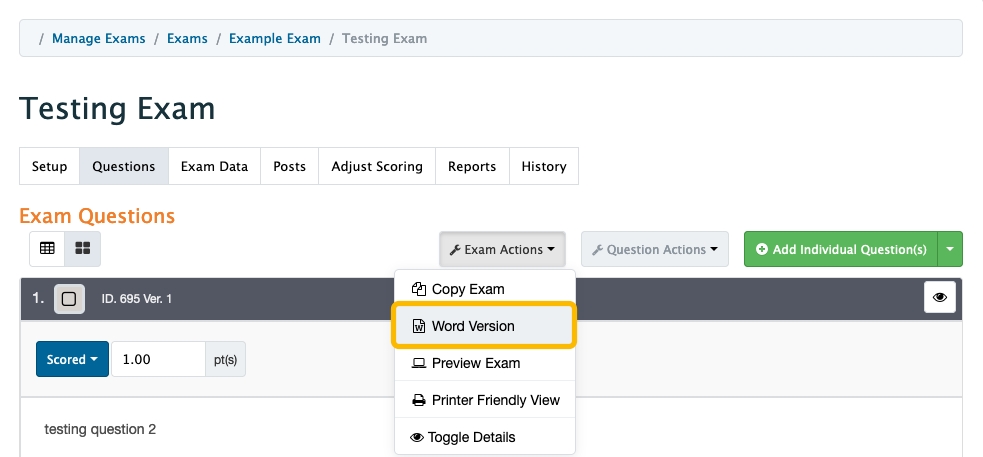
Select the exam to be exported in the Exams section.
Using the Exam Actions drop-down, select the Word Version option.
A pop-up modal will appear with the options to choose the desired language for the exported exam. The download will complete within the browser.
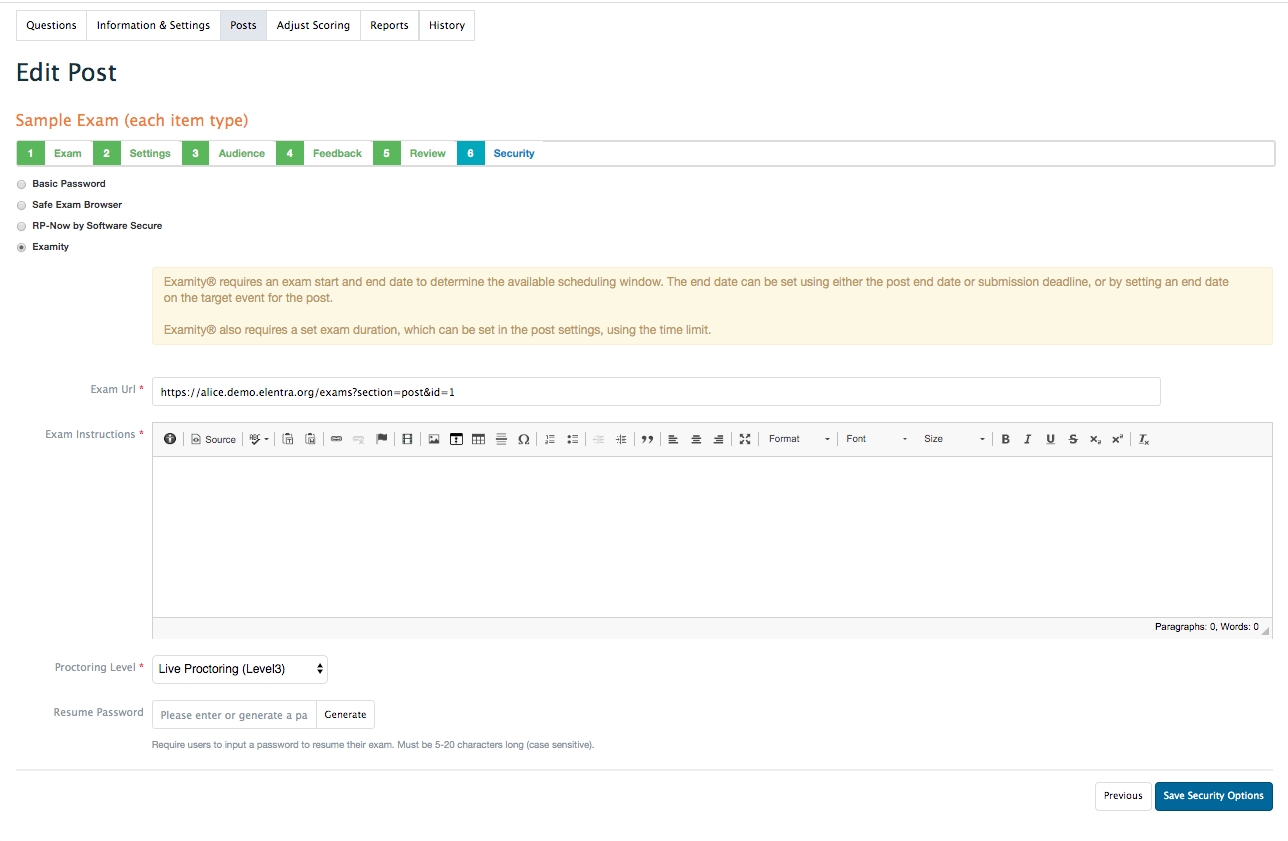
Please note that Examity is a fee-based service. An integration with Elentra exists but to use it you would also need a contract with Examity. See more at https://examity.com/
Examity is a proctoring service with a range of proctoring options.
To use Examity with the Elentra Exams module, pick Exam security options are required on Step 2 of the exam post wizard. Then, select Examity on Step 6.
Please note that there is an additional annual cost for schools to use Respondus. If your institution is interested in procuring a Respondus license, please contact the Elentra Consortium Associate Director, Operations.
Please see for more information about their services.
Before administrative staff can enable Respondus in an exam post security step, some database configuration is required. A developer will need to add respondus to the exam_security_options database setting and provide information in the other required settings fields.
Create an exam post.
On Step 2: Settings, make sure the Exam Security Mode is set to Exam security options are required (i.e. password security, lockdown browser, etc.).
On Step 6: Security, select Respondus lockdown browser.
Save the post.
It is recommended that you encourage learners to download the appropriate version of the browser for their operating system BEFORE the exam. This can make the exam taking experience smoother for everyone.
Access the exam from a Learning Event or from the Exams tab.
On an exam with the Respondus security option enabled, you will see a set of instructions to use the Lockdown browser. Download and install the version of the browser for your platform if not already up-to-date.
Click the Launch button. This should start the browser and direct you to a test page.
Use the Start new attempt button to start the exam. It should start the Respondus lockdown browser and the exam should start.
When you click on the Questions tab you will land on the Question Index page. From this page you can search for questions by typing in a word, and you can apply multiple filters to refine your search.When viewing results, card view will show you the question text and responses along with an option to see more information at the bottom of each card.List view will let you see more questions in a smaller field and get a quick overview of their status, associated groups, assigned curriculum tags, application to exams, and more.
Search query can target any visible field. Therefore, if you are showing additional columns via the "Columns" button, search queries will include those additional columns allowing for more granular ability to see only what you want to see.Filter options greatly expanded and now include Label, Date, Type, Author, Exam Usage (allows you to pick a specific exam and see the questions used), Course, Group, Retired, Status, Curriculum Tags, Assessment Type. Filters allow for more than one selection at a time allowing more granular ability to scope the returned question items to be exactly what you need.Each time you pick a category from Filter By (e.g. Question Types) you'll then be able to select your specific filters (e.g. Multiple Choice). One exception to this is the Retired option (it will just show you retired questions or all questions).Currently applied filters are displayed as badges, and can be cleared by selecting the x beside the individual badge, or via the Clear All Filters button.
A - Question Bank - select the Question Bank on the left-hand navigation bar to display Question Bank.
B - Search - use keywords in the search box to refine your search.
C - Filter - use the filter to refine the search by; author, course, group, label etc.
D - Columns - add additional columns to the Question Bank to see more question information including; author, date, languages etc.
The following enhancements have been made to both the table and card view of the index:
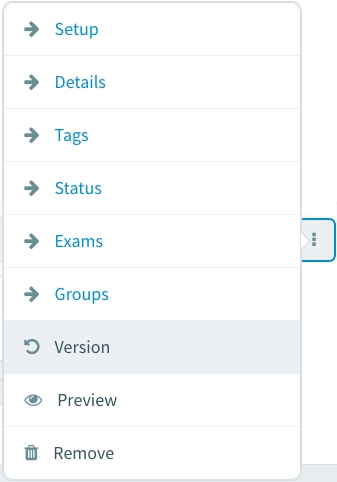
The More button allows you to navigate to the various tabs of the Edit Question process
The Edit button will start the Edit Question process
Paginated screens have controls to display how many can be displayed, and the ability to jump to first and last pages
In Table View you can control which columns to show for your filtered questions via the "Columns" button.
The Card View will allow you a preview of the question as it might appear to learners, the ability to view more information about specific questions and the ability to show or hide the correct answer.
Question Status is a new field. You can now create questions in draft mode and request that they be reviewed. This allows for careful oversight of all questions before they are published.
Currently you do not set a specific reviewer per question. Instead you can filter by status to find questions that require attention.
Additional icons will show a question's Review status:
You can Ability to set status on multiple questions by checking the question you'd like to edit and selecting: "Set Status".
Note: Draft questions can't be removed from the Question Index through the bulk "Remove Questions" options. Instead, click into a draft question as if to edit and then choose "Discard Draft".
The Question Index user interface has been improved to include more data in a more visible state. This includes:
Associated Groups
See groups this question belongs to and click edit to quickly go edit a group
Associated Exams
You'll see the total question count, a count of any existing posts, and take the exam in a preview mode; each of these will link you to another tab.
Associated Exam Types
Associated Curriculum Tags
Click on the count for each entity to see more detail about a question.
When viewing the question index you can make changes to multiple questions at once to enhance productivity when using the Question Index. These actions include:
Group questions
Set status
Set course
Set curriculum tags
This process will open the curriculum tag selector and show you the tags already assigned, which question is assign with which tag.
Tags added will be applied to every question selected via checkbox
You are able to un-assign tags via this method as well
Reactivate retired questions
Note: There is currently no support for exporting a filtered list of questions directly from the Question Index. If you wish to export questions you must add them to an exam and then export the exam to a Word file.
Migrating Questions from ExamSoft allows you to move exam questions from ExamSoft into Elentra for use on future exams.
Please note that only users with medtech:admin group and role permissions can migrate exam questions from another exam management tool.
Export the exam you would like to import from ExamSoft with the settings below.
Save the document with no spaces in the title.
Using LibreOffice, convert the file into a text and html file.
Note: Currently, only files converted using a Mac can be successfully imported.
Navigate to Admin > Manage Exams.
From the Manage Exams navigation box, click Questions.
Click on the Migrate Q's tab.
Select the question folder you would like the questions uploaded to.
Then, browse for and select your plain text file and click Import Questions.
This will take you to a new page where you can review all the questions that will be imported from the text file
Note: The system will look at the ExamSoft ID's to ensure no duplicate questions are created if questions are used on more than one exam.
Scroll to the bottom of the page and click Import All Questions to complete the process. This will automatically create an exam in the system that is only accessible via the Exams Dashboard.
Move to the Migrate Images tab.
Browse for and select your html document and all the images for that exam.
Click Import Question Images.
Review that the correct images have imported, then click Confirm Exam Import.
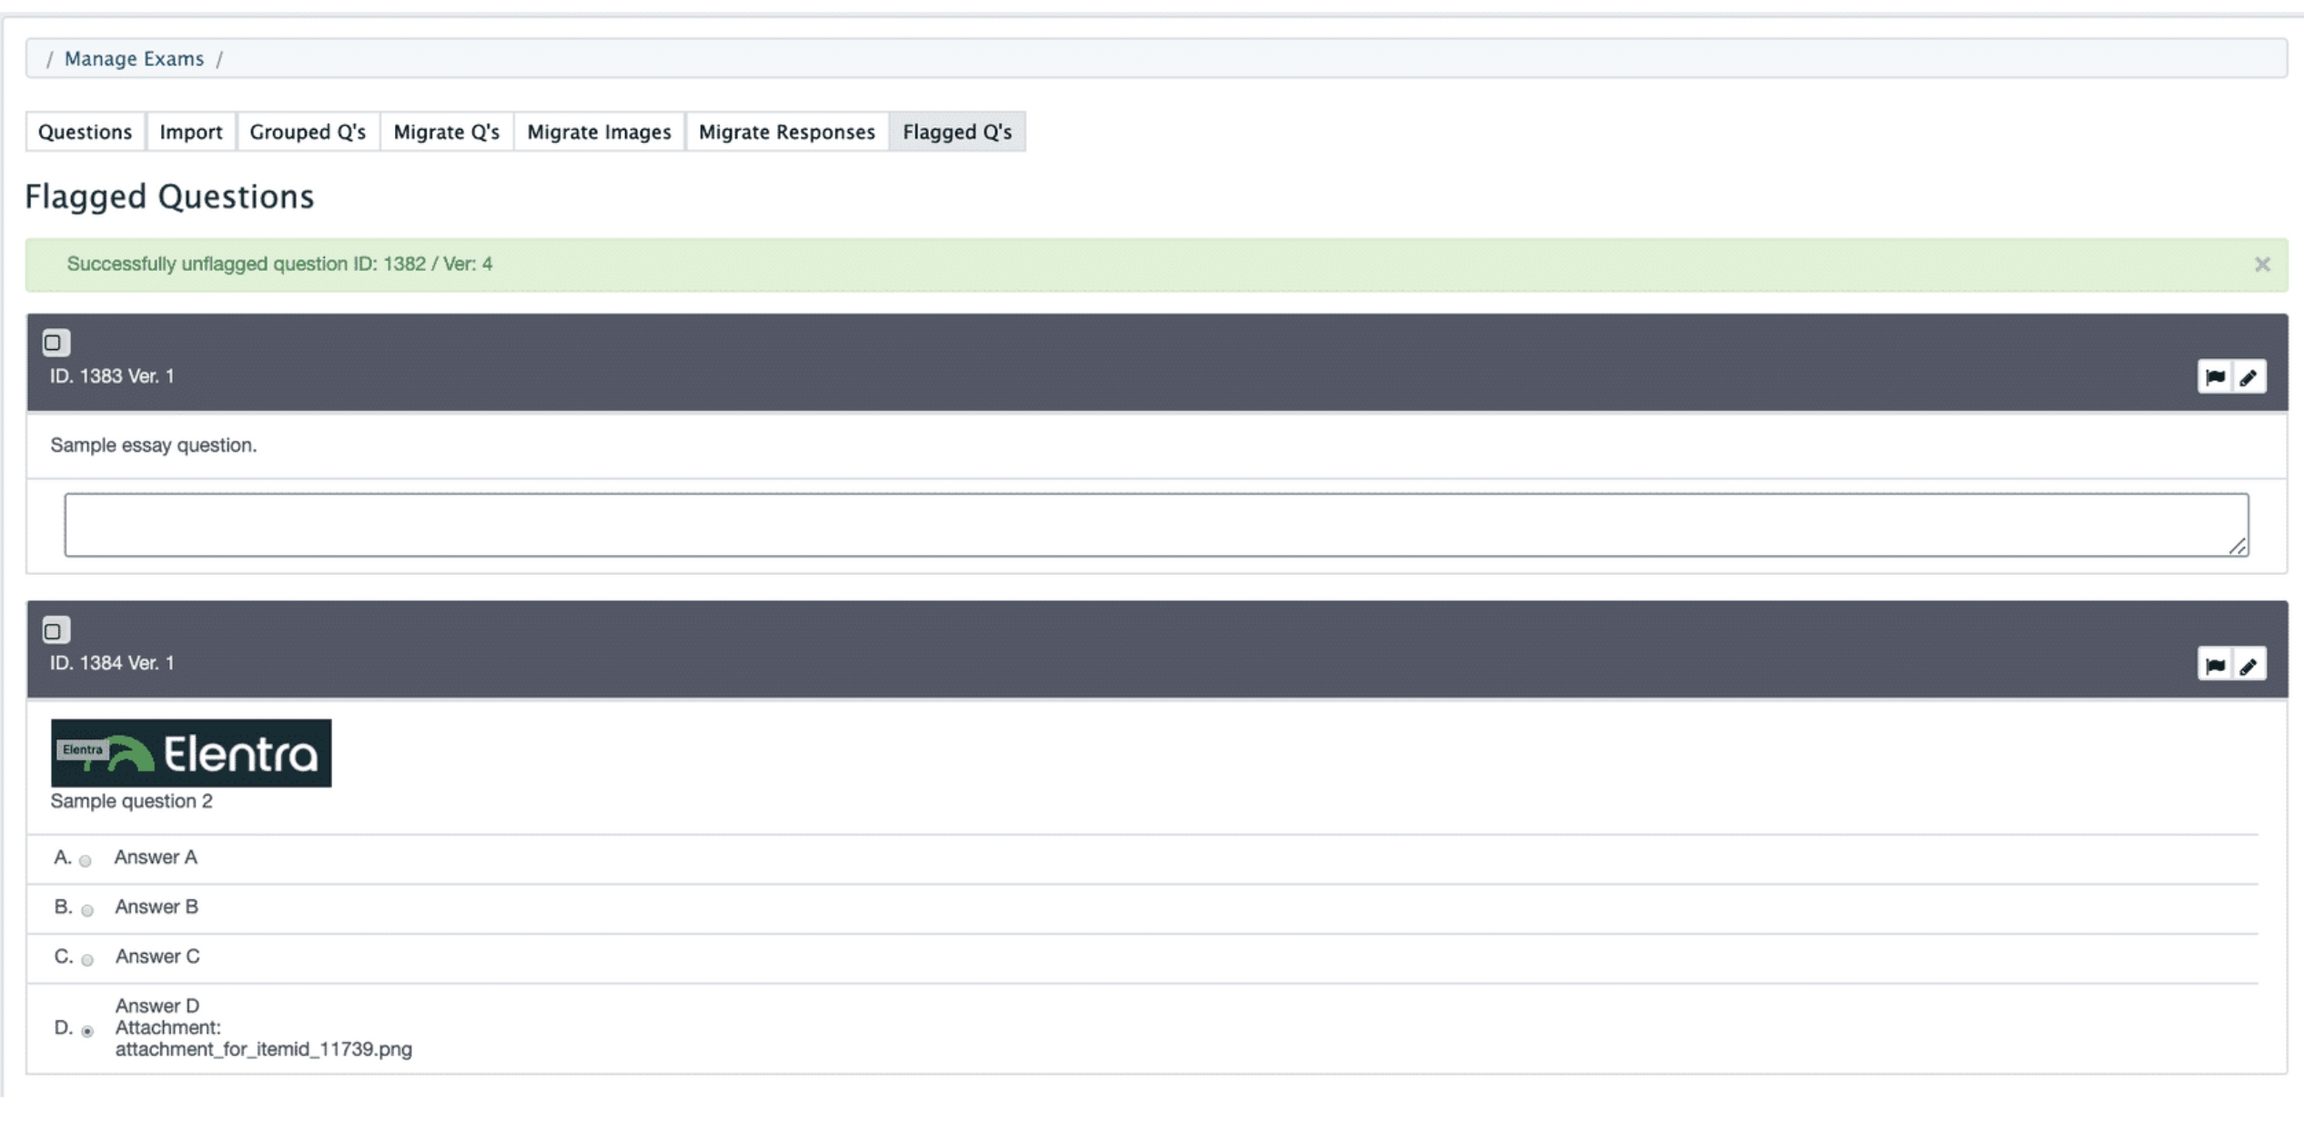
If you tried to import any questions from ExamSoft which were NOT multiple choice you'll need to review them in the Flagged Questions tab. Similarly, questions with images attached will also appear here. Non multiple choice questions are flagged because the import system can't tell if they were supposed to be matching, fill in the blank, or essay type questions. By default they are given a type of essay but this will need to be changed for matching or fill in the blank question types.
Click on the Flagged Q’s tab. On this tab, you will see all of the questions with images and any non multiple choice questions.
Click the pencil icon to edit the format of any questions.
If there are no edits to be made, click the flag to approve the question.
Images will automatically import to the top of the question.
To edit the image position easily, click Source from the text editor box.
Copy and paste the source code to the correct place in the question.
You can view the versions on a question by selecting "Versions" from the "More" button menu.
You can additionally expand or collapse all the information on a card by selecting the "Expand/Collapse" chevron.
When viewing a question its status will be represented with a blue airplane (published) or a grey page (draft).
Review Requested (yellow flag)
Question Approved (green checkmark)
Question Rejected (red x)
Default Columns
Additional Columns
ID
Author
Type
Date
Text
Languages
Status
Exam Type
Groups
Description
Tags
Code
Exams
exam_security_options
Use to control the visibility of exam security options. Defaults to basic,seb,rp_now,examity. You can optionally add respondus.
respondus_launch_prefix
This is a 2 letter organisation-specific code. The Elentra prefix is set as default: na
respondus_secret_1
This is the encryption key required by the browser; enter the information you were provided with your key.
respondus_secret_2
This is the encryption key required by the browser; enter the information you were provided with your key.
respondus_download_win
These define the download URLs of the browser for each platform. By default, the download link from Respondus is set, but this should be hosted locally as they may be changed unexpectedly by Respondus.
respondus_download_lab
respondus_download_msi
respondus_download_macos
The history tab of an exam page provides you with an overview of who created and edited the exam over time. The History tab will be accessible to any user with permission to access the exam.
In order to use Safe Exam Browser to deliver your exam, on Step 2 (Settings) tab of the Exam Post wizard for your exam, ensure that you have indicated that an Exam Security Mode is required. If you select this, the Exam Post wizard will require you to complete Step 6 (Security) after completing the other steps.ab Installation
Login to the computer with a user account that has admin rights
Download Safe Exam Browser 2.1.x for Windows: http://safeexambrowser.org/download_en.html
Run the Safe Exam Browser Installer (SafeExamBrowserInstaller.exe). After the installation a Safe Exam Browser shortcut should be placed on the desktop
Copy the provided SEB Client Configuration file (SEBClientSettings.seb) to the following location: PROGRAMDATA\SafeExamBrowser\ (typically C:\ProgramData\SafeExamBrowser)
Reboot the computer
Launch SEB by double-clicking on the desktop shortcut and verify that the Elentra login screen loads.
After clicking on the exam link, if it tries to install SEB again
Select "Do not close application..."
No to "Restart computer"
Ok to the error with reading the tmp directory.
Try to launch the exam again, it should open and prompt you to login again.
Note: DO NOT upgrade on top of an existing version, always uninstall the old version before installing the new version.
To apply Safe Exam Browser to a posted exam, navigate to the exam post and go to Step 6: Security
Edit the post and on Step 6: Secure Settings, copy the URL that is provided in the blue box in the "Safe Exam Browser (SEB) File” section. (Tip: Leave the browser window open as you complete the remaining steps)
Launch the "SEB Config Tool” from the Windows Start Menu (Start->Safe Exam Browser->SEB Config Tool)
Paste the URL copied in Step 10 in the “Start URL” field
Password-protect the SEB Exam file by creating a password in the “Administrator password” section.
Switch to the “Config File” tab
Under “Use SEB settings file for…” select the option “starting an exam"
Switch to the “Exam” tab
Check the checkbox that reads “Send Browser Exam Key in HTTP header
Under the “Link to quit SEB after exam” enter https://yourschool.edu/secure/secure-logout
Switch to the “Hooked Keys” tab
Check that checkbox that reads “Enable Right Mouse” and uncheck everything else
Switch to the “Config File” tab
Click the button “Save Settings As…” and save the SEB Exam file
If prompted to save an unencrypted SEB file, choose Yes.
Switch to the “Exam” tab
Copy the SEB Browser Exam Key under the “Browser Exam Key” section
Switch back to your web browser that is currently on the Post Exam settings page
Upload the SEB Exam file you just created by clicking the “Browse” button, selecting the file you named in Step 22. After the file finishes uploading, it should appear in the “Safe Exam Browser (SEB) File” section
Under the “Secure Key” section, click the “+” button toward the top-right corner
Paste the SEB Browser Exam Key that you copied in Step 25 in the “Browser Key” field
Enter the version of Safe Exam Browser that you used to create the SEB Browser Key and the Operating System (e.g. Win 2.1.3)
Click “Next Step” and continue through each step. When you reach the last step, click “Save Exam Post"
Launch SEB and login to Elentra
Navigate to the Exam you wish to take and verify that you can login and that the exam loads
To apply Safe Exam Browser security to a posted exam, navigate to the exam post and go to Step 6: Security
Edit the post and on Step 6: Secure Settings, copy the URL that is provided in the blue box in the "Safe Exam Browser (SEB) File” section. (Tip: Leave the browser window open as you complete the remaining steps)
Open "Safe Exam Browser" from the Applications directory.
Paste the URL copied in Step 10 in the “Start URL” field
Password-protect the SEB Exam file by creating a password in the “Administrator password” section.
Switch to the “Config File” tab
Under “Use SEB settings file for…” select the option “starting an exam"
Switch to the “Exam” tab
Check the checkbox that reads “Use Browser & Config Keys (send in HTTP header)"
Under the “Link to quit SEB after exam” enter https://elentra.yourschool.edu/?action=logout
Switch to the Security tab, and under "OS Specific Settings" click "Hooked Keys"
Check that checkbox that reads “Enable Right Mouse” and uncheck everything else
Switch to the “Exam” tab
Check the box that says "Copy Browser Exam Key to clipboard when quitting SEB"
Switch to the “Config File” tab
Click the button “Save Settings As…” and save the SEB Exam file
If prompted, click "Save unencrypted" button
If you see "Do you want to continue editing the saved settings file?" then click "Cancel"
Quit Safe Exam Browser. Note that your Browser Exam Key will now be in your clipboard, so paste it into a TextEdit file if you would like.
Switch back to your web browser that is currently on the Post Exam settings page
Upload the SEB Exam file you just created by clicking the “Browse” button, selecting the file you named in Step 22. After the file finishes uploading, it should appear in the “Safe Exam Browser (SEB) File” section
Under the “Secure Key” section, click the “+” button toward the top-right corner
Paste the SEB Browser Exam Key that you copied in Step 25 in the “Browser Key” field
Enter the version of Safe Exam Browser that you used to create the SEB Browser Key and the Operating System (e.g., 2.1.3)
Click “Next Step” and continue through each step. When you reach the last step, click “Save Exam Post"
Launch SEB and login to Elentra
Navigate to the Exam you wish to take and verify that you can login and that the exam loads
You can create questions while creating an exam, but if you have a large number of existing questions to import, it may be more efficient to import all questions and then create an exam. See Exam Question Management for information on creating questions.
To create exams, you must have at least one exam folder created. Elentra will automatically create a Default Folder but users can optionally add other exam folders to organize their exams.
Click Add Folder.
Optionally select a parent folder.
Provide a Folder Text (title) and optionally provide a description and colour.
To move existing exams into a folder, check the checkbox beside an exam from the Exams Index page and then use the Actions button and pick 'Move Exam'.
Once a folder exists you can optionally add authors to the folder. Adding an author to a folder will give that person permission to view the exams in that folder.
Click the cog icon beside a folder title and select 'Edit & Manage Authors'.
Search for the required users, add their names to the Authors list, and click 'Save'.
Navigate to Admin > Manage Exams, and click on Exams.
When viewing the Exams index, make sure to Exam Sub-folders view is toggled 'On' to most easily view exams to which you have access. Alternately, you can click on an Exam folder to view the exams stored in that folder.
Navigate to Admin>Manage Exams.
Click on ‘Exams’ from the left sidebar Manage Exams card.
Click ‘Add Exam’ to create a new exam.
Provide an Exam Name, select a folder and click ‘Add Exam’.
You will land on the Setup tab of the Exam.
Exam Description:
Question Display Settings: This setting is relevant if you prefer that learners not be able to view previously completed questions as they move through an exam (if so, display one question per page or display according to page breaks and disable Free Navigation when you create an exam post).
Question randomization: Optionally deliver questions to learners in a randomized order.
Answer randomization: Optionally delivery answers to learners in a randomized order. Note that if you locked an answer option while creating a question, its position will be respected even with the randomization option enabled.
Assessment Type: Specify if an Exam is Summative or Formative. This will preset a filter in the Question Index when you are adding questions to the exam.
Exam Type: This is to support future enhancements of the Exam Management system and does not currently appear anywhere else in the system.
If your school supports multiple languages, you can specify what languages this exam is intended to support; this will assist you by automatically filtering out any questions that shouldn't apply to your exam.
Click 'Next'
You will be directed to the exam question page where you can add questions to the exam.
Exams created in Elentra ME 1.22 and earlier will not have an assessment type associated with them.
Note: When adding a question, the Question Index will be filtered to only display exams that match what was provided during Exam Setup, specifically, if your Exam was set as a Summative Exam, only Summative questions will display. If your school supports multiple languages, the language setting will be filtered as well.
After creating an exam, you'll automatically be redirected to the Questions tab. If you've navigated away from Questions, click on the Questions tab to return.
Click 'Add Individual Questions.' This will take you to the Question Index, where you can search and filter as needed.
To add questions, check off all the questions required and then select "Attach Questions" in the top right.
To add a question group, hover over the Question Groups column and click to 'Show Groups.' Identify the appropriate group and then select "Attach".
After you click Attach Questions or Attach, you'll be redirected to the Exam Question tab. You should see the questions you chose show up in a list. Also note that the Exam Data tracker in the bottom corner of the screen will reflect the total questions and points.
To adjust the point value for questions, switch from table view to card view and enter the point value per question.
To chose whether an item is scored or not, switch from table view to card view and switch to Not Scored as needed.
You can add free text space to an exam to provide instructions or additional details to learners.
You can add a page break to an exam and when you create the exam post you'll have choices about how to display questions. One of the display options relies on page breaks.
To add either option, click on the down arrow beside the ‘Add Individual Question(s)’ button.
Select the item you want to add by clicking on it.
Note that any text entered into a free text space must be saved by clicking the Save button within the free text card. Find the Save button in the top right of the free text item beside the eye icon.
Questions groups will remain together, and in order, when an exam is posted, even if the other exam questions are randomized.
Question Groups can be created from the Question Index by users with staff:admin permissions. Existing Question Groups can be added to exams when the Question Index by hovering over the Question Group column and clicking 'Show Groups', then 'Attach'.
To create a question group from an exam, click the checkbox beside each question you wish to include, and then click on 'Question Actions'. Select 'Group Questions', provide a group name when prompted and click 'Save'.
Note that you can optionally add the selected questions to an existing question group. If you choose to do so, select the existing group from the dropdown menu and then click 'Save'.
On the Exam Questions tab, question groups will appear together with a blue border.
In the list view of questions you can:
drag and drop questions to reorder them, or
type in the desired question order in the second column, then click ‘Reorder’ to save your choices.
In the card view of questions, click on the crossed arrows on a question card to drag and drop it to the desired location.
To delete questions from an exam before it has been posted, click the checkbox beside a question and then click on 'Question Actions'. Select 'Remove Question(s)' and the question(s) will be removed from the list.
If a question added to an exam has a new version available, you'll have a blue message bar. You can choose to Update All questions or look at individual questions and see which have their forward back arrow icon blue. If it is blue it means you are not using the most recent version of a question. Click on the forward back arrow for any question to change which question version you want to use on this exam.
Parent Folder: You will have added the exam to a folder when it was created. You can adjust that here if required.
Exam Permissions: Adding someone to the permissions list will give them access to edit the exam and view its statistics.
To add permission for other users to access an exam, select the user type (individual, organization or course), begin to type in a name and click on the name you want. The selected user will appear on a list below.
To remove a permission click the red x beside a name.
If you make an exam accessible to a course, anyone listed in the course contacts section of the course setup page will be able to access the exam.
If you make an exam accessible to an organization it means anyone in that organization with access to the exam module will be able to access the exam.
This section shows you the total number of questions and points and shows you how curriculum tags have been applied to this exam. There is nothing you can edit here but you can search for specific curriculum tags to see their use across the exam.
Use this space to upload any resources you want learners to be able to access during the exam (e.g., dosage chart, x-ray image). During an entire exam learners will be able to click on a small paperclip icon to access these resources.
After an exam is posted and taken by learners it cannot be edited so copying it will be necessary if you want to edit and reuse the exam with some modifications.
Navigate to Admin>Manage Exams.
Click on ‘Exams’ from the left sidebar Manage Exams section.
Search for and click on the name of the exam you want to copy.
Click on 'Exam Actions' and select 'Copy Exam'.
Confirm your choice by clicking 'Copy'.
Adjust the exam questions as needed.
Click on the Information and Settings tab to adjust the exam title as desired.
There are two ways to preview, export, or print an exam.
While viewing an exam, click 'Exam Actions' to access a dropdown menu of options.
From the list of exams, click on the cog icon to access a dropdown menu of options.
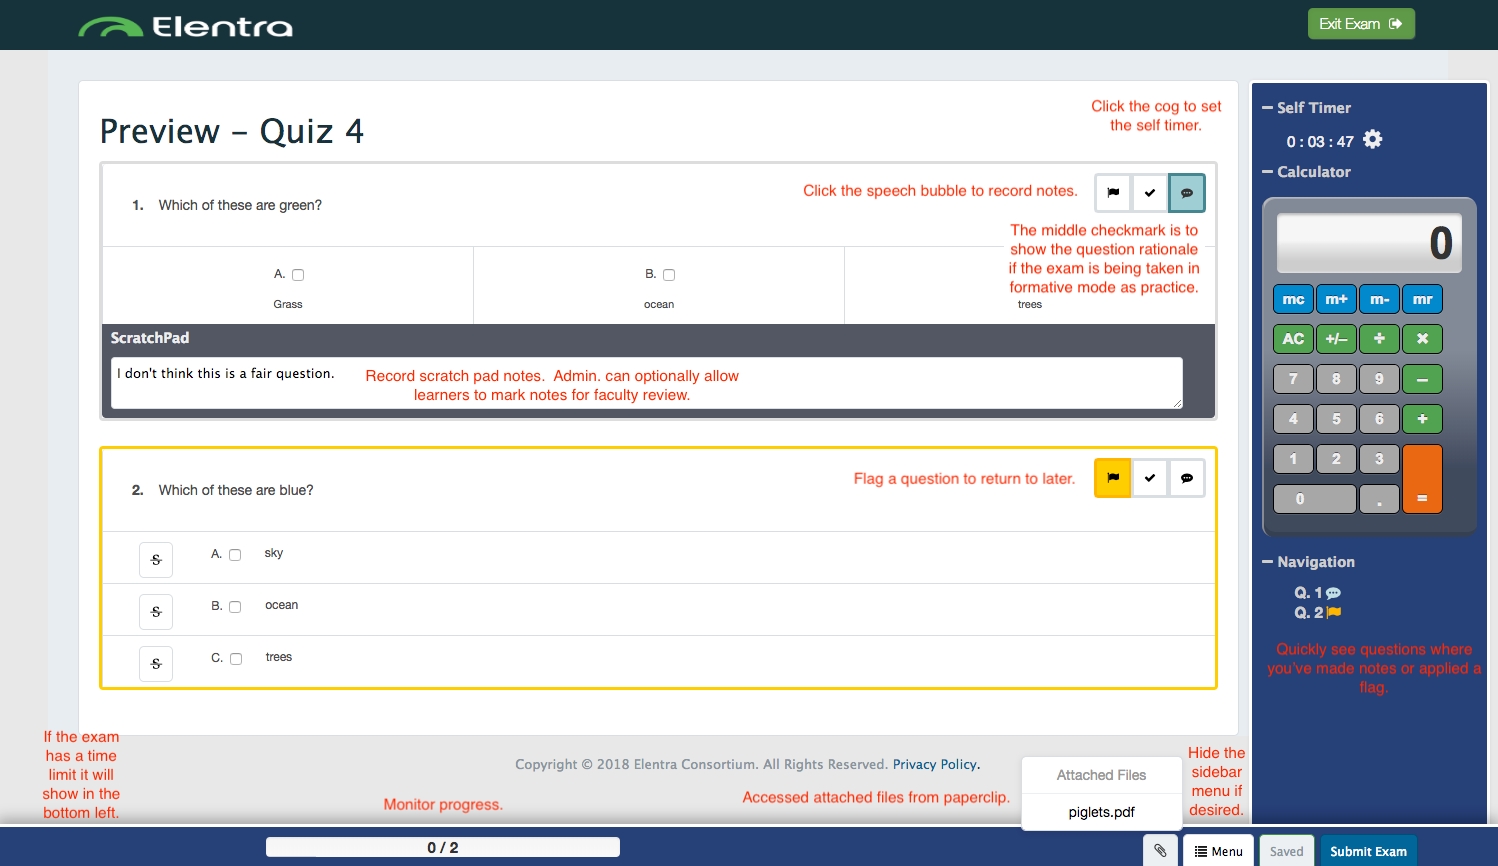
If you are previewing the exam you can choose to enable the calculator or self-timer to mimic the learner view.
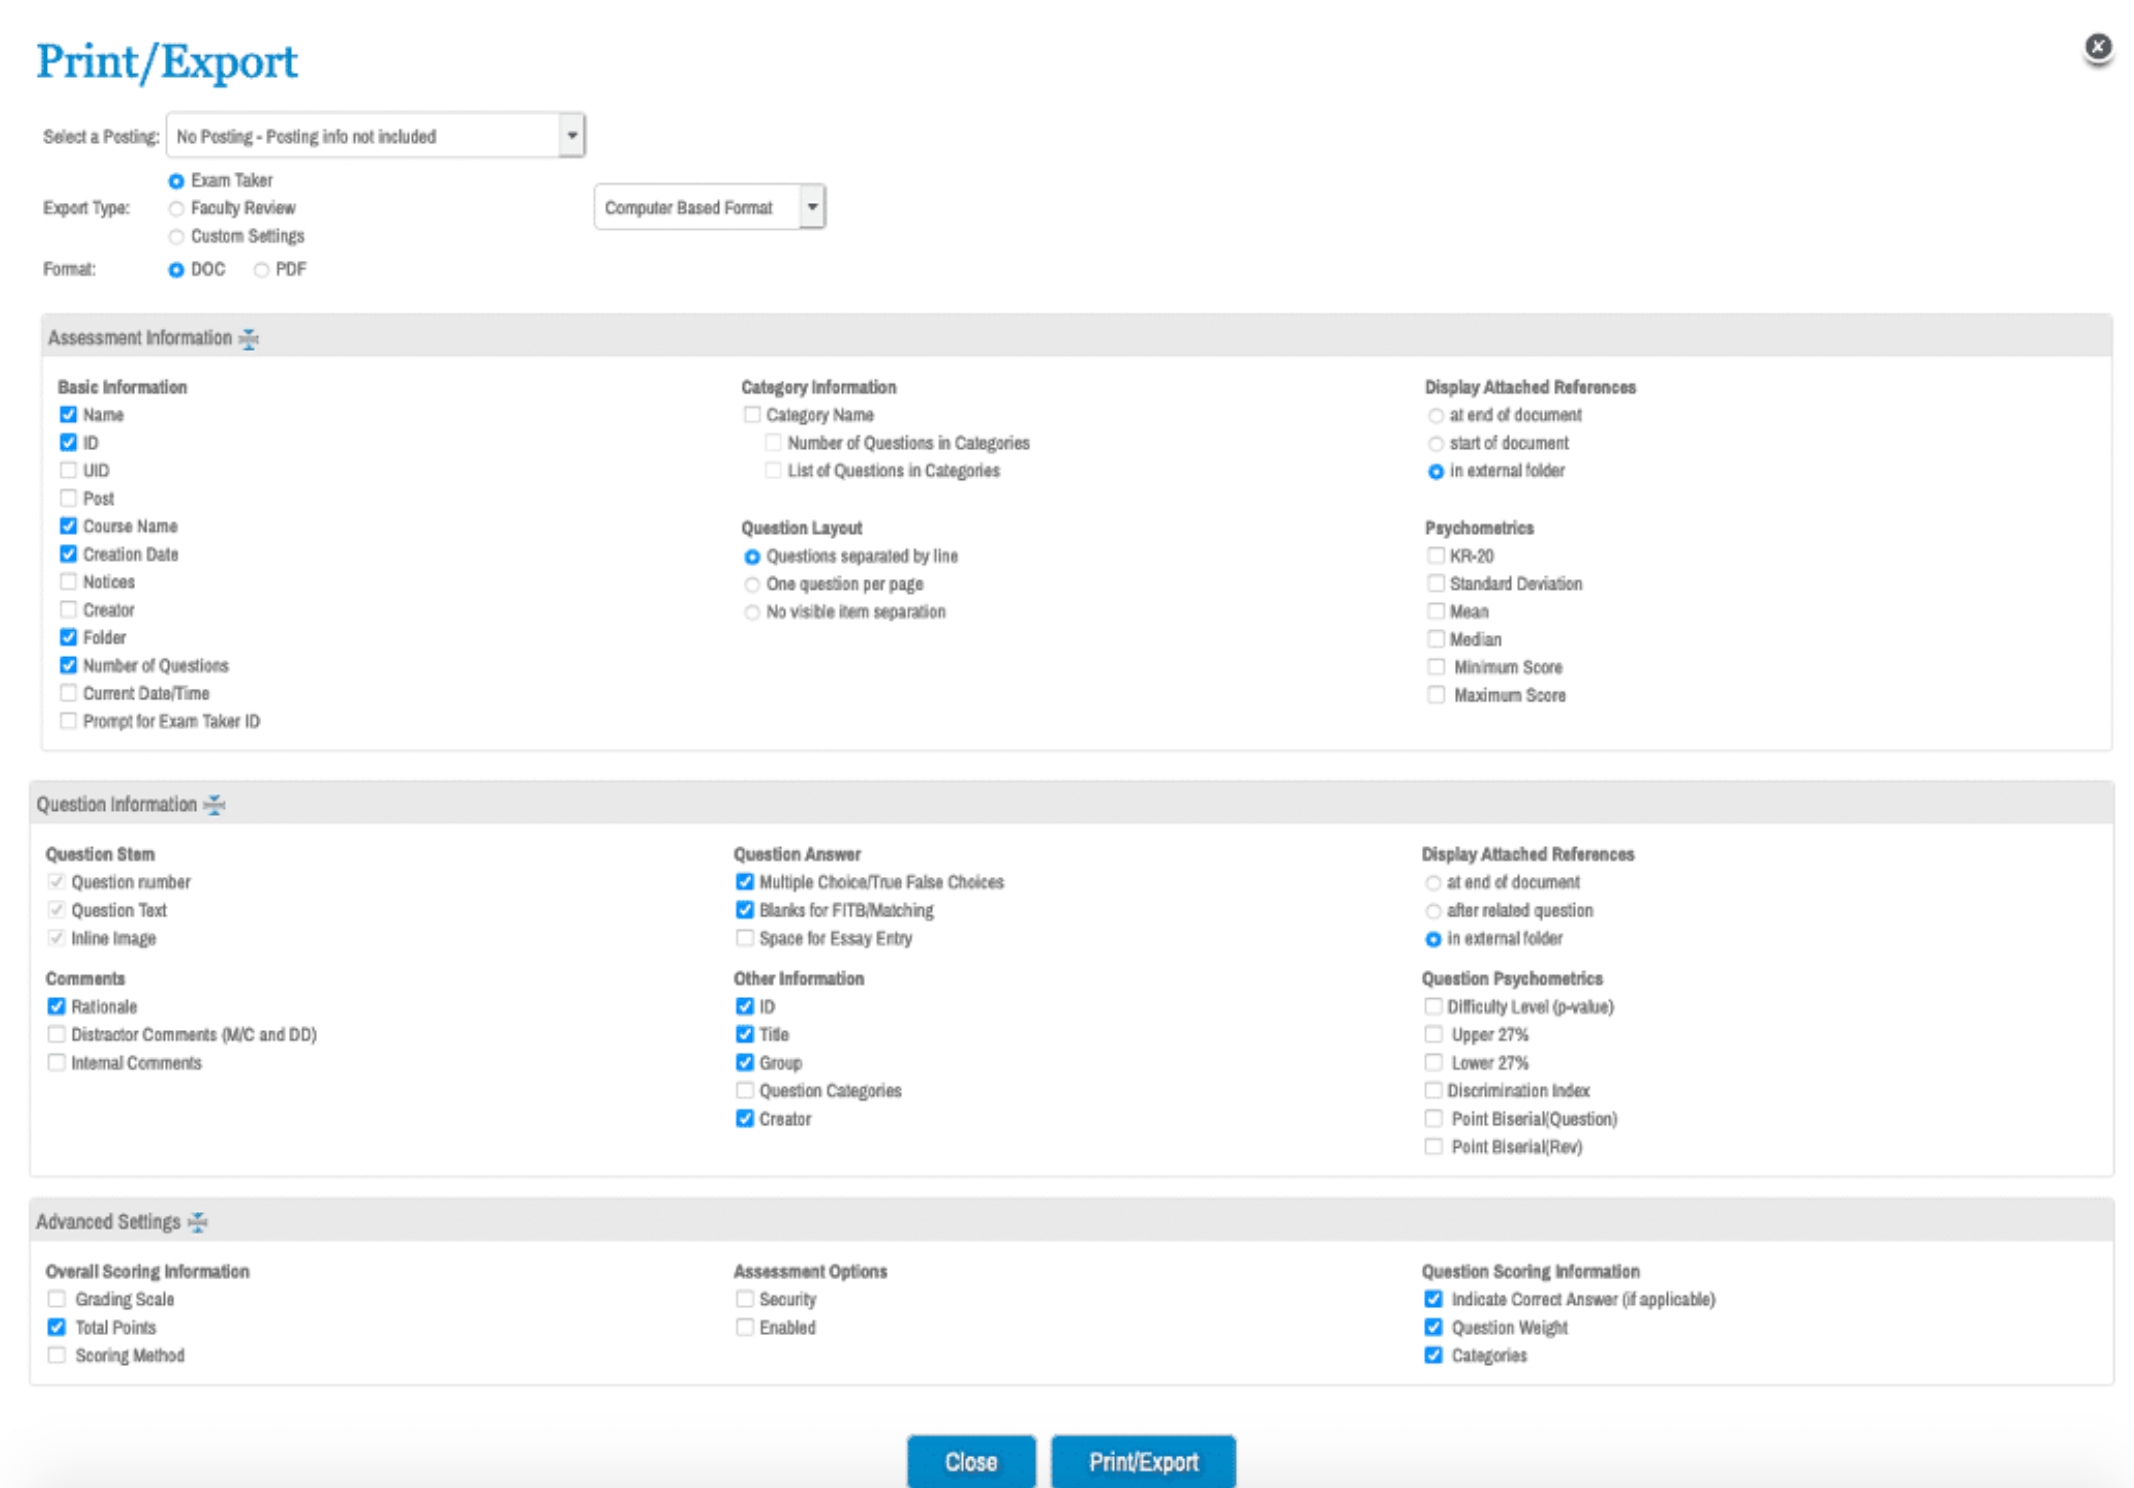
If you are printing the exam you can customize which fields to include in the printout. Use the selector menu in the left sidebar to select what you want to include and then click 'Print'.
New in ME 1.26! The ability to adjust secure browser options on a per-learner basis in Step 3: Audience.
After you've added questions to an exam and set your setting preferences you must create an exam post to actually distribute an exam to learners for them to take.
Please note that you can also post an exam directly from a learning event. To do so, go to the event Content tab, scroll down to Event Resources and click Add a Resource. Select Exams as your resource type and you will be redirected to the exam post wizard described below.
Navigate to Admin>Manage Exams.
Click on ‘Exams’ from the left sidebar Manage Exams section.
Search for the applicable exam as needed.
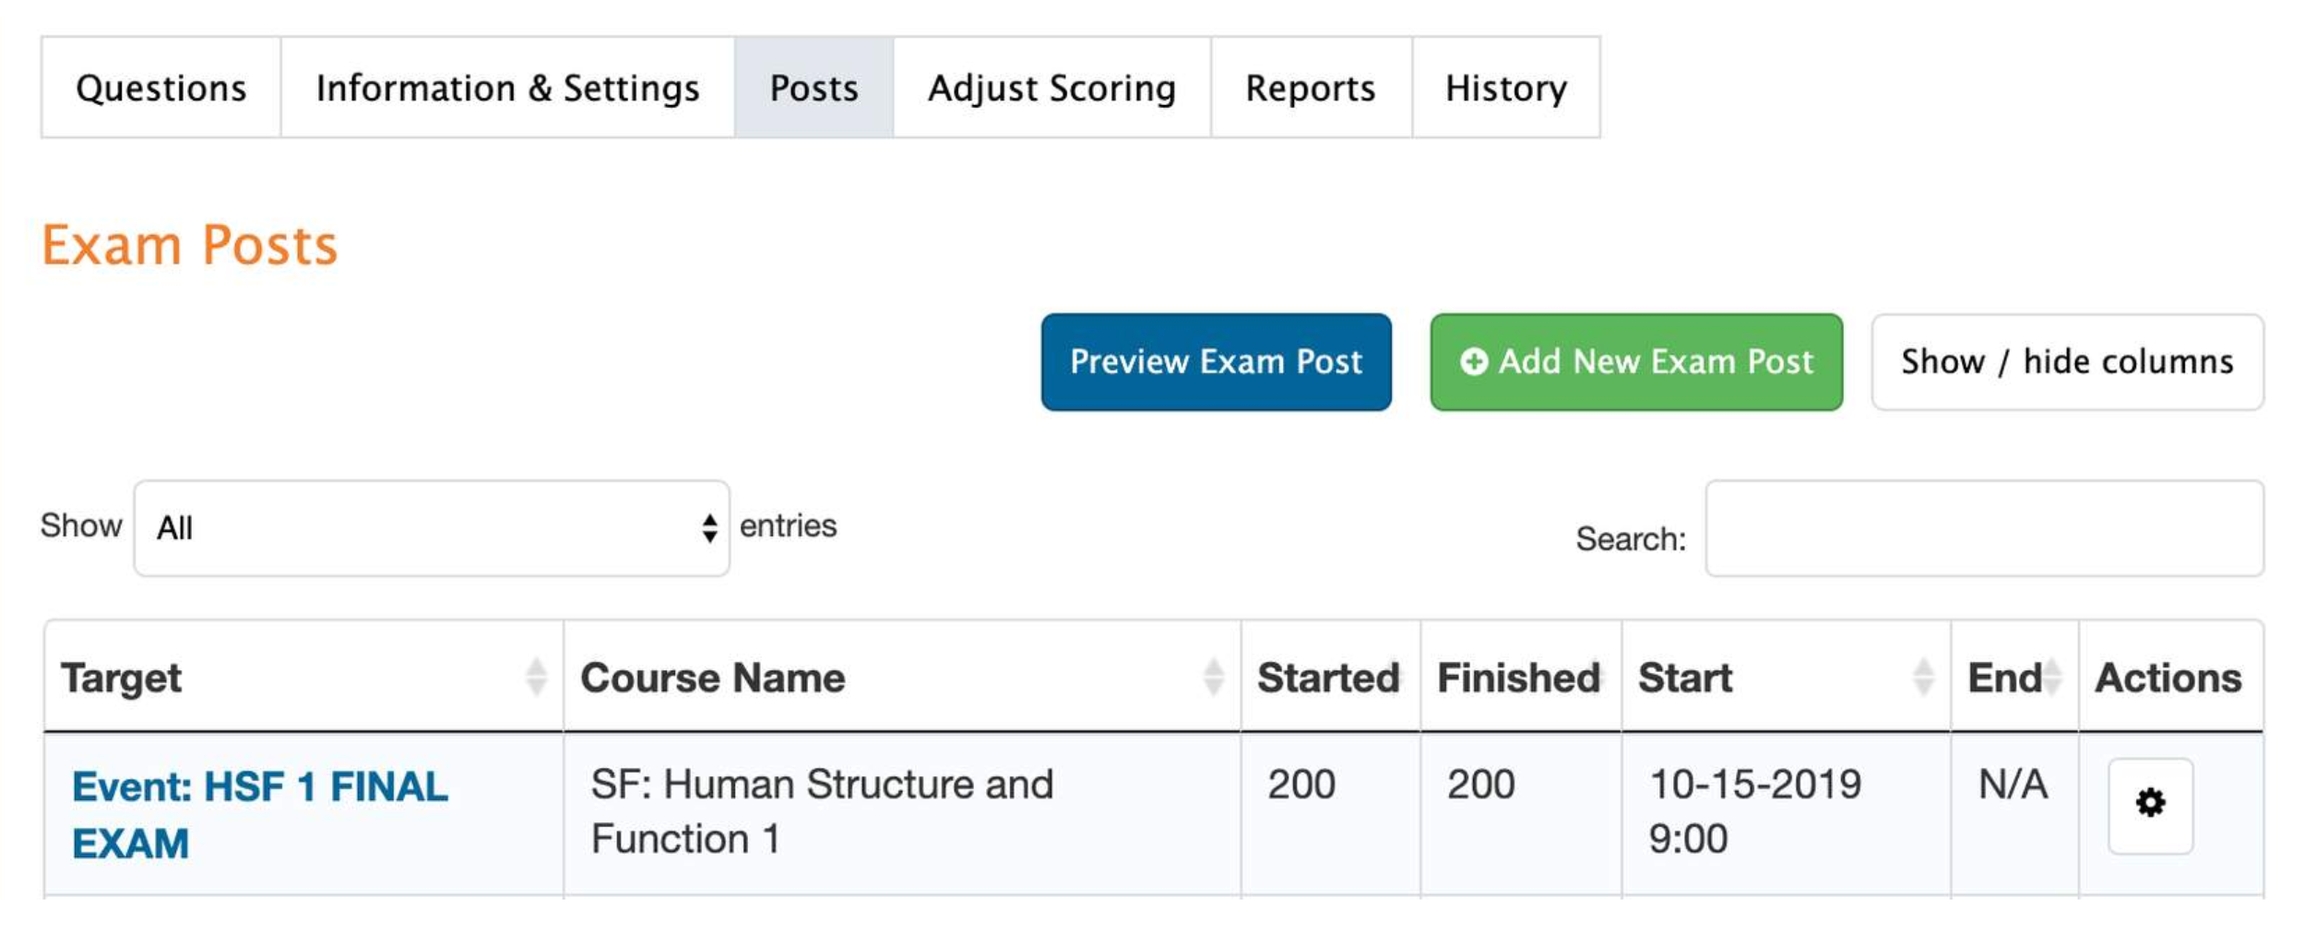
Click on the cog wheel to the right of the exam title; select 'Posts' from the dropdown menu.
Or, when viewing an exam, click the 'Posts' tab below the exam title heading.
Click ‘Add New Exam Post’.
You will be guided through a multi-step wizard to configure your exam post. Complete each section, noting the following:
When posting an exam to an event, you will only be able to access courses and events with which you are affiliated. So, for example, a pcoor can only access events in the course for which s/he is the listed pcoor. Someone with an admin role will be able to access all events.
Click 'Browse Events'. Note that a search bar is included in the resulting window.
Click on a course title.
Click on the appropriate curriculum period or click 'Show All Events'.
Click on the appropriate event.
Select an event using the drop down menu.
To go back a step at any point in selecting an event, click on the breadcrumbs (three dots) near the top of the search box.
Exam Title: Modify the exam title if necessary.
Description: This is just for internal use.
Instructions: This field will be displayed to learners on the exam intro page.
Click 'Next'.
Enter a Start and End date for the exam to be available as needed. (Click the small gray checkbox before you enter a date and time.)
Submission Deadline: This is an optional feature. If you set this, exams must be submitted by this time.
Time Frame: This determines where the exam will display in the resources section of a learning event page. Select from none, pre, during and post.
Time Limit: This allows you to limit the length of time a learner has to complete the exam (e.g. 60 minutes). Enabling this feature will also make a Time Left counter appear to learners during an exam.
Auto Submit: If using a time limit, you can also use the auto-submit feature so the exam is automatically submitted when the time expires, assuming the learner is still active in the exam. The auto-submit tools works only when a learner is still active on the exam screen to effectively cut them off when the time limit is reached. If a user logs out without submitting their exam, auto-submit will not submit it for them.
Hide Exam From Learners: If you hide the exam learners won’t see the exam in their My Exams task counter. As of ME 1.20, the exam will also be hidden on the associated learning event.
This option is frequently used on exams being delivered in TBL events.
Hide Exit Button: When checked, the Exit Exam button will be hidden.
Required: Click the box to make this exam required.
Attempts: Adjust this if you’d like students to be able to complete the exam more than once.
Free Navigation: Enable this if you want learners to be able to view questions already completed.
Exam Security Mode: Apply as needed. If you apply this, the wizard will require you to complete Step 6 (Security) after completing the other steps.
Mark for Faculty Review: Enable this to allow students to make notes during the exam and mark them as viewable by faculty. Note that once an exam is submitted students can’t add comments. There is a report to use after an exam is completed to review the scratchpad notes that were flagged for faculty review.
Calculator: Enable this to allow students access to an inline calculator during the exam.
Self Timer: Enable this to allow the learner to set a timer for him/herself during the exam.
Click 'Next'.
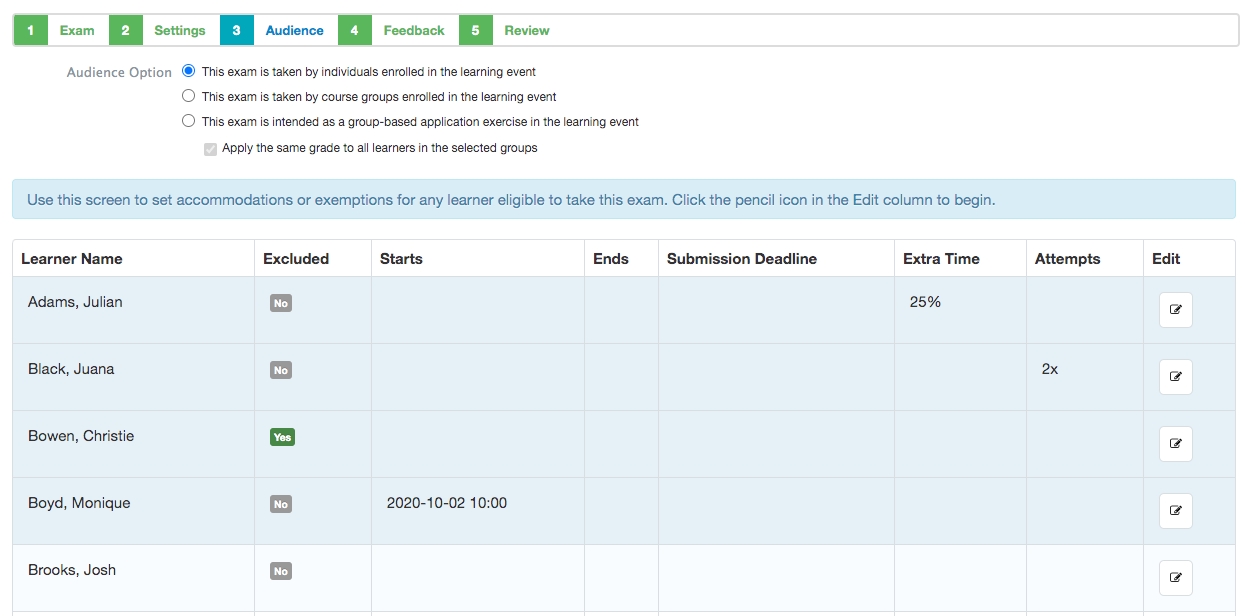
The audience for an exam post is dictated by the audience for the event to which the exam is posted. On the Audience tab you can tailor exam settings for individual exam takers.
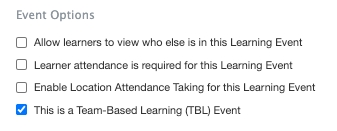
Under Audience Option, leave the default "This exam is taken by individuals enrolled in the learning event" checked unless you are using Elentra's Team Based Learning module and posting an exam to serve as a g/tRAT for a TBL event. Note, the event must be defined as a TBL event in the event setup page to use the course groups option.
To exclude a learner, increase time for a learner if an exam has a time limit, extend the end date for an exam for a student with accommodations, etc. use this feature.
Click the pencil in the Edit column to adjust the settings for any individual student. For all fields, click the checkbox first and then enter information.
Excluded: Clicking this checkbox will exclude the learner from the exam audience.
Exam Start and End Date: Click this and provide modified dates to change when a learner can access the exam.
Submission Deadline: Click this and provide a new deadline to change the deadline for a learner.
Extra Time: Click this and enter a percentage increase in time for the learner to complete the exam.
Attempts: Click this and enter a modified number of exam attempts for the learner.
Use non-secure browser: Check this if you want to allow the learner to by-pass the security requirements for the exam.
This option can be checked off during the exam taking period if you encounter technical issues like a learner's inability to use browser lockdown software.
This option can also be useful in a hybrid environment where you require the use of a secure exam browser for some students while exempting others.
Special accommodations: Use this space to record additional notes specific to this learner.
Click 'Update'.
Your changes will be displayed in the table.
To delete an exception, return to the edit window for a specific learner on the list and click 'Clear'. Confirm your choice.
When you have entered all the audience settings required, scroll to the bottom of the page and click 'Next'.
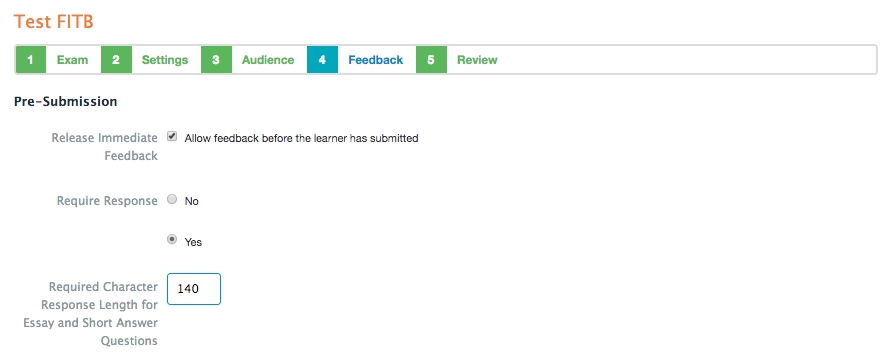
This tool allows you to create an exam post that learners can use to get immediate feedback on questions while they complete them and without submitting an exam. The use case might be formative assessments you provide to learners in advance a summative exam.
If you check off the Release Immediate Feedback checkbox you can configure a couple of other options.
Require response: This dictates whether a user has to provide a response before being shown the question feedback.
Require character response length: This allows you to set a minimum character count that users must hit before the system will release question feedback to them (please note there is no AI to check the user responses).
Release Score: Click this to return scores to learners after they submit an exam. Enable ‘Release Feedback’ if you want learners to access the information stored in the rationale section of the exam items when they get their scores; you can further modify whether to release rationale for all question or just incorrect questions. If you have included short answer or essay questions in an exam and you expect faculty to provide narrative feedback which you wish students to view, you must set the exam to release feedback for ALL questions for learners to be able to see the narrative comments from the grader.
Set the release start and end dates to delay feedback if required. This might be useful if two sections of a class are completing the exam at different times and you don't want any learners to see their results until all learners have completed the exam.
Re-Attempt Threshold: Set a minimum score to merit completeness, then set an allowable number of attempts to attain the minimum score. For example you can specific that a learner must achieve 80% on this exam and has two attempts to do so. If the learner scores 50% on their first attempt the system will automatically let them take the exam once more.
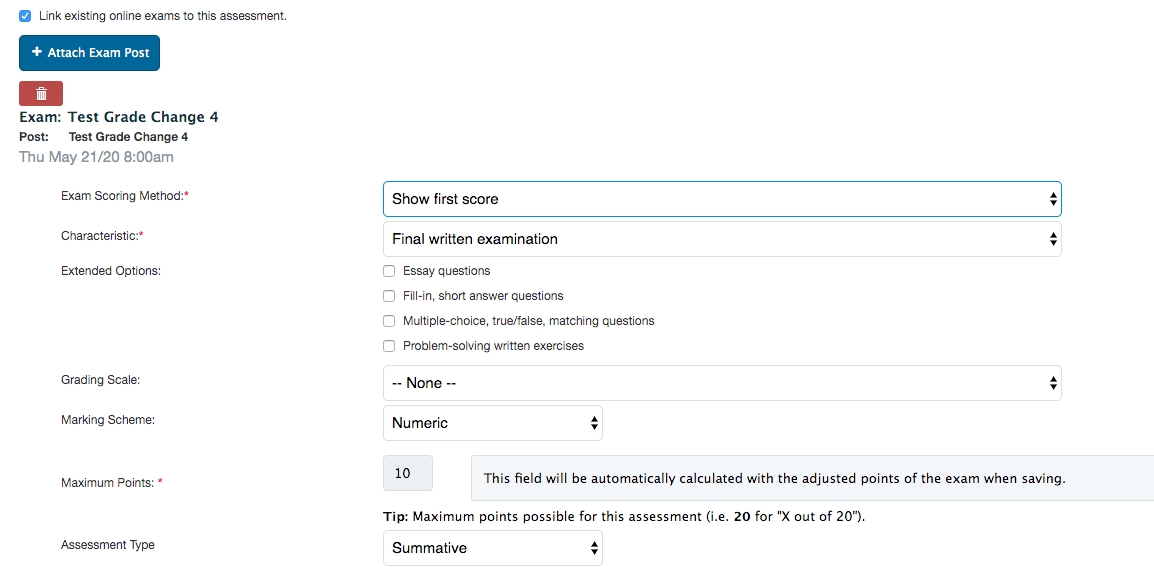
Attach GradeBook: Select an existing gradebook entry to attach the exam to (the list will prepopulate based on the course and event selected in earlier steps and the contents of the gradebook for the relevant curriculum period). The results of this action are that once graded, the grades from this exam will automatically populate the gradebook entry.
This page provides a summary of all the choices you’ve made for this exam post. If you need to change something click on the Previous button to return to an earlier screen.
Click 'Save Post and Continue' and if you are using security settings you will be redirected to complete the Security information.
This step will only display if you selected an exam security mode on Step 2: Settings.
When creating security settings you can create a basic password, or use a third party tool to provide exam security.
Basic Password: Set (or generate) a password that you’ll distribute to learners in order for them to access the exam.
Other security options: Follow the online instructions (and see more detail in each relevant help section)
Click 'Save Security Options'.
You will be redirected to the list of exam posts.
Elentra supports integrations with the following third party tools:
Safe Exam Browser
RPNow
Examity
Respondus Lockdown Browser
On the Posts tab, click the cog in the Actions column for a specific exam post.
Click 'Edit Post' to reopen the exam post wizard and make any required changes.
You can only delete an exam post if there is no progress record for the exam (i.e., no learner has written the exam).
If you need to delete progress records, go to the Exam Posts tab.
Click on the cog under the Actions column and select 'View Activity' from the dropdown options. The resulting page will show you which learners have completed an exam, their scores, start and submission dates, etc. Beside a learner's name click and chose 'Delete progress record'.
Once all progress records for an exam have been deleted go to the event where the exam was posted and scroll down to the resources section. There you will see a red garbage can beside the exam. You can delete the exam post from there.
When on the Posts tab of an exam note that you can add and remove columns from the list of exam posts to see more or less information.
Click 'Show/hide columns' to add or remove the columns you'd like to be able to view.
In order for users to access exams and grade them, they must be added as graders to an exam post. There are some prerequisites to make this happen.
To be added as a grader to an exam, users must also be course contacts for the course the exam is posted to.
You can add faculty as course contacts in the "Associated Faculty" section of a course Setup tab. You can add staff in either the Curriculum Coordinator (staff:admin users) or Program Coordinator (staff:pcoor users) roles.
If you wish to set up students as exam graders, they must be designated as Student Admins in their user profile and be added as a teaching assistant in a course (via the course Setup tab).
To set up exam grading you must have groups within a course.
Make sure you have groups configured before you try to add graders as the only way to successfully save grader names is for them to be attached to a group.
Navigate to Admin > Manage Exams.
Click on ‘Exams’ from the left sidebar Manage Exams section.
Search for the applicable exam.
Click on the cog wheel to the right of the exam title; select 'Posts' from the dropdown menu.
Or, if already viewing an exam, go to the Posts tab.
Click on the cog under the Actions column and select 'Edit Graders' from the dropdown options.
If you cannot see the Actions column, click 'Show/hide columns' to add the Actions column.
Add Graders by typing a name in the text box, and clicking on the appropriate name. To attach a grader to an exam, the grader must be associated with the course through the course Setup page.
Any existing Course Groups will appear. Assign groups to a grader or allow the system to randomly distribute groups to graders.
Click the checkbox beside one or more group names.
Click 'Assign Selected to Grader'.
Select the appropriate grader.
Click 'Assign Groups'.
The grader and their assigned groups should display on the left.
Click 'Save Grader Settings'.
To delete a group from a grader click the red minus icon. The group will move back to the right side under the groups list.
Currently you can only assign a group to one grader. This means you require a one-to-one relationship between examinees and graders. If you need multiple faculty to share responsibility for grading multiple students you can have users set up permission masking or create a generic account that multiple users have access to. Remember that for short or long answer items that require a grader, learners will see the name of the individual who graded their response.
If an exam is attached to a gradebook assessment so that the course gradebook automatically populates with the exam score, you will see the option to add graders to the gradebook assessment entry. Adding graders to a gradebook assessment alone will not allow faculty to access the exam to grade. To allow someone to grade an exam they must be added as a grader to the specific exam post.
Updated in ME 1.21 to include the option to submit a learner's exam for them.
Navigate to Admin > Manage Exams.
Click on ‘Exams’ from the left sidebar Manage Exams section.
Search for the applicable exam.
Click on the cog wheel to the right of the exam title; select 'Posts' from the dropdown menu.
Add or remove columns from the display by clicking 'Show/hide columns'. You will need to see the Actions column to proceed.
Click on the cog under the Actions column and select 'View Activity' from the dropdown options.
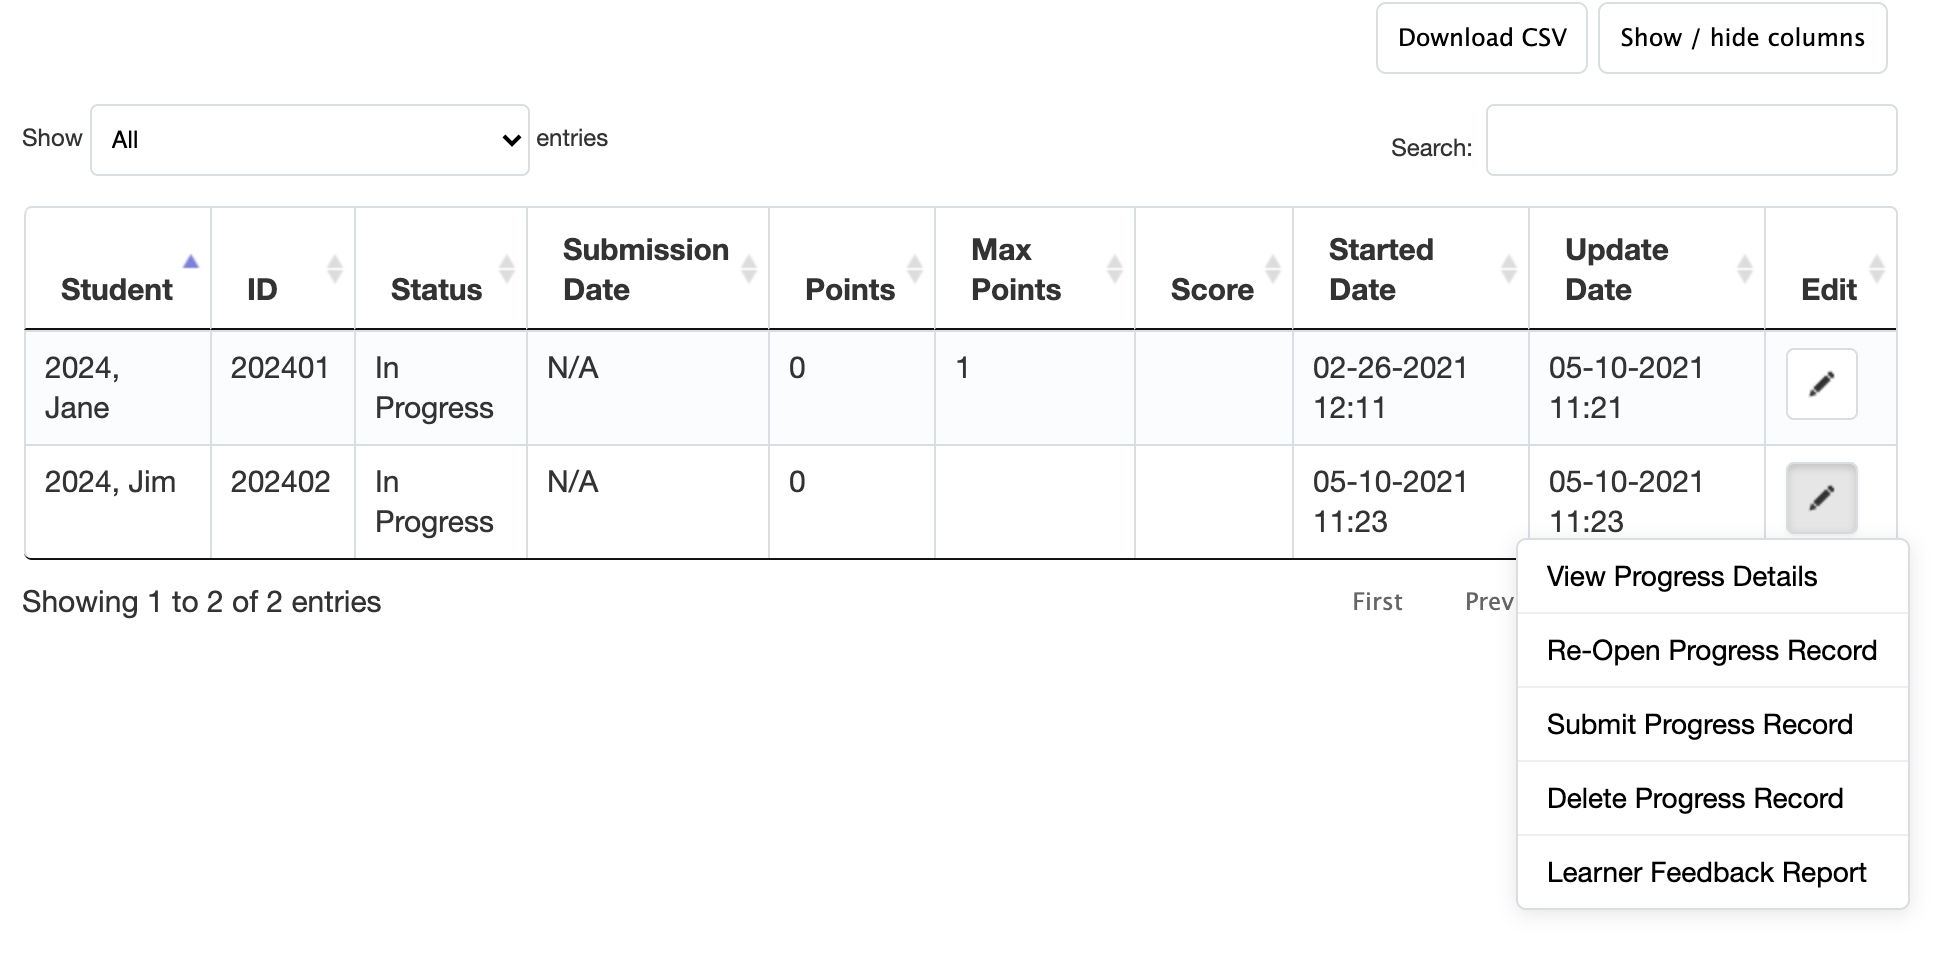
The resulting page will show you which learners have started or completed an exam, their points, start, update and submission dates, etc.
From the edit icon on the far right, you can take action on specific learner's exams.
View Progress Details: This will show you an item by item view of the learner's progress on an exam.
You can optionally add more columns to view the item text, grade comments (if applicable), etc.
Re-Open Progress Record
If a learner submitted an exam but you wish to reopen it for them to continue, you can do so here.
You can optionally override the time the learner has left to complete the exam.
Submit Progress Record
If a learner did not submit their exam, an administrator may do so from here. Click 'Submit' in the modal that opens.
Delete Progress Record
If you wish to delete an exam post, it must have no activity. Deleting each learner's progress record can let you delete a post (and hence an exam). This should likely only be used in test cases.
Learner Feedback Report
For completed exams, quickly jump to vie the Learner Feedback Report.
Please note that RPNow is a fee-based service. An integration with Elentra exists but to use it you would also need a contract with RPNow. See more at https://www.psionline.com/platforms/rpnow/
If you are using RPNow to provide exam security, note that after an exam post is created you'll have the option to automatically email learners their exam codes, or to email a course director with the exam code for each learner. From the posts screen, look in the Actions column for an email icon.
Click the email icon.
Check off whether to email the course director or students. If you choose to email students the default email text will display.
Edit the email subject line as required.
Edit the email content as required, noting the available variables.
Click 'Send'.
If you email the course director, s/he will receive a csv file listing student names, emails, and exam codes. The email will have RP-Now Exam Codes as the subject line but will not include any text in the body of the email.
For additional information about how to use security settings, please see the Exams>Information and Settings help section.\
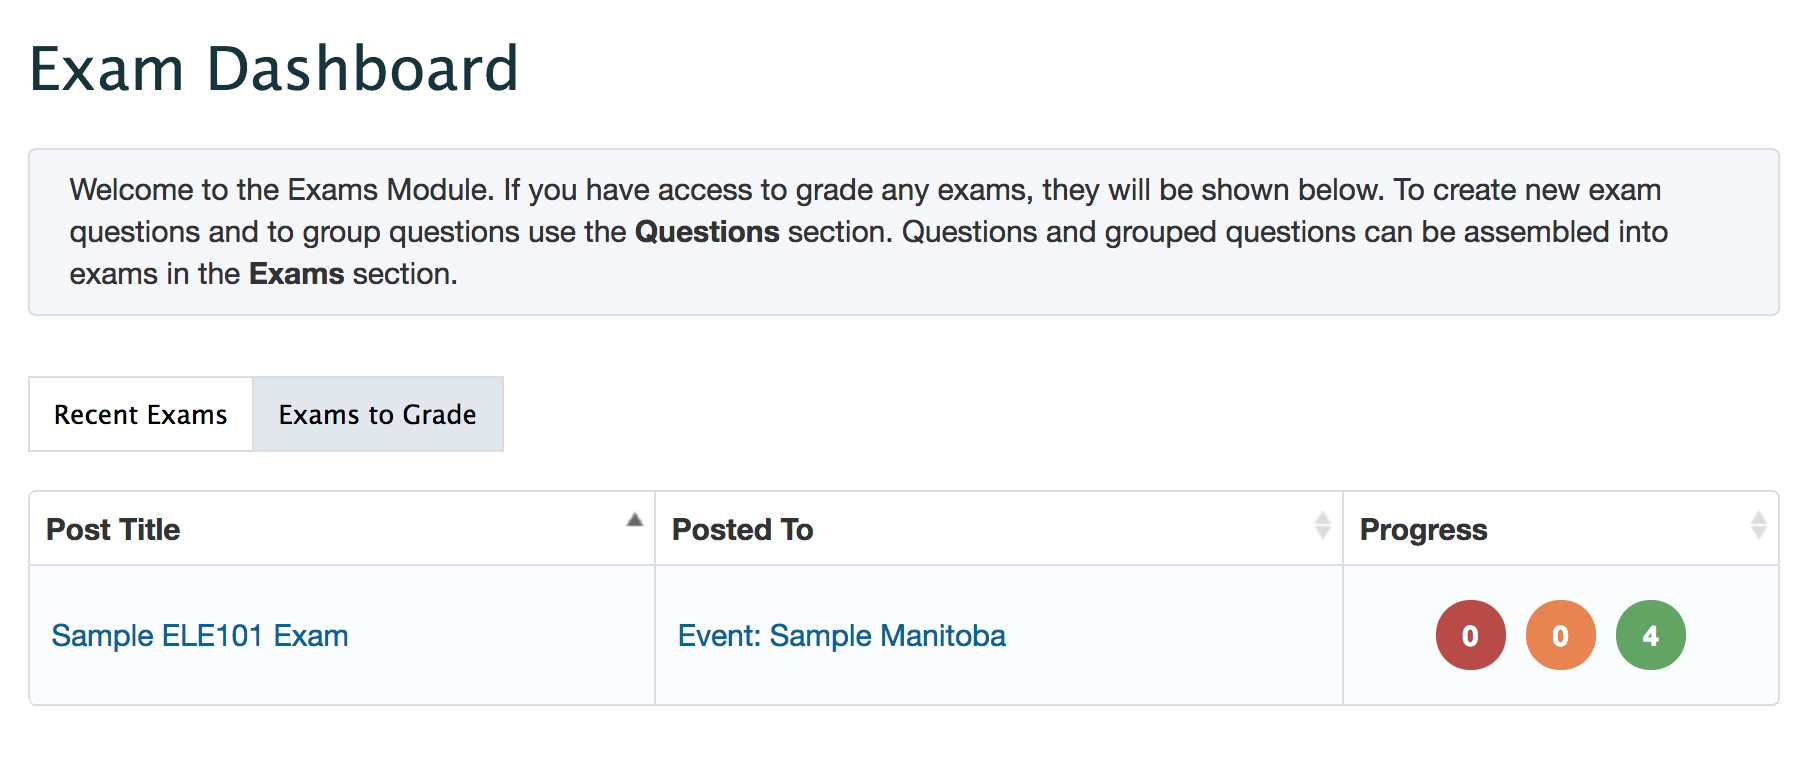
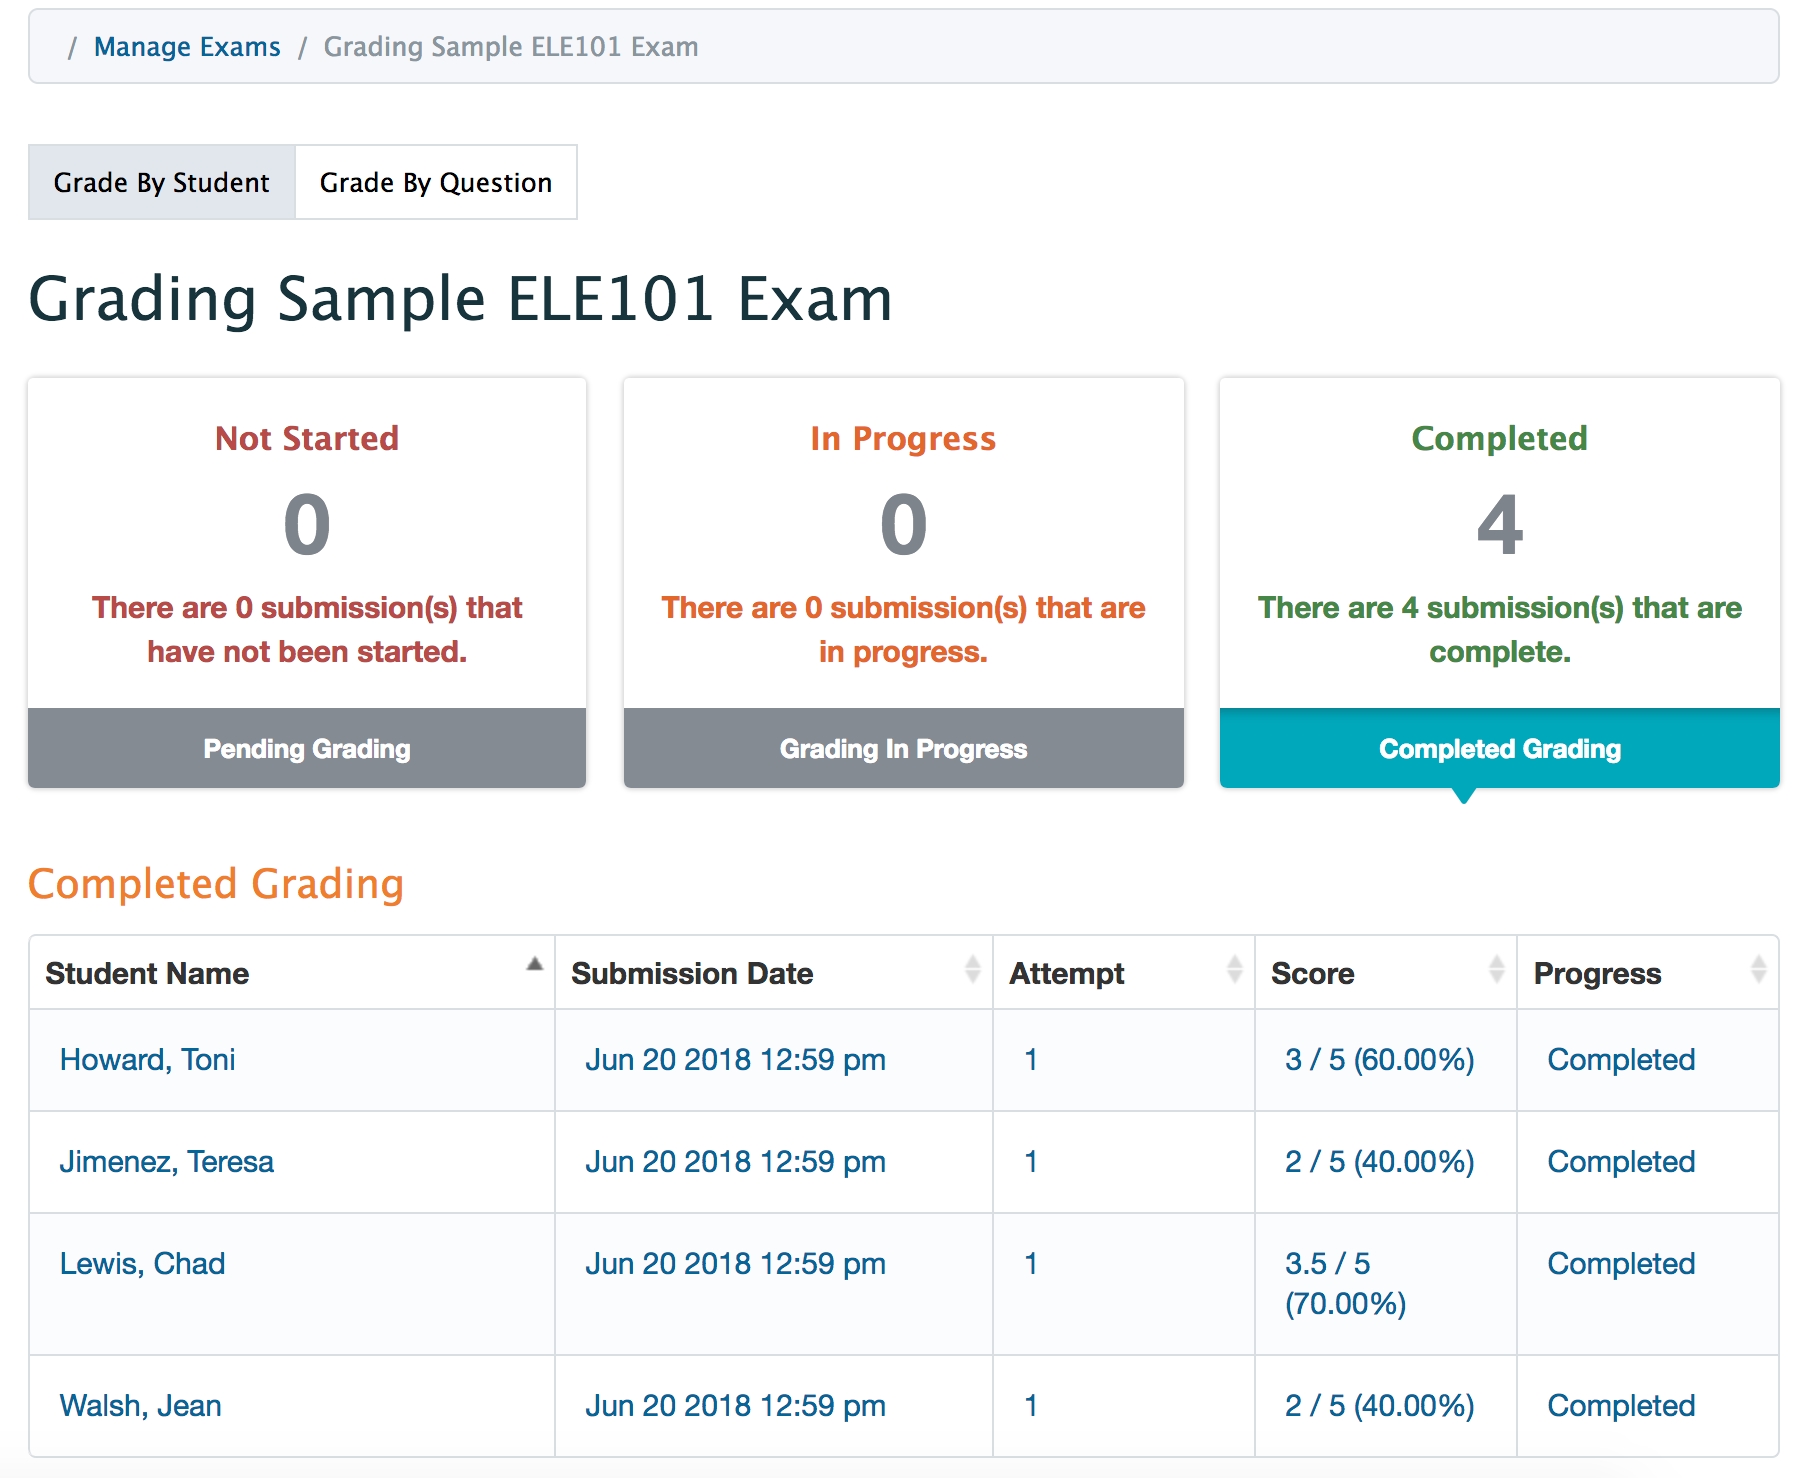
When users are assigned as graders on an exam, they will be able to access exams to grade from Admin > Manage Exams. On the Exam Dashboard they should click on the Exams to Grade tab (this may also be their default view depending on their group and role permissions in Elentra). Users will see a list of any exams where they are assigned as a grader.
By clicking on an exam title the user will be taken to count of exams they have not started grading, are in progress, or are completed. Graders can switch from grading by student to grading by question, depending on their preference. Clicking on any status card (e.g. Not Started) will show a list of the exams that remain in each category.
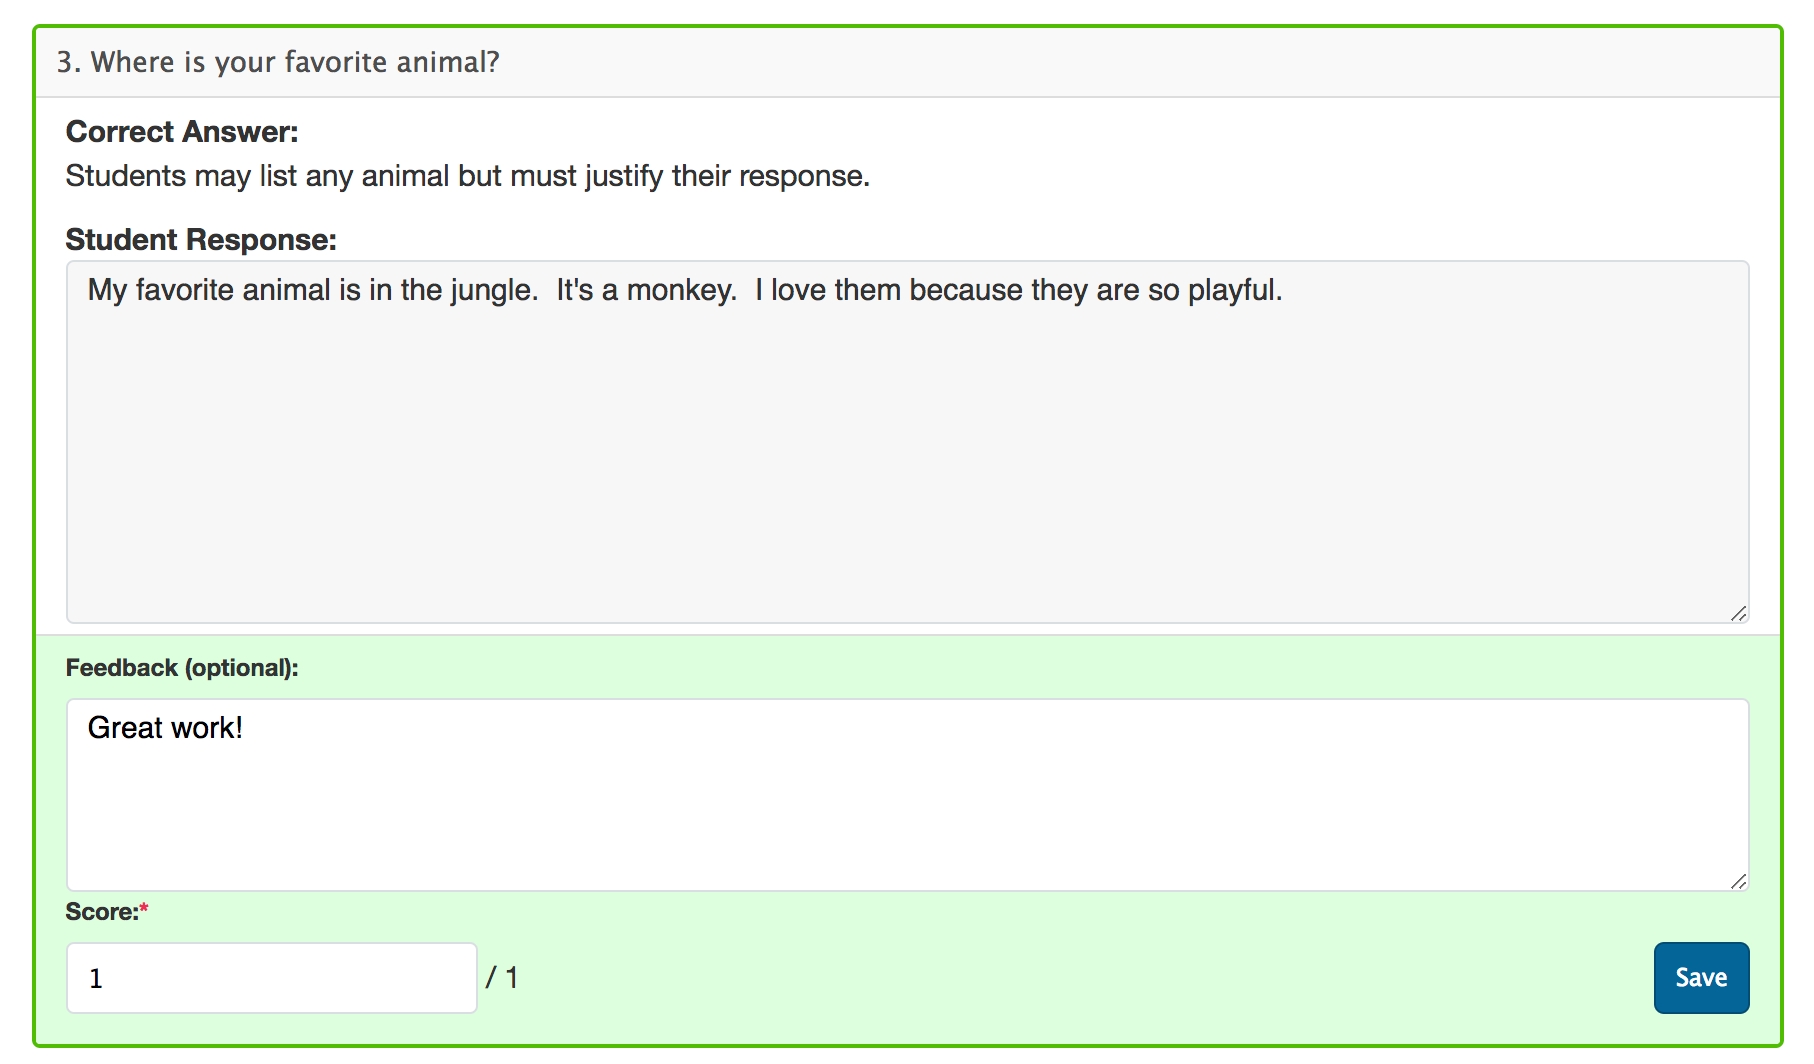
By clicking on a student name (or question number if grading by question), the user will be taken to a screen where they can view exam answers and provide feedback and a grade. If a 'Correct Answer' was provided with the question, the grader will be able to see it to use as a guide when grading. Graders can also type feedback that will be visible to the learner depending on the exam post settings.
Users may have reason to adjust the scoring of an exam after it has been written (e.g., decide a question was confusingly worded).The Adjust Exam Scoring tab will be visible to staff:admin by default, and staff:pcoorindators and faculty:directors for exams they are specifically permissioned to.
Adjusting the exam scoring will impact all posts of an exam! If an exam was used in 2018 and again in 2019 and you adjust the scores in 2019 you will also impact the 2018 exam post and its results.
If you adjust the scoring on an exam, and have released feedback for an exam post, learners will see a note reflecting the changes.
If you have linked an exam to a gradebook assessment, adjustments made to the exam scoring will automatically get reflected in the gradebook assessment (and in the learners' view of their grade if it is displayed to them).
From the Adjust Score tab you can:
Adjust which item response is correct or incorrect
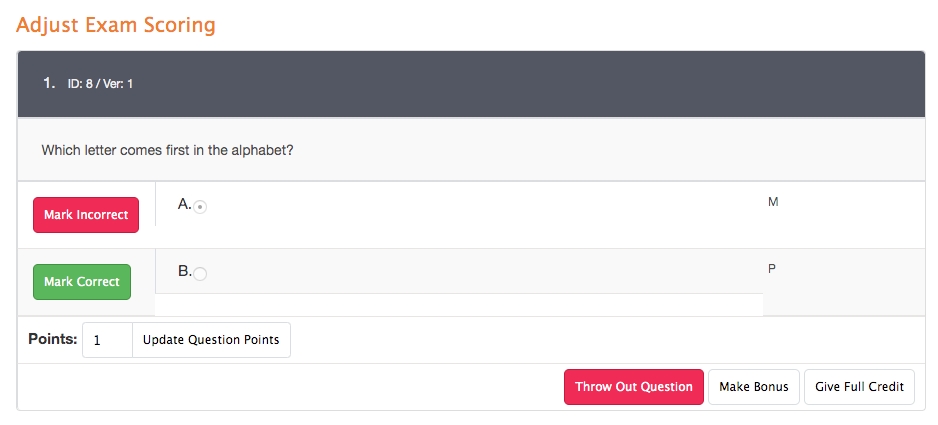
Click 'Mark Incorrect' to set a previously correct answer to be incorrect.
Click 'Mark Correct' to set a previously incorrect answer to be correct.
Pay close attention to the words on the buttons! Answers that are correct are shown with a filled in radio button (not those with a green button beside them).
In the example below, 'A' is the correct answer (despite the red button beside it). If B was also a correct answer, one would click 'Mark Correct'.
Edit the point value for an item
Enter the new point value and click 'Update Question Points'
This will update the total point value and adjust learner scores accordingly.
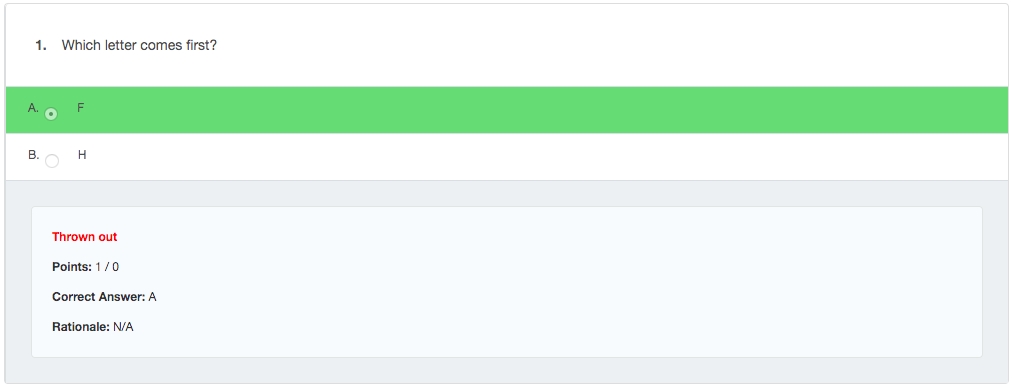
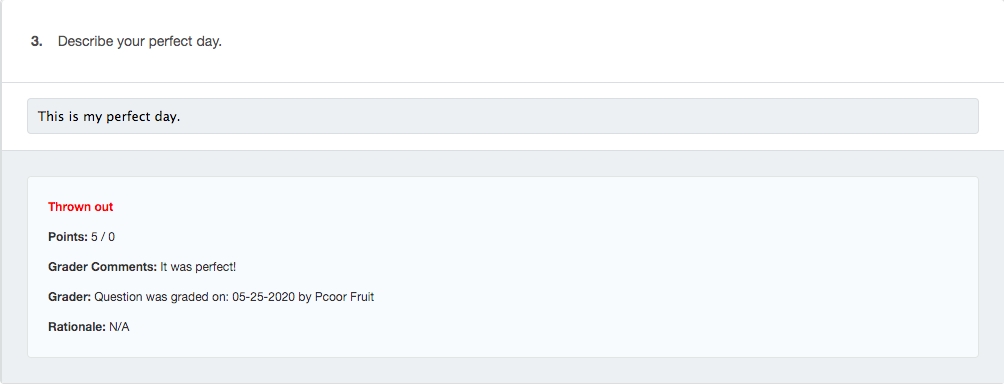
Throw Out Questions
This will remove the question from the exam entirely. The exam's total point value will decrease.
Make Bonus
This will give bonus credit to any learner who correctly answered the question.
When viewed through the Exams module, the total points for the exam will decrease by the question point value, but the learners' points will remain the same. (The denominator decreases while the numerator remains the same.)
In effect, a learner can score over 100% on an exam if you make a question a bonus.
Note that if an exam is attached to a gradebook assessment and you make an item a bonus, if you display the exam score numerically in the gradebook, the denominator will actually stay the same as the original points total, however, the learners' points totals will be multiplied to account for their bonus points.
Give Full Credit
This will give full credit for the item to every learner. The exam point total stays the same, and learners' points will increase (assuming they originally got the item incorrect). (The denominator remains consistent while the numerator potentially increases.)
Migrating responses from ExamSoft into Elentra allows you to record learner performance on past exams delivered through ExamSoft in Elentra.
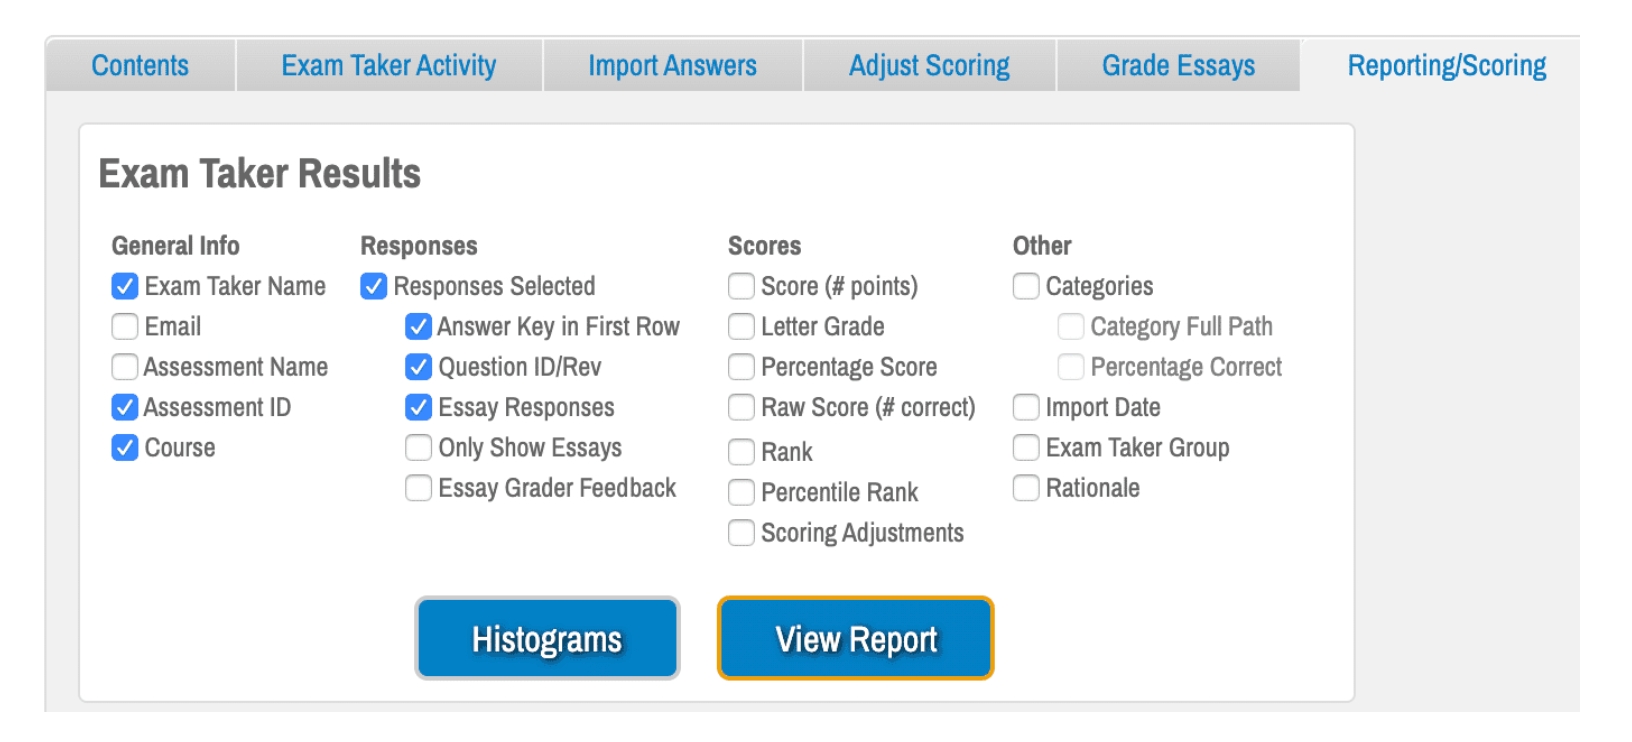
Export your learners results from ExamSoft with the following settings as a CSV file.
If your exam does not have essay questions, you can uncheck the Essay Responses category.
From the main page, click to update any questions then proceed to the Posts section.
Create a post of this exam and associate it with a learning event for the cohort that wrote it. (Review the exam posting section for more information).
Once your questions have been imported, return to your Exam Dashboard through the Exam menu located in the collapsible left-hand side bar.
Click on the title of your imported exam to open it.
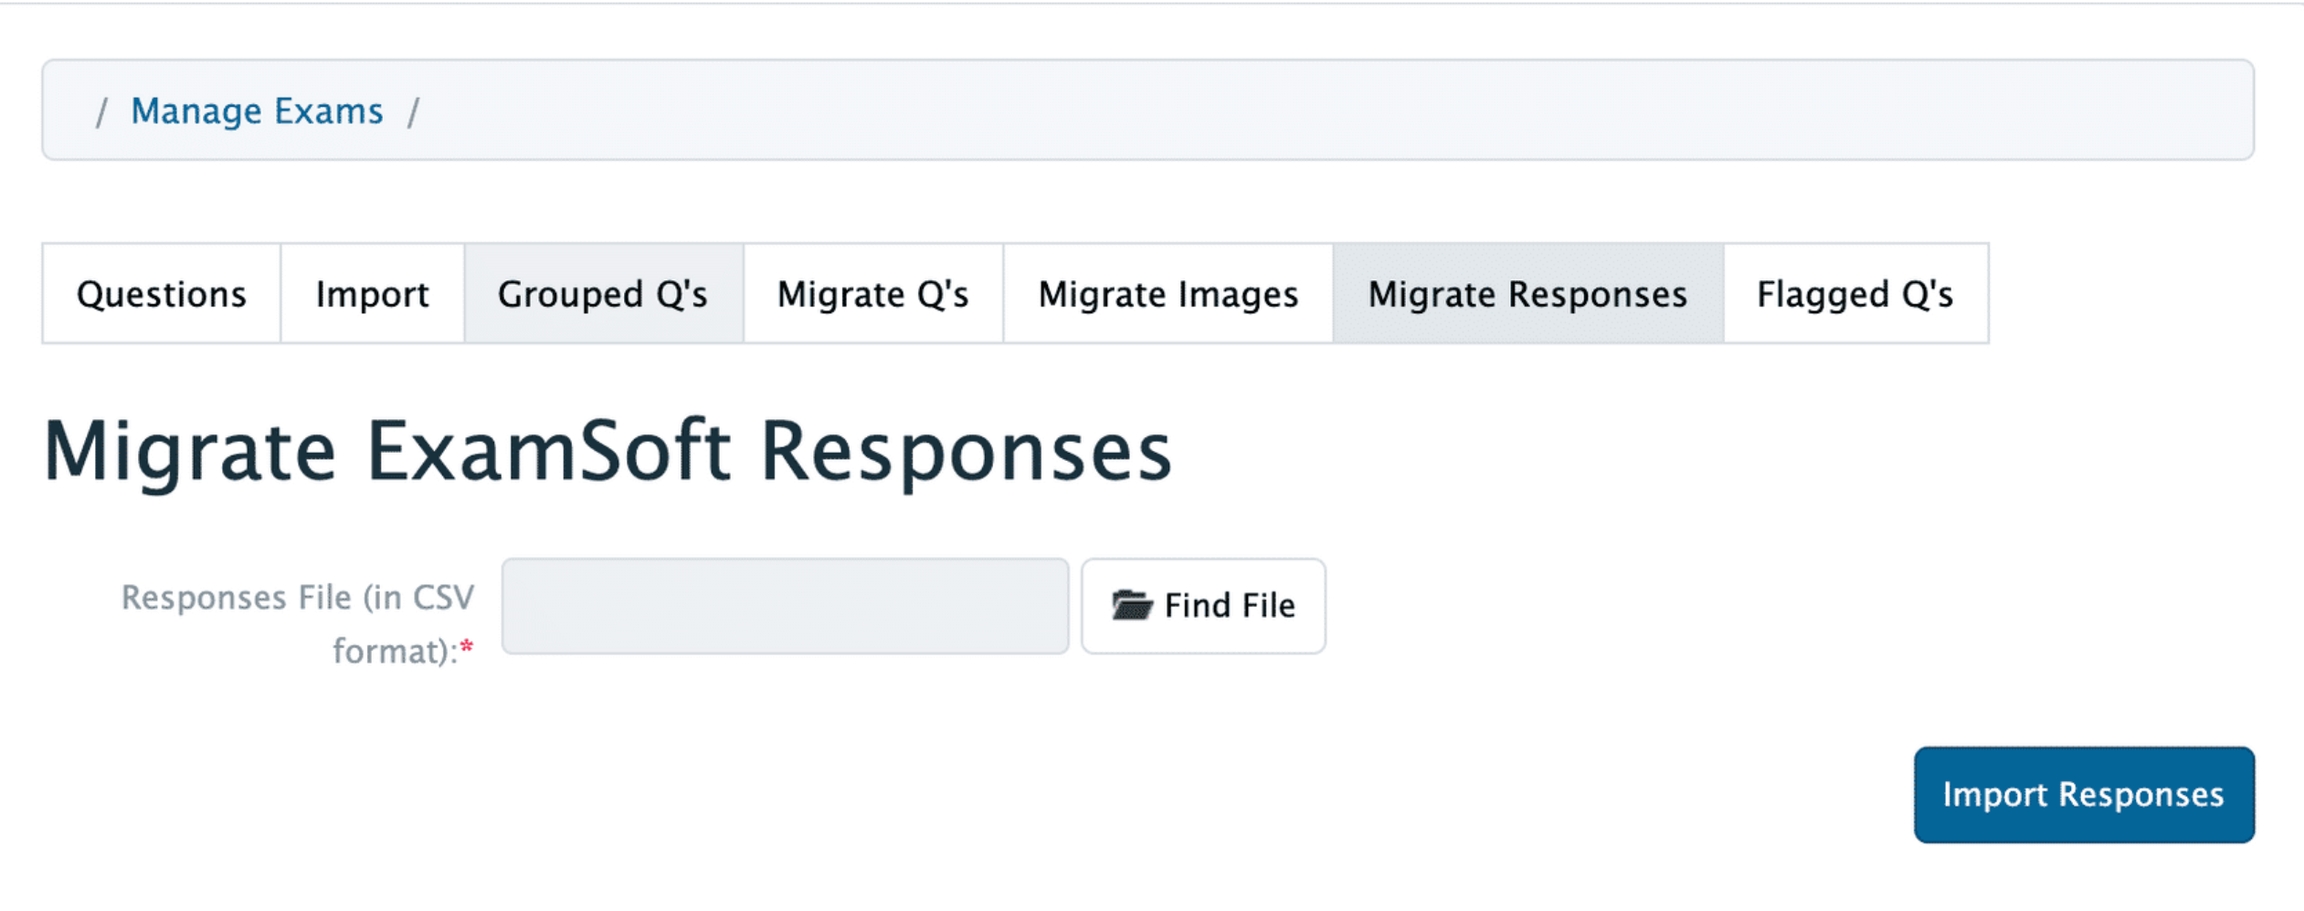
Go back to the Questions section and select the Migrate Responses tab.
Browse for and select the CSV of the learner results and then click Import Responses.
This can take a few minutes to complete if there are many questions and learners.
Once the results have been imported, the post will be updated so learner results can be reviewed and reports can be generated for the exam.

Users in the student group can optionally be given 'student admin' status in their user profile. If learners have this status they will be able to access Admin > Manage Exams to view and create questions using labels granting them permissions.
Navigate to Admin > Manage Exams.
From the left sidebar, click on Questions.
Learners will be able to view any questions to which they have been granted access via a Label.
If the Label includes write access, learners will be able to create questions.
Navigate to Admin > Manage Exams.
From the Exam Dashboard learners will view any exams for which they have questions to grade.
Click on a Post Title to access the exam questions.
Users will see their progress including grading not started, in progress, and completed.
Learners can access an exam either from the event the exam is posted to or through their user menu options.
Click the user's name in the top right.
Click on My Exams.
A number badge beside My Exams shows the learner how many exams they have to complete.
How learners see an exam will depend on some of the settings made in the exam information and settings as well as the exam post. For example, from Information and Settings an administrator can decide whether an exam will display all questions on one page, one question per page, or apply page breaks added to the exam.
Within the Settings tab of an exam post administrators can set whether learners can go back and forth between questions, access a calculator, or use a self timer.
While taking an exam learners can use several tools like the self-timer, scratch pad, flags, strikethrough (click on the S beside a question to grey it out and eliminate it as a choice), etc. The exam is automatically saved every few seconds.
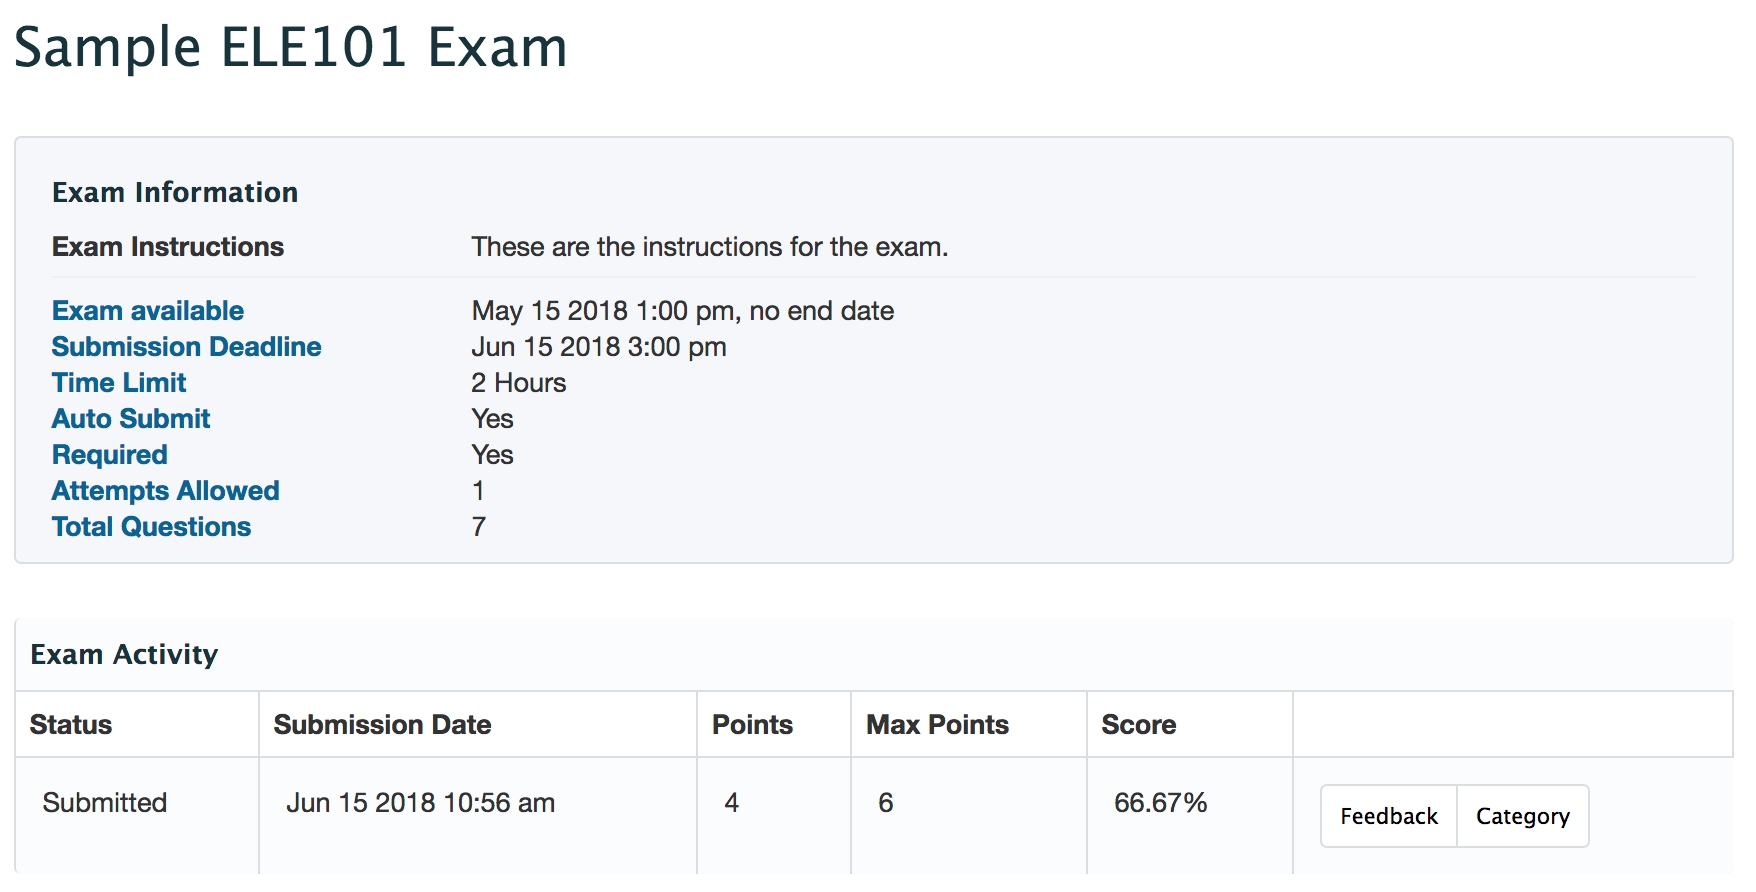
When you create an exam post you can optionally choose to provide learners with scores and/or feedback after they have completed the exam.
Remember that if you have attached an exam to a gradebook assessment you can also control the visibility of the gradebook assessment. If you choose to not release scores or feedback about an exam, check that any linked gradebook assessment is also set to not display to learners.
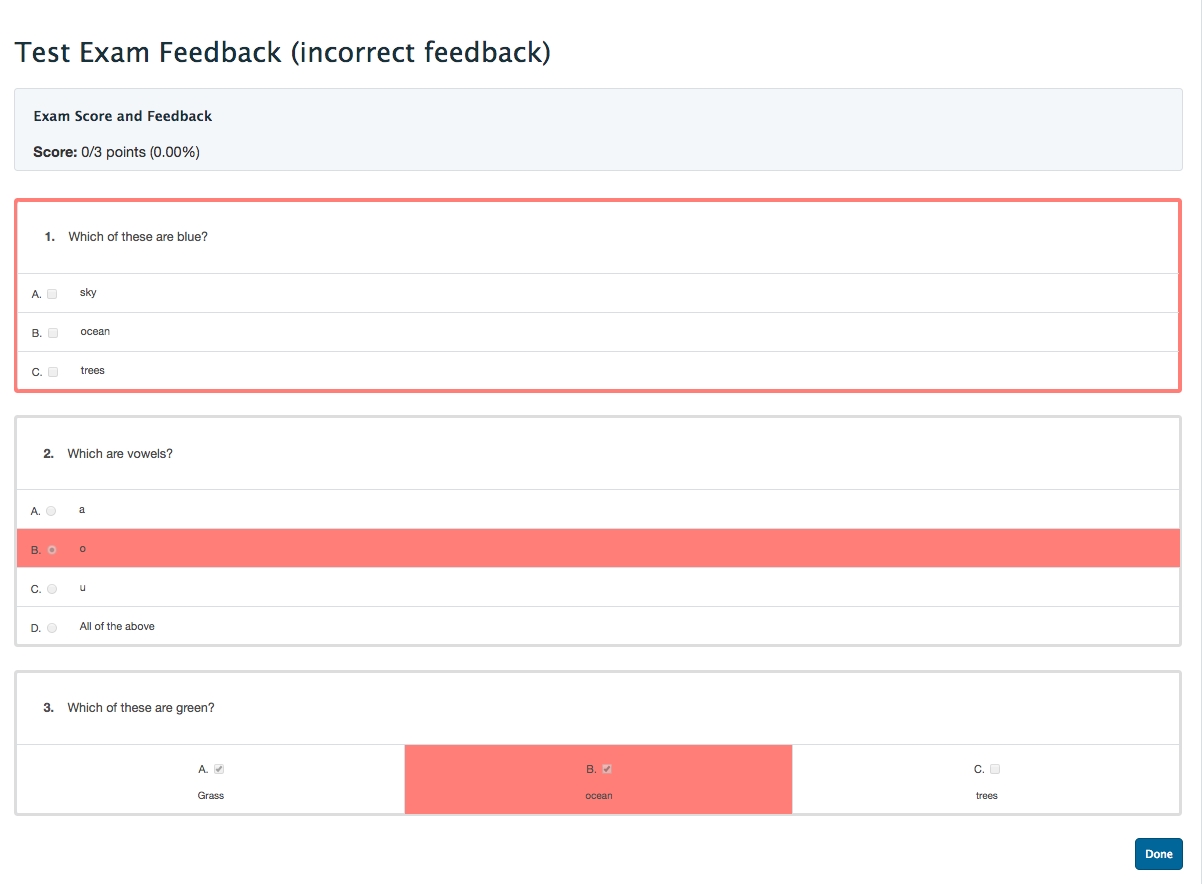
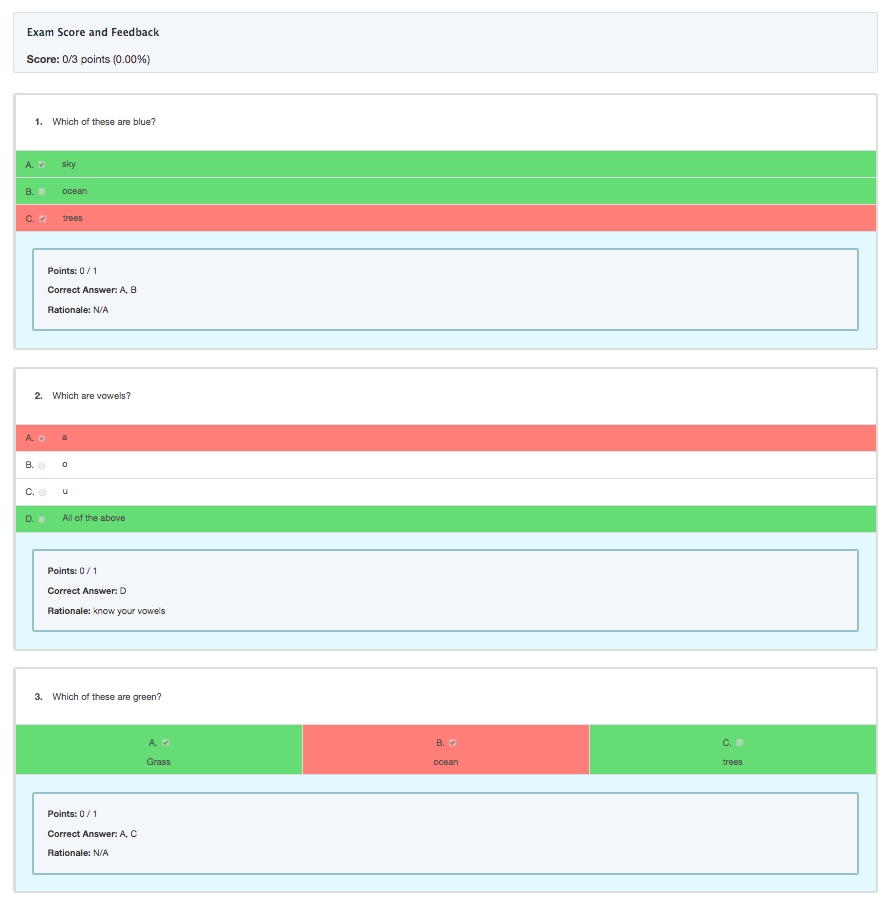
You can release feedback about incorrect answers only, or release feedback about all answers and provide the question rationale.
If a learner created notes or used the strike out feature when taking their exam, their annotations will be shown to them.
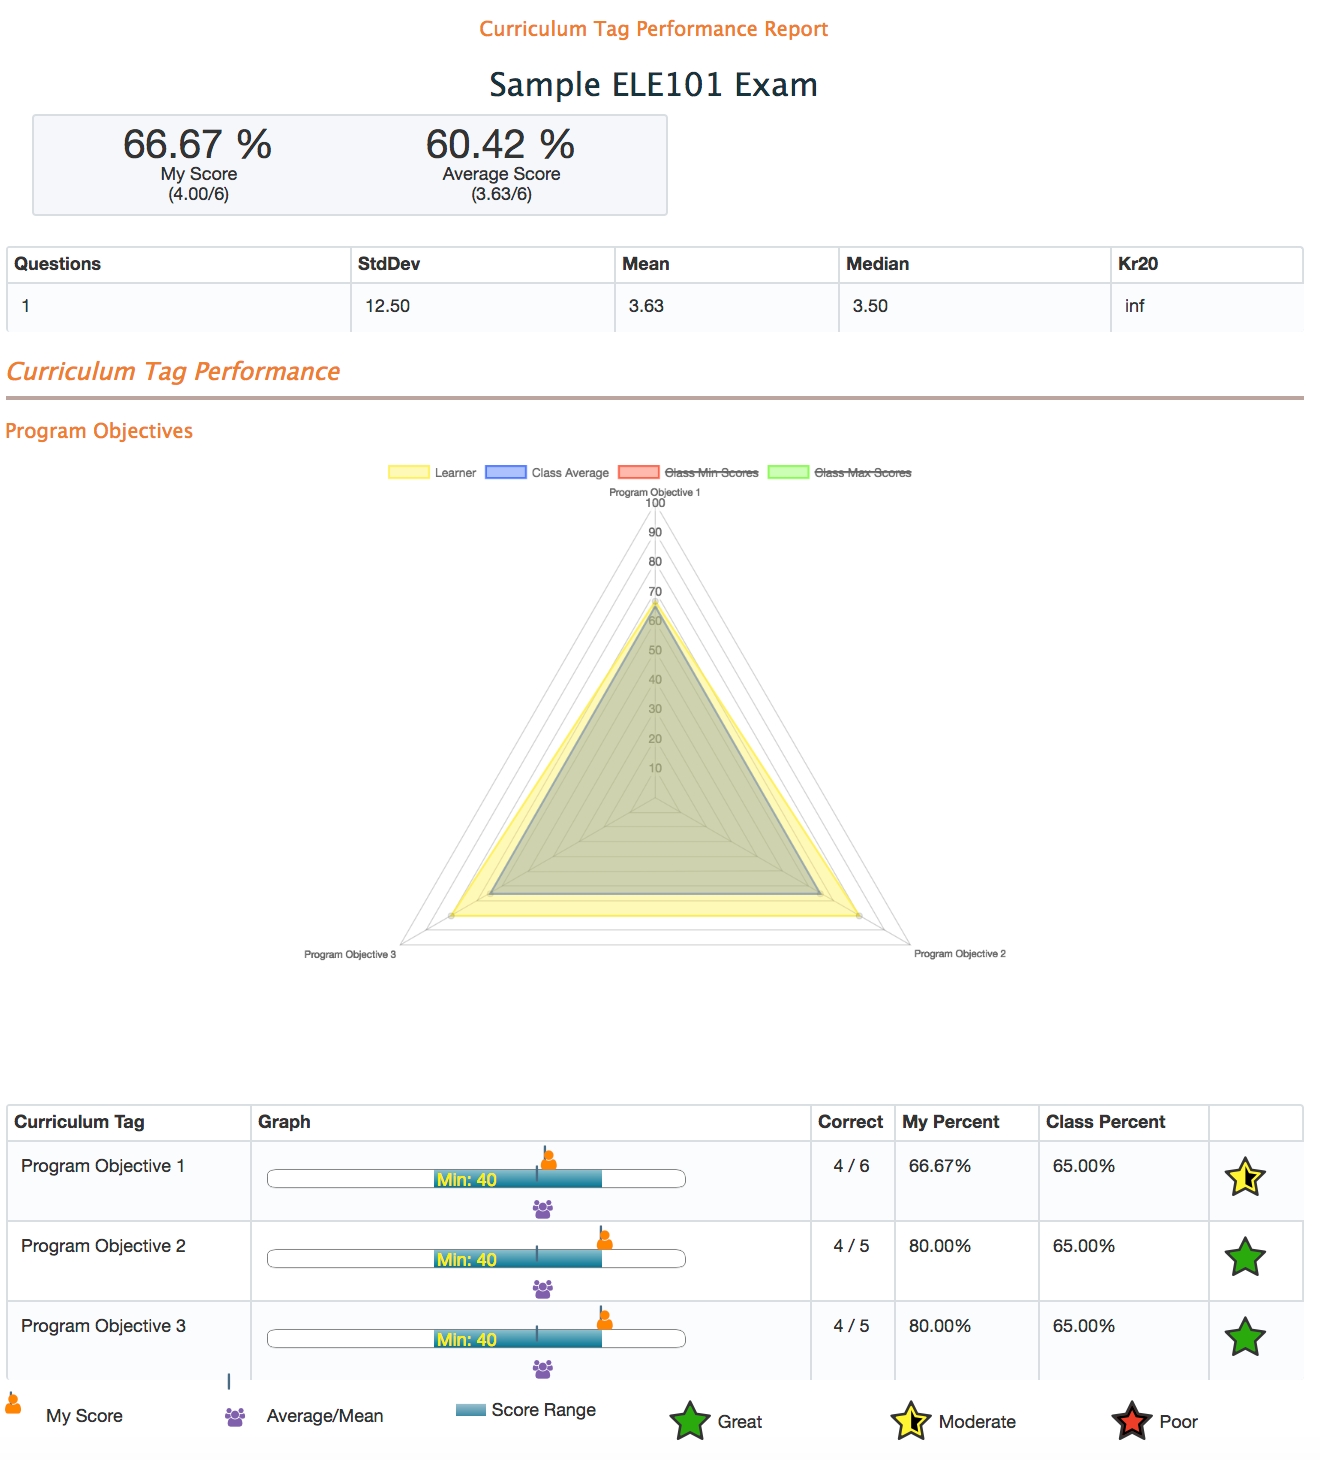
If you adjust the score on an exam or include items which require a grader, learners will also see that information in their feedback.
Administrators can also optionally release the Learner Curriculum Tags Report to learners. This allows you to release exam results, based on performance on specific curriculum tags, to the learner. You can customize when learners can access results, which tag sets they should see, and to which learners this applies. If you set this up, the learner will see an additional 'Category' tab when viewing their submitted exams and if they click on it will see a personalized report showing their performance for specific curriculum tags.
Navigate to Admin>Manage Exams and select a recent exam or click on Exams on the left to select an older exam.
Open the selected exam and click on the Reports tab to see a selection of available reports.
Curriculum Tags Report: Filter by curriculum tag, exam post and learner (optional) to view learner performance across curriculum tags. You can also view one learner’s performance compared to the class average (can be turned on or off).
Item Analysis Report: View a variety of statistics relevant to an exam post. View results on the screen or download as a CSV.
Learner Comments Report: View a compilation of all learner comments from an exam post. The report shows questions, responses, and comments.
Learner Responses Report: Download a list of all learner responses (by question number and point value) from an exam post.
Print View: Access a printable copy of the exam including questions and correct answers.
Score Report: See an overview of learner performance on the exam. Modify columns to view as needed and download the results as a CSV.
Summary Report: Generate a report that includes exam performance, curriculum tag performance, the lowest 27% of learners, and item analysis.
Please note that the upper/lower 27% calculations are only calculated on the first submission of an exam. If you allow users multiple attempts on an exam, the calculation won't be accurate.
Learner Curriculum Tags Report: This tool allows you to release exam results, based on performance on specific curriculum tags, to the learner. You can customize when learners can access results, which tag sets they should see, and to which learners this applies. If you set this up, the learner will see an additional 'Category' tab when viewing their submitted exams and if they click on it will see a personalized report showing their performance for specific curriculum tags. Please note that you must set a release start date for this report to become visible to learners.
There are two ways to view student scores.
Navigate to Admin>Manage Exams, and select the relevant exam.
Click on the Posts tab, and from the cog on the right side, select View Activity for the appropriate post.
You can show or hide different columns, click on a column header to sort the list, adjust the number of learners shown on the screen, search for a specific learner and download the results as a CSV.
You can also access student scores from a learning event where an exam is a posted resource. From a learning event content page, scroll down to “Posted Exams” and click on view results. This will take you to the Assessment Activity page.

